Brother International MFC 9880 Owners Manual - Page 25
Setup, Initial Settings, Setting the Date and Time, Setting the Station ID
 |
View all Brother International MFC 9880 manuals
Add to My Manuals
Save this manual to your list of manuals |
Page 25 highlights
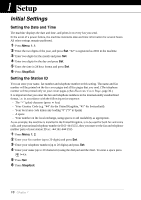
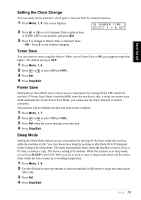
1 Setup Initial Settings Setting the Date and Time The machine displays the date and time, and prints it on every fax you send. In the event of a power failure, the machine maintains date and time information for several hours. All other settings remain unaffected. 1 Press Menu, 1, 1. 2 Enter the two digits of the year, and press Set. "02" is registered as 2002 in the machine. 3 Enter two digits for the month and press Set. 4 Enter two digits for the day and press Set. 5 Enter the time in 24 hour format and press Set. 6 Press Stop/Exit. Setting the Station ID You can store your name, fax number and telephone number in this setting. The name and fax number will be printed on the fax cover pages and all fax pages that you send. (The telephone number will be printed only on your cover pages.) (See Electronic Cover Page, page 36.) It is important that you enter the fax and telephone numbers in the internationally standardized format, i.e. in accordance with the following strict sequence: - The "+" (plus) character (press key) - Your Country Code (e.g. "44" for the United Kingdom, "41" for Switzerland) - Your local area code minus any leading "0" ("9" in Spain) - A space - Your number on the local exchange, using spaces to aid readability as appropriate. As an example, the machine is installed in the United Kingdom, is to be used for both fax and voice calls, and your national telephone number is 0161-444 5555, then you must set the fax and telephone number parts of your station ID as: +44 161-444 5555 1 Press Menu, 1, 2. 2 Enter your fax number (up to 20 digits) and press Set. 3 Enter your telephone number (up to 20 digits) and press Set. 4 Enter your name (up to 20 characters) using the dial pad and the chart. To enter a space press twice. 5 Press Set. 6 Press Stop/Exit. 16 Chapter 1
-
 1
1 -
2
-
3
-
4
-
5
-
6
-
7
-
8
-
9
-
10
-
11
-
12
-
13
-
14
-
15
-
16
-
17
-
18
-
19
-
 20
20 -
 21
21 -
 22
22 -
 23
23 -
 24
24 -
 25
25 -
 26
26 -
 27
27 -
 28
28 -
 29
29 -
 30
30 -
31
-
32
-
33
-
34
-
35
-
36
-
37
-
38
-
39
-
40
-
41
-
42
-
43
-
44
-
45
-
46
-
47
-
48
-
49
-
50
-
51
-
52
-
53
-
54
-
55
-
56
-
57
-
58
-
59
-
60
-
61
-
62
-
63
-
64
-
65
-
66
-
67
-
68
-
69
-
70
-
71
-
72
-
73
-
74
-
75
-
76
-
77
-
78
-
79
-
80
-
81
-
82
-
83
-
84
-
85
-
86
-
87
-
88
-
89
-
90
-
91
-
92
-
93
-
94
-
95
-
96
-
97
-
98
-
99
-
100
-
101
-
102
-
103
-
104
-
105
-
106
-
107
-
108
-
109
-
110
-
111
-
112
-
113
-
114
-
115
-
116
-
117
-
118
-
119
-
120
-
121
-
122
-
123
-
124
-
125
-
126
-
127
-
128
-
129
-
130
-
131
-
132
-
133
-
134
-
135
-
136
-
137
-
138
-
139
-
140
-
141
-
142
-
143
-
144
-
145
-
146
-
147
-
148
-
149
-
150
-
151
-
152
-
153
-
154
-
155
-
156
-
157
-
158
-
159
-
160
-
161
-
162
-
163
-
164
-
165
-
166
-
167
-
168
-
169
-
170
-
171
-
172
-
173
-
174
-
175
-
176
-
177
-
178
-
179
-
180
-
181
-
182
 |
 |