Brother International MFC 9880 Owners Manual - Page 29
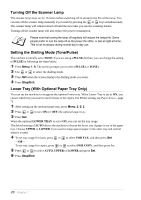
Turning Off the Scanner Lamp, Setting the Dialling Mode (Tone/Pulse)
 |
View all Brother International MFC 9880 manuals
Add to My Manuals
Save this manual to your list of manuals |
Page 29 highlights
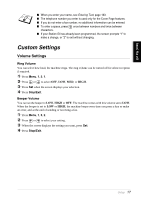
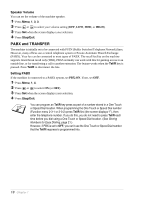
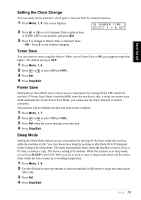
Turning Off the Scanner Lamp The scanner lamp stays on for 16 hours before switching off to preserve the life of the lamp. You can turn off the scanner lamp manually if you wish by pressing the or keys simultaneously. The scanner lamp will remain turned off until the next time you use the scanning feature. Turning off the scanner lamp will also reduce the power consumption. Please note that turning the lamp off regularly will reduce the lamps life. Some people prefer to turn the lamp off as they leave the office, or late at night at home. This is not necessary during normal day to day use. Setting the Dialling Mode (Tone/Pulse) The machine is initially set to TONE. If you are using a PULSE dial line, you can change the setting to PULSE by following the steps below. 1 Press Menu, 1, 9. The screen prompts you to select PULSE (or TONE). 2 Use or to select the dialling mode. 3 Press Set when the screen displays the dialling mode you want. 4 Press Stop/Exit. Lower Tray (With Optional Paper Tray Only) You can set the machine to recognize the optional lower tray. When Lower Tray is set to ON, you can set which tray you want to use for faxes or for copies. For Printer setting, see Paper Source, page 71. 1 After setting up the optional paper tray, press Menu, 2, 0, 2. 2 Press or to turn ON (or OFF) the optional paper tray. 3 Press Set. When the optional LOWER TRAY is set to ON, you can set the tray usage. The default setting of AUTO allows the machine to choose the lower tray if paper is out in the upper tray. Choose UPPER or LOWER if you want to keep special paper in the other tray and control when it is used. 4 To set tray usage for faxes, press or to select FOR FAX, and then press Set. -OR- To set tray usage for copies, press or to select FOR COPY, and then press Set. 5 Press or to select AUTO, UPPER or LOWER and press Set. 6 Press Stop/Exit. 20 Chapter 1
-
 1
1 -
2
-
3
-
4
-
5
-
6
-
7
-
8
-
9
-
10
-
11
-
12
-
13
-
14
-
15
-
16
-
17
-
18
-
19
-
20
-
21
-
22
-
23
-
 24
24 -
 25
25 -
 26
26 -
 27
27 -
 28
28 -
 29
29 -
 30
30 -
 31
31 -
 32
32 -
 33
33 -
 34
34 -
35
-
36
-
37
-
38
-
39
-
40
-
41
-
42
-
43
-
44
-
45
-
46
-
47
-
48
-
49
-
50
-
51
-
52
-
53
-
54
-
55
-
56
-
57
-
58
-
59
-
60
-
61
-
62
-
63
-
64
-
65
-
66
-
67
-
68
-
69
-
70
-
71
-
72
-
73
-
74
-
75
-
76
-
77
-
78
-
79
-
80
-
81
-
82
-
83
-
84
-
85
-
86
-
87
-
88
-
89
-
90
-
91
-
92
-
93
-
94
-
95
-
96
-
97
-
98
-
99
-
100
-
101
-
102
-
103
-
104
-
105
-
106
-
107
-
108
-
109
-
110
-
111
-
112
-
113
-
114
-
115
-
116
-
117
-
118
-
119
-
120
-
121
-
122
-
123
-
124
-
125
-
126
-
127
-
128
-
129
-
130
-
131
-
132
-
133
-
134
-
135
-
136
-
137
-
138
-
139
-
140
-
141
-
142
-
143
-
144
-
145
-
146
-
147
-
148
-
149
-
150
-
151
-
152
-
153
-
154
-
155
-
156
-
157
-
158
-
159
-
160
-
161
-
162
-
163
-
164
-
165
-
166
-
167
-
168
-
169
-
170
-
171
-
172
-
173
-
174
-
175
-
176
-
177
-
178
-
179
-
180
-
181
-
182
 |
 |