Brother International MFC-J835DW Users Manual - English - Page 28
Loading photo paper, Photo Bypass Tray
 |
View all Brother International MFC-J835DW manuals
Add to My Manuals
Save this manual to your list of manuals |
Page 28 highlights
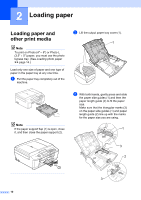
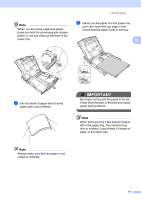
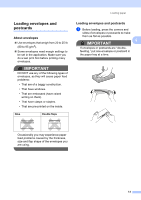
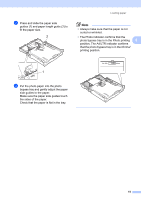
Chapter 2 b Put envelopes or postcards in the paper tray with the address side down and the leading edge in first as shown in the illustration. Using both hands, gently press and slide the paper side guides (1) and paper length guide (2) to fit the size of the envelopes or postcards. 1 2 If you have problems printing on envelopes with the flap on the short edge, try the following: 2 a Open the envelope flap. b Put the envelope into the paper tray with the address side down and the flap positioned as shown in the illustration. c Select Reverse Print in the printer driver's dialog box, and then adjust the size and margin in your application. uuSoftware User's Guide: Printing (Windows®) uuSoftware User's Guide: Printing and Faxing (Macintosh) Loading photo paper 2 Note In Canada, the photo bypass tray is called the photo paper tray. Use the photo bypass tray, which is located on the top of the output paper tray cover, to print on Photo (4" 6") and Photo L (3.5" 5") size paper. When you use the photo bypass tray, you do not have to take out the paper that is in the tray beneath it. (For the maximum number of photo cards you can load, see Paper weight, thickness and capacity uu page 22.) a Squeeze the blue photo bypass tray release button (1) using your right index finger and thumb and push the photo bypass tray forward until it clicks into the photo printing position (2). 1 2 Photo Bypass Tray 14
-
 1
1 -
2
-
3
-
4
-
5
-
6
-
7
-
8
-
9
-
10
-
11
-
12
-
13
-
14
-
15
-
16
-
17
-
18
-
19
-
20
-
21
-
22
-
 23
23 -
 24
24 -
 25
25 -
 26
26 -
 27
27 -
 28
28 -
 29
29 -
 30
30 -
 31
31 -
 32
32 -
 33
33 -
34
-
35
-
36
-
37
-
38
-
39
-
40
-
41
-
42
-
43
-
44
-
45
-
46
-
47
-
48
-
49
-
50
-
51
-
52
-
53
-
54
-
55
-
56
-
57
-
58
-
59
-
60
-
61
-
62
-
63
-
64
-
65
-
66
-
67
-
68
-
69
-
70
-
71
-
72
-
73
-
74
-
75
-
76
-
77
-
78
-
79
-
80
-
81
-
82
-
83
-
84
-
85
-
86
-
87
-
88
-
89
-
90
-
91
-
92
-
93
-
94
-
95
-
96
-
97
-
98
-
99
-
100
-
101
-
102
-
103
-
104
-
105
-
106
-
107
-
108
-
109
-
110
-
111
-
112
-
113
-
114
-
115
-
116
-
117
-
118
-
119
-
120
-
121
-
122
-
123
-
124
-
125
-
126
-
127
-
128
-
129
-
130
-
131
-
132
-
133
-
134
-
135
-
136
-
137
-
138
-
139
-
140
-
141
-
142
-
143
-
144
-
145
-
146
-
147
-
148
-
149
-
150
-
151
-
152
-
153
-
154
 |
 |
