Canon PIXMA MX532 Printing Guide - Page 167
In Windows 7 or Windows Vista
 |
View all Canon PIXMA MX532 manuals
Add to My Manuals
Save this manual to your list of manuals |
Page 167 highlights
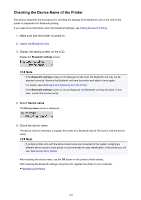
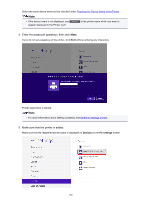
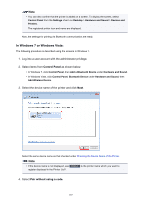
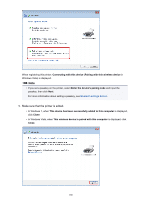
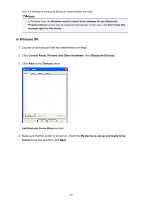
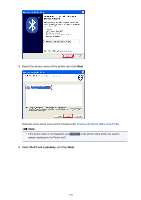
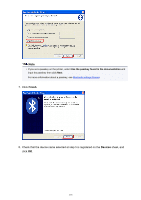
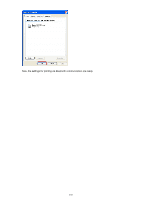
Note • You can also confirm that the printer is added on a screen. To display the screen, select Control Panel from the Settings charm on Desktop > Hardware and Sound > Devices and Printers. The registered printer icon and name are displayed. Now, the settings for printing via Bluetooth communication are ready. In Windows 7 or Windows Vista: The following procedure is described using the screens in Windows 7. 1. Log into a user account with the administrator privilege. 2. Select items from Control Panel as shown below. • In Windows 7, click Control Panel, then Add a Bluetooth Device under Hardware and Sound. • In Windows Vista, click Control Panel, Bluetooth Device under Hardware and Sound, then Add Wireless Device. 3. Select the device name of the printer and click Next. Select the same device name as that checked under Checking the Device Name of the Printer. Note • If the device name is not displayed, see Check 3 Is the printer name which you want to register displayed in the Printer List?. 4. Select Pair without using a code. 167
-
 1
1 -
2
-
3
-
4
-
5
-
6
-
7
-
8
-
9
-
10
-
11
-
12
-
13
-
14
-
15
-
16
-
17
-
18
-
19
-
20
-
21
-
22
-
23
-
24
-
25
-
26
-
27
-
28
-
29
-
30
-
31
-
32
-
33
-
34
-
35
-
36
-
37
-
38
-
39
-
40
-
41
-
42
-
43
-
44
-
45
-
46
-
47
-
48
-
49
-
50
-
51
-
52
-
53
-
54
-
55
-
56
-
57
-
58
-
59
-
60
-
61
-
62
-
63
-
64
-
65
-
66
-
67
-
68
-
69
-
70
-
71
-
72
-
73
-
74
-
75
-
76
-
77
-
78
-
79
-
80
-
81
-
82
-
83
-
84
-
85
-
86
-
87
-
88
-
89
-
90
-
91
-
92
-
93
-
94
-
95
-
96
-
97
-
98
-
99
-
100
-
101
-
102
-
103
-
104
-
105
-
106
-
107
-
108
-
109
-
110
-
111
-
112
-
113
-
114
-
115
-
116
-
117
-
118
-
119
-
120
-
121
-
122
-
123
-
124
-
125
-
126
-
127
-
128
-
129
-
130
-
131
-
132
-
133
-
134
-
135
-
136
-
137
-
138
-
139
-
140
-
141
-
142
-
143
-
144
-
145
-
146
-
147
-
148
-
149
-
150
-
151
-
152
-
153
-
154
-
155
-
156
-
157
-
158
-
159
-
160
-
161
-
 162
162 -
 163
163 -
 164
164 -
 165
165 -
 166
166 -
 167
167 -
 168
168 -
 169
169 -
 170
170 -
 171
171 -
 172
172 -
173
-
174
-
175
-
176
-
177
-
178
-
179
-
180
-
181
-
182
-
183
-
184
-
185
-
186
-
187
-
188
-
189
-
190
-
191
-
192
-
193
-
194
-
195
-
196
-
197
-
198
-
199
-
200
-
201
-
202
-
203
 |
 |