Canon PIXMA MX532 Getting Started Guide - Page 83
Operation Panel
 |
View all Canon PIXMA MX532 manuals
Add to My Manuals
Save this manual to your list of manuals |
Page 83 highlights
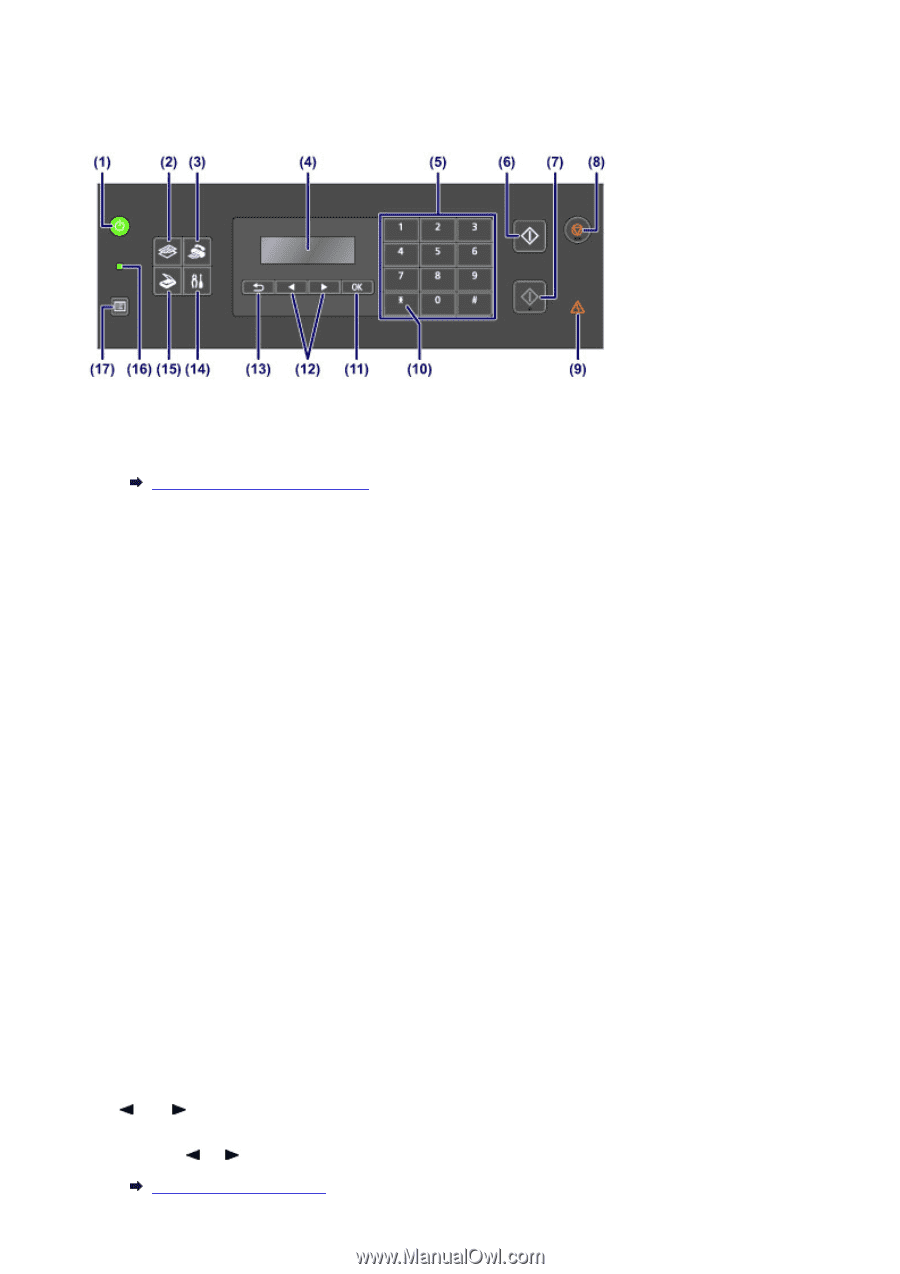
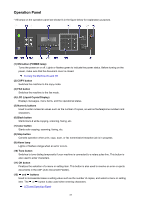
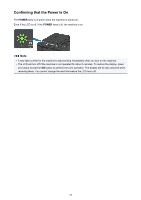
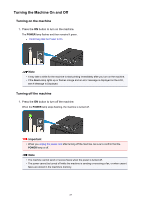
Operation Panel * All lamps on the operation panel are shown lit in the figure below for explanatory purposes. (1) ON button (POWER lamp) Turns the power on or off. Lights or flashes green to indicate the power status. Before turning on the power, make sure that the document cover is closed. Turning the Machine On and Off (2) COPY button Switches the machine to the copy mode. (3) FAX button Switches the machine to the fax mode. (4) LCD (Liquid Crystal Display) Displays messages, menu items, and the operational status. (5) Numeric buttons Used to enter numerical values such as the number of copies, as well as fax/telephone numbers and characters. (6) Black button Starts black & white copying, scanning, faxing, etc. (7) Color button Starts color copying, scanning, faxing, etc. (8) Stop button Cancels operation when print, copy, scan, or fax transmission/reception job is in progress. (9) Alarm lamp Lights or flashes orange when an error occurs. (10) Tone button Switches to tone dialing temporarily if your machine is connected to a rotary pulse line. This button is also used to enter characters. (11) OK button Finalizes the selection of a menu or setting item. This button is also used to resolve an error or ejects documents in the ADF (Auto Document Feeder). (12) and buttons Used to increase/decrease a setting value such as the number of copies, and select a menu or setting item. The or button is also used when entering characters. LCD and Operation Panel 83
-
 1
1 -
2
-
3
-
4
-
5
-
6
-
7
-
8
-
9
-
10
-
11
-
12
-
13
-
14
-
15
-
16
-
17
-
18
-
19
-
20
-
21
-
22
-
23
-
24
-
25
-
26
-
27
-
28
-
29
-
30
-
31
-
32
-
33
-
34
-
35
-
36
-
37
-
38
-
39
-
40
-
41
-
42
-
43
-
44
-
45
-
46
-
47
-
48
-
49
-
50
-
51
-
52
-
53
-
54
-
55
-
56
-
57
-
58
-
59
-
60
-
61
-
62
-
63
-
64
-
65
-
66
-
67
-
68
-
69
-
70
-
71
-
72
-
73
-
74
-
75
-
76
-
77
-
 78
78 -
 79
79 -
 80
80 -
 81
81 -
 82
82 -
 83
83 -
 84
84 -
 85
85 -
 86
86 -
 87
87 -
 88
88 -
89
-
90
-
91
-
92
-
93
-
94
-
95
-
96
-
97
-
98
-
99
-
100
-
101
-
102
-
103
-
104
-
105
-
106
-
107
-
108
-
109
-
110
-
111
-
112
-
113
-
114
-
115
-
116
-
117
-
118
-
119
-
120
-
121
-
122
-
123
-
124
-
125
-
126
-
127
-
128
-
129
-
130
-
131
-
132
-
133
-
134
-
135
-
136
-
137
-
138
-
139
-
140
-
141
-
142
-
143
-
144
-
145
-
146
-
147
-
148
-
149
-
150
-
151
-
152
-
153
-
154
-
155
-
156
-
157
-
158
-
159
-
160
-
161
-
162
-
163
-
164
-
165
-
166
-
167
-
168
-
169
-
170
-
171
-
172
-
173
-
174
-
175
-
176
-
177
-
178
-
179
-
180
-
181
-
182
-
183
-
184
-
185
-
186
-
187
-
188
-
189
-
190
-
191
-
192
-
193
-
194
-
195
-
196
-
197
-
198
-
199
-
200
-
201
-
202
-
203
-
204
-
205
-
206
-
207
-
208
-
209
-
210
-
211
-
212
-
213
-
214
-
215
-
216
-
217
-
218
-
219
-
220
-
221
-
222
-
223
-
224
-
225
-
226
-
227
-
228
-
229
-
230
-
231
-
232
-
233
-
234
-
235
-
236
-
237
-
238
-
239
-
240
-
241
-
242
-
243
-
244
-
245
-
246
-
247
-
248
-
249
-
250
-
251
-
252
-
253
-
254
-
255
-
256
-
257
-
258
-
259
-
260
-
261
-
262
-
263
-
264
-
265
-
266
-
267
-
268
-
269
-
270
-
271
-
272
-
273
-
274
-
275
-
276
-
277
-
278
-
279
-
280
-
281
-
282
-
283
-
284
-
285
-
286
 |
 |