Canon PIXMA MX532 Getting Started Guide - Page 84
Back button, Setup button, Setup menu, SCAN button, FAX Memory lamp, Menu button, Copy menu, Scan - fax setup
 |
View all Canon PIXMA MX532 manuals
Add to My Manuals
Save this manual to your list of manuals |
Page 84 highlights
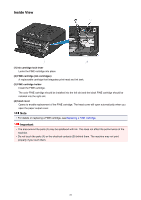
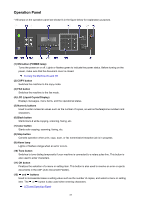
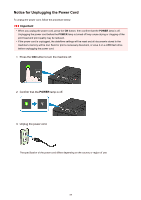
(13) Back button Returns the LCD to the previous screen. This button is also used to delete a character under the cursor when entering characters, such as when entering a name for registration. (14) Setup button Displays the Setup menu screen. With this menu, you can perform machine maintenance and change machine settings. (15) SCAN button Switches the machine to the scan mode. (16) FAX Memory lamp Lights when there are received or unsent documents stored in the machine's memory. (17) Menu button Displays the Copy menu, Scan menu, or FAX menu screen. Note • The machine makes the beep sound when pressing buttons on the operation panel. The sound volume can be adjusted in Sound control of Dev. user settings. Dev. user settings 84
-
 1
1 -
2
-
3
-
4
-
5
-
6
-
7
-
8
-
9
-
10
-
11
-
12
-
13
-
14
-
15
-
16
-
17
-
18
-
19
-
20
-
21
-
22
-
23
-
24
-
25
-
26
-
27
-
28
-
29
-
30
-
31
-
32
-
33
-
34
-
35
-
36
-
37
-
38
-
39
-
40
-
41
-
42
-
43
-
44
-
45
-
46
-
47
-
48
-
49
-
50
-
51
-
52
-
53
-
54
-
55
-
56
-
57
-
58
-
59
-
60
-
61
-
62
-
63
-
64
-
65
-
66
-
67
-
68
-
69
-
70
-
71
-
72
-
73
-
74
-
75
-
76
-
77
-
78
-
 79
79 -
 80
80 -
 81
81 -
 82
82 -
 83
83 -
 84
84 -
 85
85 -
 86
86 -
 87
87 -
 88
88 -
 89
89 -
90
-
91
-
92
-
93
-
94
-
95
-
96
-
97
-
98
-
99
-
100
-
101
-
102
-
103
-
104
-
105
-
106
-
107
-
108
-
109
-
110
-
111
-
112
-
113
-
114
-
115
-
116
-
117
-
118
-
119
-
120
-
121
-
122
-
123
-
124
-
125
-
126
-
127
-
128
-
129
-
130
-
131
-
132
-
133
-
134
-
135
-
136
-
137
-
138
-
139
-
140
-
141
-
142
-
143
-
144
-
145
-
146
-
147
-
148
-
149
-
150
-
151
-
152
-
153
-
154
-
155
-
156
-
157
-
158
-
159
-
160
-
161
-
162
-
163
-
164
-
165
-
166
-
167
-
168
-
169
-
170
-
171
-
172
-
173
-
174
-
175
-
176
-
177
-
178
-
179
-
180
-
181
-
182
-
183
-
184
-
185
-
186
-
187
-
188
-
189
-
190
-
191
-
192
-
193
-
194
-
195
-
196
-
197
-
198
-
199
-
200
-
201
-
202
-
203
-
204
-
205
-
206
-
207
-
208
-
209
-
210
-
211
-
212
-
213
-
214
-
215
-
216
-
217
-
218
-
219
-
220
-
221
-
222
-
223
-
224
-
225
-
226
-
227
-
228
-
229
-
230
-
231
-
232
-
233
-
234
-
235
-
236
-
237
-
238
-
239
-
240
-
241
-
242
-
243
-
244
-
245
-
246
-
247
-
248
-
249
-
250
-
251
-
252
-
253
-
254
-
255
-
256
-
257
-
258
-
259
-
260
-
261
-
262
-
263
-
264
-
265
-
266
-
267
-
268
-
269
-
270
-
271
-
272
-
273
-
274
-
275
-
276
-
277
-
278
-
279
-
280
-
281
-
282
-
283
-
284
-
285
-
286
 |
 |
(13) Back button
Returns the LCD to the previous screen. This button is also used to delete a character under the cursor
when entering characters, such as when entering a name for registration.
(14) Setup button
Displays the
Setup menu
screen. With this menu, you can perform machine maintenance and change
machine settings.
(15) SCAN button
Switches the machine to the scan mode.
(16) FAX Memory lamp
Lights when there are received or unsent documents stored in the machine's memory.
(17) Menu button
Displays the
Copy menu
,
Scan menu
, or
FAX menu
screen.
Note
•
The machine makes the beep sound when pressing buttons on the operation panel. The sound volume
can be adjusted in
Sound control
of
Dev. user settings
.
Dev. user settings
84