Canon PIXMA iP2000 iP2000 Quick Start Guide - Page 39
Printing Borderless Photographs
 |
View all Canon PIXMA iP2000 manuals
Add to My Manuals
Save this manual to your list of manuals |
Page 39 highlights
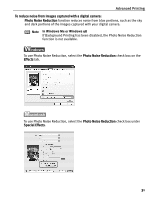
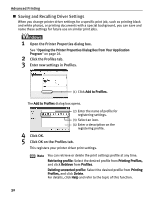
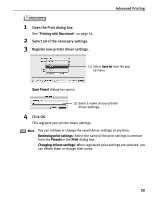
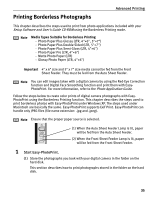
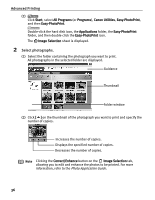
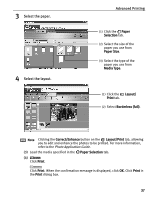
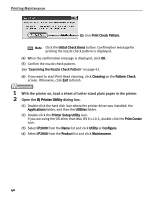
Printing Borderless Photographs Advanced Printing This chapter describes the steps used to print from photo applications included with your Setup Software and User's Guide CD-ROM using the Borderless Printing mode. Note Media Types Suitable for Borderless Printing - Photo Paper Plus Glossy (LTR, 4"×6", 5"×7") - Photo Paper Plus Double Sided (LTR, 5"×7") - Photo Paper Plus Semi-Gloss (LTR, 4"×6") - Photo Paper Pro (LTR, 4"×6") - Matte Photo Paper (LTR) - Glossy Photo Paper (LTR, 4"×6") Important 4" x 6" size and 5" x 7" size media cannot be fed from the Front Sheet Feeder. They must be fed from the Auto Sheet Feeder. Note You can edit images taken with a digital camera by using the Red-Eye Correction function and Digital Face Smoothing function and print them with EasyPhotoPrint. For more information, refer to the Photo Application Guide. Follow the steps below to create color prints of digital camera photographs with EasyPhotoPrint using the Borderless Printing function. This chapter describes the steps used to print borderless photos with Easy-PhotoPrint under Windows XP. The steps used under Macintosh are basically the same. Easy-PhotoPrint supports Exif Print. Easy-PhotoPrint can handle only JPEG files (file name extension: .jpg and .jpeg). Note Ensure that the proper paper source is selected. (1) When the Auto Sheet Feeder Lamp is lit, paper will be fed from the Auto Sheet Feeder. (2) When the Front Sheet Feeder Lamp is lit, paper will be fed from the Front Sheet Feeder. 1 Start Easy-PhotoPrint. (1) Store the photographs you took with your digital camera in the folder on the hard disk. This section describes how to print photographs stored in the folder on the hard disk. 35
-
 1
1 -
2
-
3
-
4
-
5
-
6
-
7
-
8
-
9
-
10
-
11
-
12
-
13
-
14
-
15
-
16
-
17
-
18
-
19
-
20
-
21
-
22
-
23
-
24
-
25
-
26
-
27
-
28
-
29
-
30
-
31
-
32
-
33
-
 34
34 -
 35
35 -
 36
36 -
 37
37 -
 38
38 -
 39
39 -
 40
40 -
 41
41 -
 42
42 -
 43
43 -
 44
44 -
45
-
46
-
47
-
48
-
49
-
50
-
51
-
52
-
53
-
54
-
55
-
56
-
57
-
58
-
59
-
60
-
61
-
62
-
63
-
64
-
65
-
66
-
67
-
68
-
69
-
70
-
71
-
72
-
73
-
74
-
75
-
76
-
77
-
78
-
79
-
80
-
81
-
82
-
83
-
84
-
85
-
86
-
87
-
88
-
89
-
90
-
91
-
92
 |
 |