Canon PIXMA iP2000 iP2000 Quick Start Guide - Page 9
Basic Printing, Prepare to load paper. - drivers
 |
View all Canon PIXMA iP2000 manuals
Add to My Manuals
Save this manual to your list of manuals |
Page 9 highlights
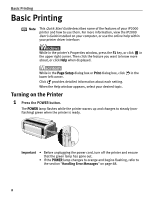
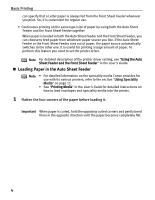
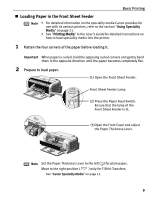
2 Prepare to load paper. Basic Printing (1) Pull out the Paper Support. Auto Sheet Feeder Lamp (3) Press the Paper Feed Switch. Ensure that the lamp of the Auto Sheet Feeder is lit. (2) Pull out the Paper Output Tray completely as shown. (4) Open the Front Cover and adjust the Paper Thickness Lever. Note • Set the Paper Thickness Lever to the left ( ) for plain paper. Move to the right position ( ) only for envelopes and T-Shirt Transfers. See "Canon Speciality Media" on page 12. • You can also select the paper source in the printer driver. For details, see "Using the Auto Sheet Feeder and the Front Sheet Feeder" in the User's Guide. 5
-
 1
1 -
2
-
3
-
 4
4 -
 5
5 -
 6
6 -
 7
7 -
 8
8 -
 9
9 -
 10
10 -
 11
11 -
 12
12 -
 13
13 -
 14
14 -
15
-
16
-
17
-
18
-
19
-
20
-
21
-
22
-
23
-
24
-
25
-
26
-
27
-
28
-
29
-
30
-
31
-
32
-
33
-
34
-
35
-
36
-
37
-
38
-
39
-
40
-
41
-
42
-
43
-
44
-
45
-
46
-
47
-
48
-
49
-
50
-
51
-
52
-
53
-
54
-
55
-
56
-
57
-
58
-
59
-
60
-
61
-
62
-
63
-
64
-
65
-
66
-
67
-
68
-
69
-
70
-
71
-
72
-
73
-
74
-
75
-
76
-
77
-
78
-
79
-
80
-
81
-
82
-
83
-
84
-
85
-
86
-
87
-
88
-
89
-
90
-
91
-
92
 |
 |

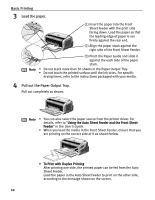
Basic Printing
5
2
Prepare to load paper.
Note
•
Set the Paper Thickness Lever to the left (
) for plain paper.
Move to the right position (
) only for envelopes and T-Shirt
Transfers.
See
"
Canon Speciality Media
"
on page 12.
•
You can also select the paper source in the printer driver. For details,
see "
Using the Auto Sheet Feeder and the Front Sheet Feeder
" in the
User’s Guide
.
(1) Pull out the Paper Support.
(2) Pull out the Paper Output Tray completely as shown.
(3) Press the Paper Feed Switch.
Ensure that the lamp of the
Auto Sheet Feeder is lit.
Auto Sheet Feeder Lamp
(4) Open the Front Cover and adjust
the Paper Thickness Lever.