Cisco CP-7931G User Guide - Page 19
Understanding Lines and Calls
 |
View all Cisco CP-7931G manuals
Add to My Manuals
Save this manual to your list of manuals |
Page 19 highlights
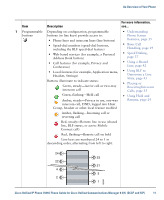
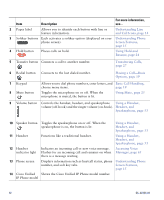
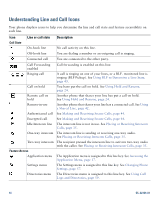
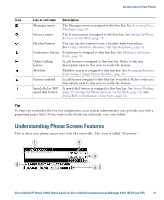
An Overview of Your Phone Item Description For more information, see... 15 4-way Navigation button Understanding Phone navigation pad and Select button (center) • Scroll up and down to see menus and highlight Screen Features, items page 15 • Scroll left to open the Details view and see directory numbers and features assigned to each line button (when on call screen) • Scroll right to close the Details view Select button-scroll to select a line using the Navigation button, then: • If the button is mapped to a directory number, and: Understanding Phone Screen Features, page 15 - The line is idle, press new call. to initiate a - An on-hold call is on the line, press to resume the call. - An active call is on the line, the Select button has no effect. • If the button is mapped to a feature, press to access the feature. Understanding Lines and Calls To avoid confusion about lines and calls, refer to these descriptions: • Lines-There are 24 programmable buttons (see Understanding Buttons and Hardware, page 9). Typically, your system administrator assigns some of these lines (up to 24) to be used as lines for making and receiving calls. Each corresponds to a directory number or intercom number that others can use to call you. Some of your lines may share the same directory number, and others may have unique directory numbers. To see your phone lines, use the Navigation button to scroll through the list of programmable button display (see Understanding Phone Screen Features, page 15). Buttons configured as lines display their assigned directory number and associated button number. For example, if you have directory number "3105" assigned to button 1, the line appears as 3105:01 on the phone screen. Each line also has an associated icon to help you identify its purpose (see Understanding Line and Call Icons, page 14). • Calls-Each line can support a single call. If multiple lines share a directory number, each line can still support one call each. Cisco Unified IP Phone 7931G Phone Guide for Cisco Unified Communications Manager 8.5(1) (SCCP and SIP) 13
-
 1
1 -
2
-
3
-
4
-
5
-
6
-
7
-
8
-
9
-
10
-
11
-
12
-
13
-
 14
14 -
 15
15 -
 16
16 -
 17
17 -
 18
18 -
 19
19 -
 20
20 -
 21
21 -
 22
22 -
 23
23 -
 24
24 -
25
-
26
-
27
-
28
-
29
-
30
-
31
-
32
-
33
-
34
-
35
-
36
-
37
-
38
-
39
-
40
-
41
-
42
-
43
-
44
-
45
-
46
-
47
-
48
-
49
-
50
-
51
-
52
-
53
-
54
-
55
-
56
-
57
-
58
-
59
-
60
-
61
-
62
-
63
-
64
-
65
-
66
-
67
-
68
-
69
-
70
-
71
-
72
-
73
-
74
-
75
-
76
-
77
-
78
-
79
-
80
-
81
-
82
-
83
-
84
-
85
-
86
-
87
-
88
-
89
-
90
-
91
-
92
-
93
-
94
-
95
-
96
-
97
-
98
-
99
-
100
-
101
-
102
 |
 |
