Dell Brocade 1020 Brocade Adapters Installation and Reference Manual - Page 186
Installing VMware and the driver, Insert the Solaris installation CD/DVD.
 |
View all Dell Brocade 1020 manuals
Add to My Manuals
Save this manual to your list of manuals |
Page 186 highlights
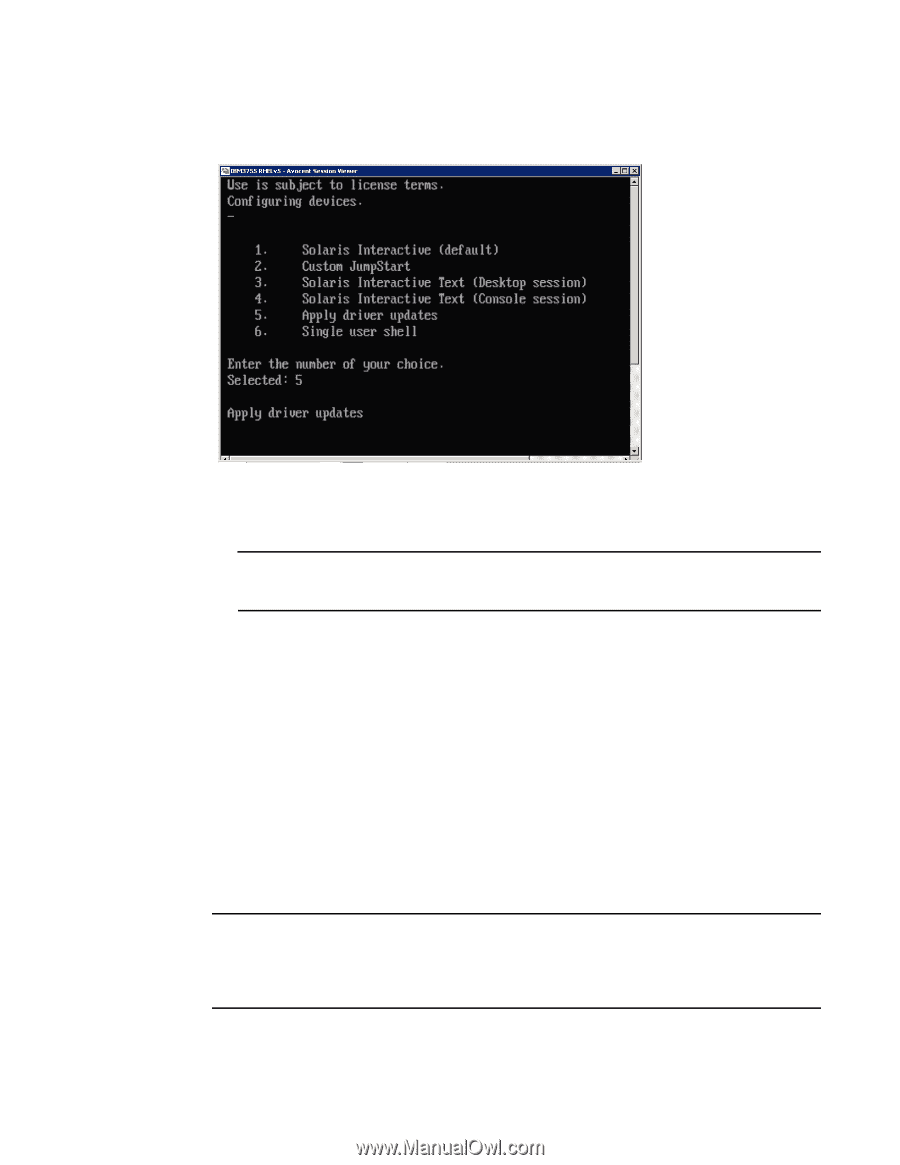
4 Boot over SAN If devices are configured, a menu should display such as the following: 7. Press "5" to select Apply Driver Updates. 8. Replace the Solaris installation DVD with the install time update CD or USB drive that you created in step 3. ATTENTION You must load the Brocade storage driver at this stage so that the system can access the boot LUN for Solaris installation. 9. When the update completes, press "e" to eject the install time update CD or USB drive containing the driver update. 10. Insert the Solaris installation CD/DVD. 11. Continue responding to on-screen instructions and refer to your system documentation as necessary to format and complete installation on the target boot LUN. Installing VMware and the driver Use the following steps to install VMware and the adapter driver on an unformatted Fibre Channel disk that you that you configured as a bootable device when setting up the adapter BIOS or UEFI on the host system. If the LUN you have targeted for booting over SAN already has an operating system installed, be sure to use options for reformatting the LUN during VMware installation. Refer to your operating system documentation for details. NOTE For boot over SAN on VMware 4.0 and later systems, if driver installation or updates are done for CNAs and Fabric Adapter ports configured in CNA mode using the ISO image, update the storage drivers using the bfa DUD. For HBAs and Fabric Adapter ports configured in HBA mode, just use the bfa ISO image. 158 Brocade Adapters Installation and Reference Manual 53-1002144-01
-
 1
1 -
2
-
3
-
4
-
5
-
6
-
7
-
8
-
9
-
10
-
11
-
12
-
13
-
14
-
15
-
16
-
17
-
18
-
19
-
20
-
21
-
22
-
23
-
24
-
25
-
26
-
27
-
28
-
29
-
30
-
31
-
32
-
33
-
34
-
35
-
36
-
37
-
38
-
39
-
40
-
41
-
42
-
43
-
44
-
45
-
46
-
47
-
48
-
49
-
50
-
51
-
52
-
53
-
54
-
55
-
56
-
57
-
58
-
59
-
60
-
61
-
62
-
63
-
64
-
65
-
66
-
67
-
68
-
69
-
70
-
71
-
72
-
73
-
74
-
75
-
76
-
77
-
78
-
79
-
80
-
81
-
82
-
83
-
84
-
85
-
86
-
87
-
88
-
89
-
90
-
91
-
92
-
93
-
94
-
95
-
96
-
97
-
98
-
99
-
100
-
101
-
102
-
103
-
104
-
105
-
106
-
107
-
108
-
109
-
110
-
111
-
112
-
113
-
114
-
115
-
116
-
117
-
118
-
119
-
120
-
121
-
122
-
123
-
124
-
125
-
126
-
127
-
128
-
129
-
130
-
131
-
132
-
133
-
134
-
135
-
136
-
137
-
138
-
139
-
140
-
141
-
142
-
143
-
144
-
145
-
146
-
147
-
148
-
149
-
150
-
151
-
152
-
153
-
154
-
155
-
156
-
157
-
158
-
159
-
160
-
161
-
162
-
163
-
164
-
165
-
166
-
167
-
168
-
169
-
170
-
171
-
172
-
173
-
174
-
175
-
176
-
177
-
178
-
179
-
180
-
 181
181 -
 182
182 -
 183
183 -
 184
184 -
 185
185 -
 186
186 -
 187
187 -
 188
188 -
 189
189 -
 190
190 -
 191
191 -
192
-
193
-
194
-
195
-
196
-
197
-
198
-
199
-
200
-
201
-
202
-
203
-
204
-
205
-
206
-
207
-
208
-
209
-
210
-
211
-
212
-
213
-
214
-
215
-
216
-
217
-
218
-
219
-
220
-
221
-
222
-
223
-
224
-
225
-
226
-
227
-
228
-
229
-
230
-
231
-
232
-
233
-
234
-
235
-
236
-
237
-
238
-
239
-
240
-
241
-
242
-
243
-
244
-
245
-
246
-
247
-
248
-
249
-
250
-
251
-
252
-
253
-
254
-
255
-
256
-
257
-
258
-
259
-
260
-
261
-
262
-
263
-
264
-
265
-
266
-
267
-
268
-
269
-
270
-
271
-
272
 |
 |