Dell Brocade 1020 Brocade Adapters Installation and Reference Manual - Page 187
Server Installation and Upgrade Guide
 |
View all Dell Brocade 1020 manuals
Add to My Manuals
Save this manual to your list of manuals |
Page 187 highlights
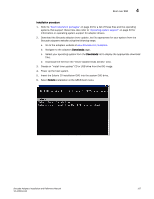
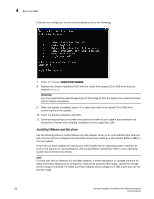
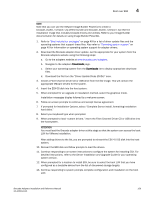
Boot over SAN 4 NOTE Note that you can use the VMware Image Builder PowerCLI to create a brocade_esx50_.zip offline bundle and brocade_esx50_.iso ESX 5.0 installation image that includes brocade drivers and utilities. Refer to your Image Builder documentation for details on using Image Builder PowerCLI. 1. Refer to "Boot installation packages" on page 49 for a list of driver update files and the operating systems that support these files. Also refer to "Operating system support" on page 40 for information on operating system support for adapter drivers. 2. Download the Brocade adapter driver update .iso file appropriate for your system from the Brocade adapters website using the following steps: a. Go to the adapters website at www.brocade.com/adapters. b. Navigate to the adapters Downloads page. c. Select your operating system from the Downloads list to display appropriate download files. d. Download the file from the "Driver Update Disks (DUDs)" area. 3. Create a Fibre Channel driver CD or USB drive from the ISO image. This will contain the appropriate VMware drivers for the system. 4. Insert the ESX OS disk into the host system. 5. When prompted for an upgrade or installation method, select the graphical mode. Installation messages display followed by a welcome screen. 6. Follow on-screen prompts to continue and accept license agreement. 7. If prompted for Installation Options, select "Complete Server install, formatting installation hard disks." 8. Select your keyboard type when prompted. 9. When prompted to load "custom drivers," insert the Fibre Channel Driver CD or USB drive into the host system. ATTENTION You must load the Brocade adapter driver at this stage so that the system can access the boot LUN for VMware installation. After adding drivers to the list, you are prompted to reinsert the ESX 4.X OS disk into the host system. 10. Reinsert the ESX disk and follow prompts to load the drivers. 11. Continue responding to on-screen instructions to configure the system for installing ESX. For detailed instructions, refer to the Server Installation and Upgrade Guide for your operating system version. 12. When prompted for a location to install ESX, be sure to select the boot LUN that you have configured as a bootable device from the list of discovered storage targets. 13. Continue responding to system prompts complete configuration and installation on the boot LUN. Brocade Adapters Installation and Reference Manual 159 53-1002144-01
-
 1
1 -
2
-
3
-
4
-
5
-
6
-
7
-
8
-
9
-
10
-
11
-
12
-
13
-
14
-
15
-
16
-
17
-
18
-
19
-
20
-
21
-
22
-
23
-
24
-
25
-
26
-
27
-
28
-
29
-
30
-
31
-
32
-
33
-
34
-
35
-
36
-
37
-
38
-
39
-
40
-
41
-
42
-
43
-
44
-
45
-
46
-
47
-
48
-
49
-
50
-
51
-
52
-
53
-
54
-
55
-
56
-
57
-
58
-
59
-
60
-
61
-
62
-
63
-
64
-
65
-
66
-
67
-
68
-
69
-
70
-
71
-
72
-
73
-
74
-
75
-
76
-
77
-
78
-
79
-
80
-
81
-
82
-
83
-
84
-
85
-
86
-
87
-
88
-
89
-
90
-
91
-
92
-
93
-
94
-
95
-
96
-
97
-
98
-
99
-
100
-
101
-
102
-
103
-
104
-
105
-
106
-
107
-
108
-
109
-
110
-
111
-
112
-
113
-
114
-
115
-
116
-
117
-
118
-
119
-
120
-
121
-
122
-
123
-
124
-
125
-
126
-
127
-
128
-
129
-
130
-
131
-
132
-
133
-
134
-
135
-
136
-
137
-
138
-
139
-
140
-
141
-
142
-
143
-
144
-
145
-
146
-
147
-
148
-
149
-
150
-
151
-
152
-
153
-
154
-
155
-
156
-
157
-
158
-
159
-
160
-
161
-
162
-
163
-
164
-
165
-
166
-
167
-
168
-
169
-
170
-
171
-
172
-
173
-
174
-
175
-
176
-
177
-
178
-
179
-
180
-
181
-
 182
182 -
 183
183 -
 184
184 -
 185
185 -
 186
186 -
 187
187 -
 188
188 -
 189
189 -
 190
190 -
 191
191 -
 192
192 -
193
-
194
-
195
-
196
-
197
-
198
-
199
-
200
-
201
-
202
-
203
-
204
-
205
-
206
-
207
-
208
-
209
-
210
-
211
-
212
-
213
-
214
-
215
-
216
-
217
-
218
-
219
-
220
-
221
-
222
-
223
-
224
-
225
-
226
-
227
-
228
-
229
-
230
-
231
-
232
-
233
-
234
-
235
-
236
-
237
-
238
-
239
-
240
-
241
-
242
-
243
-
244
-
245
-
246
-
247
-
248
-
249
-
250
-
251
-
252
-
253
-
254
-
255
-
256
-
257
-
258
-
259
-
260
-
261
-
262
-
263
-
264
-
265
-
266
-
267
-
268
-
269
-
270
-
271
-
272
 |
 |