Dell Brocade 1020 Brocade Adapters Installation and Reference Manual - Page 87
Removing and installing SFP transceivers, Removing transceivers
 |
View all Dell Brocade 1020 manuals
Add to My Manuals
Save this manual to your list of manuals |
Page 87 highlights
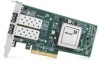
Stand-up adapters 2 1. Pull out the protective rubber inserts from fiber optic SFP connectors, if installed in adapters or the switch. 2. Connect the cable from the switch to the appropriate SFP connector on the adapter. Removing and installing SFP transceivers User the following procedures to remove and install fiber optic SFP transceivers. NOTE Use only the Brocade-branded small form factor pluggable (SFP) transceivers in the Brocade adapters. Refer to "Hardware compatibility" on page 10. Removing transceivers If you need to remove SFP transceivers from the adapter to provide clearance for installing into the server cabinet, use the following steps. 1. Pull out the protective rubber plug from the SFP connector. 2. Remove the SFP. • For SFPs with optical transceivers, use your thumb and forefinger to unlatch the bail from the side of the cable connector. Using the bail or pull tab as a handle, pull the SFP straight out of the receiver. Refer to the left illustration in Figure 10. NOTE For 16 Gbps optical transceivers, a pull tab may be available for pulling the SFP out of the receiver. • For copper SFPs with attached cables, use your thumb and forefinger to pull the tab on the cable to release the SFP latch, then pull the SFP straight out of the receiver. Refer to the right illustration in Figure 10. NOTE In the following figure, the fiber optic SFPs are shown illustration A, and the copper SFPs with attached cable are shown in the illustration B. Brocade Adapters Installation and Reference Manual 59 53-1002144-01
-
 1
1 -
2
-
3
-
4
-
5
-
6
-
7
-
8
-
9
-
10
-
11
-
12
-
13
-
14
-
15
-
16
-
17
-
18
-
19
-
20
-
21
-
22
-
23
-
24
-
25
-
26
-
27
-
28
-
29
-
30
-
31
-
32
-
33
-
34
-
35
-
36
-
37
-
38
-
39
-
40
-
41
-
42
-
43
-
44
-
45
-
46
-
47
-
48
-
49
-
50
-
51
-
52
-
53
-
54
-
55
-
56
-
57
-
58
-
59
-
60
-
61
-
62
-
63
-
64
-
65
-
66
-
67
-
68
-
69
-
70
-
71
-
72
-
73
-
74
-
75
-
76
-
77
-
78
-
79
-
80
-
81
-
 82
82 -
 83
83 -
 84
84 -
 85
85 -
 86
86 -
 87
87 -
 88
88 -
 89
89 -
 90
90 -
 91
91 -
 92
92 -
93
-
94
-
95
-
96
-
97
-
98
-
99
-
100
-
101
-
102
-
103
-
104
-
105
-
106
-
107
-
108
-
109
-
110
-
111
-
112
-
113
-
114
-
115
-
116
-
117
-
118
-
119
-
120
-
121
-
122
-
123
-
124
-
125
-
126
-
127
-
128
-
129
-
130
-
131
-
132
-
133
-
134
-
135
-
136
-
137
-
138
-
139
-
140
-
141
-
142
-
143
-
144
-
145
-
146
-
147
-
148
-
149
-
150
-
151
-
152
-
153
-
154
-
155
-
156
-
157
-
158
-
159
-
160
-
161
-
162
-
163
-
164
-
165
-
166
-
167
-
168
-
169
-
170
-
171
-
172
-
173
-
174
-
175
-
176
-
177
-
178
-
179
-
180
-
181
-
182
-
183
-
184
-
185
-
186
-
187
-
188
-
189
-
190
-
191
-
192
-
193
-
194
-
195
-
196
-
197
-
198
-
199
-
200
-
201
-
202
-
203
-
204
-
205
-
206
-
207
-
208
-
209
-
210
-
211
-
212
-
213
-
214
-
215
-
216
-
217
-
218
-
219
-
220
-
221
-
222
-
223
-
224
-
225
-
226
-
227
-
228
-
229
-
230
-
231
-
232
-
233
-
234
-
235
-
236
-
237
-
238
-
239
-
240
-
241
-
242
-
243
-
244
-
245
-
246
-
247
-
248
-
249
-
250
-
251
-
252
-
253
-
254
-
255
-
256
-
257
-
258
-
259
-
260
-
261
-
262
-
263
-
264
-
265
-
266
-
267
-
268
-
269
-
270
-
271
-
272
 |
 |
