Dell Inspiron 531S Owner's Manual - Page 134
till it snaps in place., Slide the FlexBay drive cage along with the floppy drive in the FlexBay slot
 |
View all Dell Inspiron 531S manuals
Add to My Manuals
Save this manual to your list of manuals |
Page 134 highlights
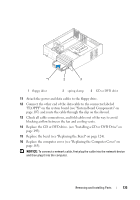
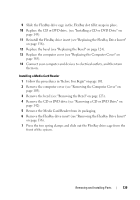
1 2 3 4 6 5 1 floppy drive 4 notch hole (2) 2 screws (2) 3 spring clamp (2) 5 cage notch (2) 6 floppy drive cage 8 Align the two screw holes on the floppy drive with the FlexBay drive cage. 9 Tighten the two screws to secure the floppy drive in the FlexBay drive cage. 10 Slide the FlexBay drive cage along with the floppy drive in the FlexBay slot till it snaps in place. 134 Removing and Installing Parts
-
 1
1 -
2
-
3
-
4
-
5
-
6
-
7
-
8
-
9
-
10
-
11
-
12
-
13
-
14
-
15
-
16
-
17
-
18
-
19
-
20
-
21
-
22
-
23
-
24
-
25
-
26
-
27
-
28
-
29
-
30
-
31
-
32
-
33
-
34
-
35
-
36
-
37
-
38
-
39
-
40
-
41
-
42
-
43
-
44
-
45
-
46
-
47
-
48
-
49
-
50
-
51
-
52
-
53
-
54
-
55
-
56
-
57
-
58
-
59
-
60
-
61
-
62
-
63
-
64
-
65
-
66
-
67
-
68
-
69
-
70
-
71
-
72
-
73
-
74
-
75
-
76
-
77
-
78
-
79
-
80
-
81
-
82
-
83
-
84
-
85
-
86
-
87
-
88
-
89
-
90
-
91
-
92
-
93
-
94
-
95
-
96
-
97
-
98
-
99
-
100
-
101
-
102
-
103
-
104
-
105
-
106
-
107
-
108
-
109
-
110
-
111
-
112
-
113
-
114
-
115
-
116
-
117
-
118
-
119
-
120
-
121
-
122
-
123
-
124
-
125
-
126
-
127
-
128
-
 129
129 -
 130
130 -
 131
131 -
 132
132 -
 133
133 -
 134
134 -
 135
135 -
 136
136 -
 137
137 -
 138
138 -
 139
139 -
140
-
141
-
142
-
143
-
144
-
145
-
146
-
147
-
148
-
149
-
150
-
151
-
152
-
153
-
154
-
155
-
156
-
157
-
158
-
159
-
160
-
161
-
162
-
163
-
164
-
165
-
166
-
167
-
168
-
169
-
170
-
171
-
172
-
173
-
174
-
175
-
176
-
177
-
178
-
179
-
180
-
181
-
182
-
183
-
184
-
185
-
186
-
187
-
188
-
189
-
190
-
191
-
192
-
193
-
194
-
195
-
196
-
197
-
198
-
199
-
200
-
201
-
202
-
203
-
204
-
205
-
206
-
207
-
208
-
209
-
210
-
211
-
212
 |
 |

134
Removing and Installing Parts
8
Align the two screw holes on the floppy drive with the FlexBay drive cage.
9
Tighten the two screws to secure the floppy drive in the FlexBay drive cage.
10
Slide the FlexBay drive cage along with the floppy drive in the FlexBay slot
till it snaps in place.
1
floppy drive
2
screws (2)
3
spring clamp (2)
4
notch hole (2)
5
cage notch (2)
6
floppy drive cage
2
3
1
4
5
6