Dell Inspiron 531S Owner's Manual - Page 44
Configuring Your Hard Drives for RAID, Windows Vista
 |
View all Dell Inspiron 531S manuals
Add to My Manuals
Save this manual to your list of manuals |
Page 44 highlights
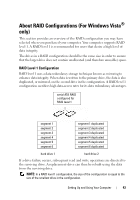
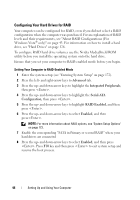
Configuring Your Hard Drives for RAID Your computer can be configured for RAID, even if you did not select a RAID configuration when the computer was purchased. For an explanation of RAID levels and their requirements, see "About RAID Configurations (For Windows Vista® only)" on page 43. For information on how to install a hard drive, see "Hard Drives" on page 126. To configure RAID hard drive volumes use the Nvidia MediaShield ROM utility before you install the operating system onto the hard drive. Ensure that you set your computer to RAID-enabled mode before you begin. Setting Your Computer to RAID-Enabled Mode 1 Enter the system setup (see "Entering System Setup" on page 172). 2 Press the left- and right-arrow keys to Advanced tab. 3 Press the up- and down-arrow keys to highlight the Integrated Peripherals, then press . 4 Press the up- and down-arrow keys to highlight the Serial-ATA Configuration, then press . 5 Press the up- and down-arrow keys to highlight RAID Enabled, and then press . 6 Press the up- and down-arrow keys to select Enabled, and then press. NOTE: For more information about RAID options, see "System Setup Options" on page 173. 7 Enable the corresponding "SATA in Primary or second RAID" where your hard drives are connected 8 Press the up- and down-arrow keys to select Enabled, and then press . Press F10 key and then press to exit system setup and resume the boot process. 44 Setting Up and Using Your Computer
-
 1
1 -
2
-
3
-
4
-
5
-
6
-
7
-
8
-
9
-
10
-
11
-
12
-
13
-
14
-
15
-
16
-
17
-
18
-
19
-
20
-
21
-
22
-
23
-
24
-
25
-
26
-
27
-
28
-
29
-
30
-
31
-
32
-
33
-
34
-
35
-
36
-
37
-
38
-
 39
39 -
 40
40 -
 41
41 -
 42
42 -
 43
43 -
 44
44 -
 45
45 -
 46
46 -
 47
47 -
 48
48 -
 49
49 -
50
-
51
-
52
-
53
-
54
-
55
-
56
-
57
-
58
-
59
-
60
-
61
-
62
-
63
-
64
-
65
-
66
-
67
-
68
-
69
-
70
-
71
-
72
-
73
-
74
-
75
-
76
-
77
-
78
-
79
-
80
-
81
-
82
-
83
-
84
-
85
-
86
-
87
-
88
-
89
-
90
-
91
-
92
-
93
-
94
-
95
-
96
-
97
-
98
-
99
-
100
-
101
-
102
-
103
-
104
-
105
-
106
-
107
-
108
-
109
-
110
-
111
-
112
-
113
-
114
-
115
-
116
-
117
-
118
-
119
-
120
-
121
-
122
-
123
-
124
-
125
-
126
-
127
-
128
-
129
-
130
-
131
-
132
-
133
-
134
-
135
-
136
-
137
-
138
-
139
-
140
-
141
-
142
-
143
-
144
-
145
-
146
-
147
-
148
-
149
-
150
-
151
-
152
-
153
-
154
-
155
-
156
-
157
-
158
-
159
-
160
-
161
-
162
-
163
-
164
-
165
-
166
-
167
-
168
-
169
-
170
-
171
-
172
-
173
-
174
-
175
-
176
-
177
-
178
-
179
-
180
-
181
-
182
-
183
-
184
-
185
-
186
-
187
-
188
-
189
-
190
-
191
-
192
-
193
-
194
-
195
-
196
-
197
-
198
-
199
-
200
-
201
-
202
-
203
-
204
-
205
-
206
-
207
-
208
-
209
-
210
-
211
-
212
 |
 |