Dell Inspiron 531S Owner's Manual - Page 49
Setting Up a Home and Office Network, Connecting to a Network Adapter
 |
View all Dell Inspiron 531S manuals
Add to My Manuals
Save this manual to your list of manuals |
Page 49 highlights
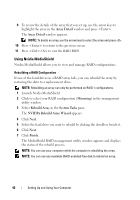
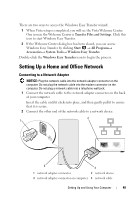
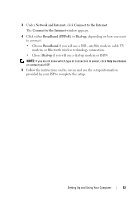
There are two ways to access the Windows Easy Transfer wizard: 1 When Vista setup is completed, you will see the Vista Welcome Center. One icon in the Welcome Center is Transfer Files and Settings. Click this icon to start Windows Easy Transfer. 2 If the Welcome Center dialog box has been closed, you can access Windows Easy Transfer by clicking Start → All Programs→ Accessories→ System Tools→ Windows Easy Transfer. Double-click the Windows Easy Transfer icon to begin the process. Setting Up a Home and Office Network Connecting to a Network Adapter NOTICE: Plug the network cable into the network adapter connector on the computer. Do not plug the network cable into the modem connector on the computer. Do not plug a network cable into a telephone wall jack. 1 Connect the network cable to the network adapter connector on the back of your computer. Insert the cable until it clicks into place, and then gently pull it to ensure that it is secure. 2 Connect the other end of the network cable to a network device. 2 1 3 4 1 network adapter connector 2 network device 3 network adapter connector on computer 4 network cable Setting Up and Using Your Computer 49
-
 1
1 -
2
-
3
-
4
-
5
-
6
-
7
-
8
-
9
-
10
-
11
-
12
-
13
-
14
-
15
-
16
-
17
-
18
-
19
-
20
-
21
-
22
-
23
-
24
-
25
-
26
-
27
-
28
-
29
-
30
-
31
-
32
-
33
-
34
-
35
-
36
-
37
-
38
-
39
-
40
-
41
-
42
-
43
-
 44
44 -
 45
45 -
 46
46 -
 47
47 -
 48
48 -
 49
49 -
 50
50 -
 51
51 -
 52
52 -
 53
53 -
 54
54 -
55
-
56
-
57
-
58
-
59
-
60
-
61
-
62
-
63
-
64
-
65
-
66
-
67
-
68
-
69
-
70
-
71
-
72
-
73
-
74
-
75
-
76
-
77
-
78
-
79
-
80
-
81
-
82
-
83
-
84
-
85
-
86
-
87
-
88
-
89
-
90
-
91
-
92
-
93
-
94
-
95
-
96
-
97
-
98
-
99
-
100
-
101
-
102
-
103
-
104
-
105
-
106
-
107
-
108
-
109
-
110
-
111
-
112
-
113
-
114
-
115
-
116
-
117
-
118
-
119
-
120
-
121
-
122
-
123
-
124
-
125
-
126
-
127
-
128
-
129
-
130
-
131
-
132
-
133
-
134
-
135
-
136
-
137
-
138
-
139
-
140
-
141
-
142
-
143
-
144
-
145
-
146
-
147
-
148
-
149
-
150
-
151
-
152
-
153
-
154
-
155
-
156
-
157
-
158
-
159
-
160
-
161
-
162
-
163
-
164
-
165
-
166
-
167
-
168
-
169
-
170
-
171
-
172
-
173
-
174
-
175
-
176
-
177
-
178
-
179
-
180
-
181
-
182
-
183
-
184
-
185
-
186
-
187
-
188
-
189
-
190
-
191
-
192
-
193
-
194
-
195
-
196
-
197
-
198
-
199
-
200
-
201
-
202
-
203
-
204
-
205
-
206
-
207
-
208
-
209
-
210
-
211
-
212
 |
 |