Dell PowerConnect W-IAP92 Dell Instant 5.0.3.0-1.1.0.0 User Guide - Page 133
User Database, Adding a User, Editing User Settings
 |
View all Dell PowerConnect W-IAP92 manuals
Add to My Manuals
Save this manual to your list of manuals |
Page 133 highlights
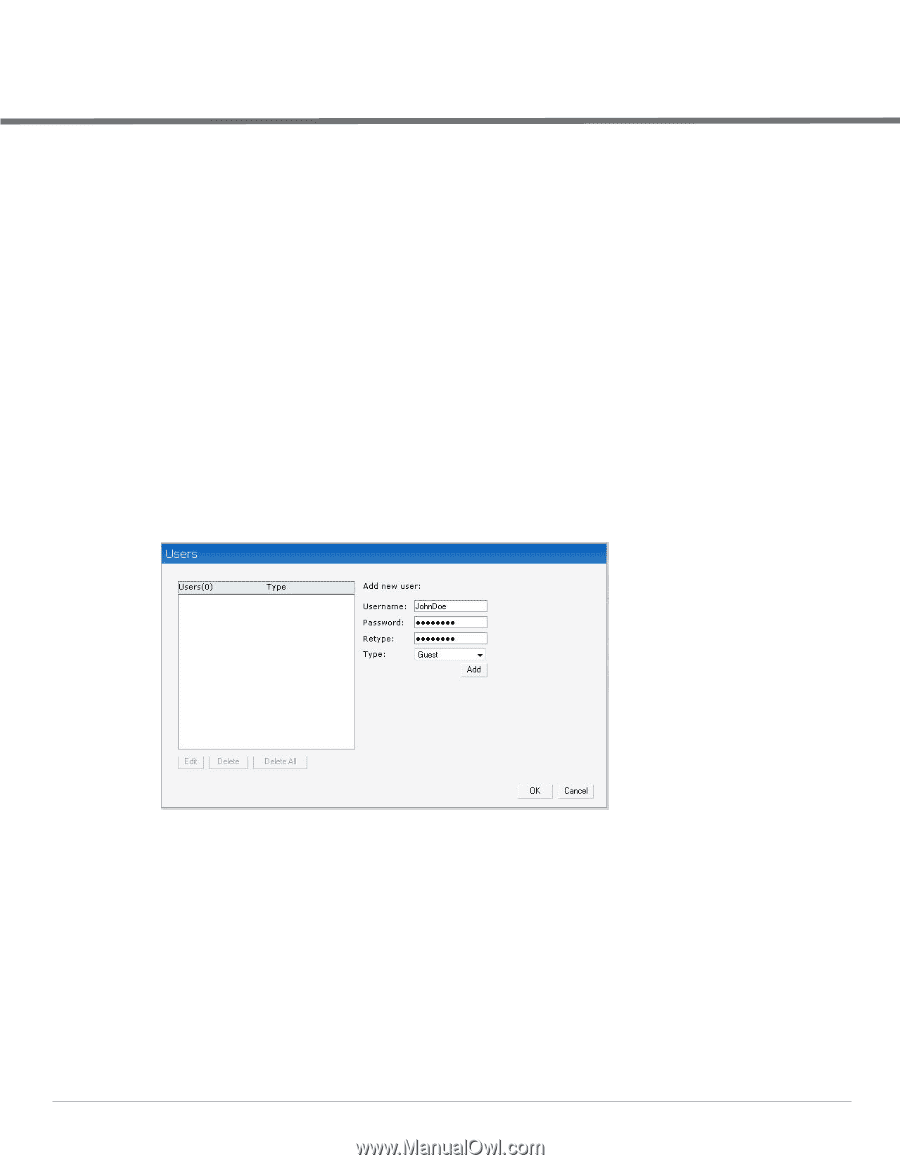
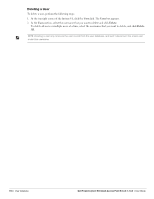
Chapter 21 User Database In Dell Instant, the user database consists of a list of guest and employee users. Addition of a user involves specifying a username and password for the user. The login credentials for these users are provided outside the Dell Instant system. A guest user can be a visitor who will be temporarily using the enterprise network to access the internet. However, you would not want to share the internal network and the intranet with them. To segregate the guest traffic from the enterprise traffic, you can create a Guest WLAN, specify the required authentication, encryption, and access rules and allow the guest user to use the enterprise network. An employee user is the employee who will be using the enterprise network for various official tasks. You can create Employee WLANs, specify the required authentication, encryption and access rules and allow the employees to use the enterprise network. Adding a User To add a user, perform the following steps: 1. At the top right corner of the Instant UI, click the Users link. The Users box appears. Figure 104 Adding a User 2. Enter the username in the Username text box. 3. Enter the password in the Password text box and reconfirm. 4. Select appropriate network type from the Type drop-down list. 5. Click Add and click OK. The users are listed in the Users list. Editing User Settings To edit user settings, perform the following steps: 1. At the top right corner of the Instant UI, click the Users link. The Users box appears. 2. In the Users section, select the username for which you want to edit the settings and click Edit. The user's details appear on the right side. 3. Edit as required and click OK. Dell PowerConnect W-Instant Access Point 5.0.3.0-1.1.0.0 | User Guide User Database | 133
-
 1
1 -
2
-
3
-
4
-
5
-
6
-
7
-
8
-
9
-
10
-
11
-
12
-
13
-
14
-
15
-
16
-
17
-
18
-
19
-
20
-
21
-
22
-
23
-
24
-
25
-
26
-
27
-
28
-
29
-
30
-
31
-
32
-
33
-
34
-
35
-
36
-
37
-
38
-
39
-
40
-
41
-
42
-
43
-
44
-
45
-
46
-
47
-
48
-
49
-
50
-
51
-
52
-
53
-
54
-
55
-
56
-
57
-
58
-
59
-
60
-
61
-
62
-
63
-
64
-
65
-
66
-
67
-
68
-
69
-
70
-
71
-
72
-
73
-
74
-
75
-
76
-
77
-
78
-
79
-
80
-
81
-
82
-
83
-
84
-
85
-
86
-
87
-
88
-
89
-
90
-
91
-
92
-
93
-
94
-
95
-
96
-
97
-
98
-
99
-
100
-
101
-
102
-
103
-
104
-
105
-
106
-
107
-
108
-
109
-
110
-
111
-
112
-
113
-
114
-
115
-
116
-
117
-
118
-
119
-
120
-
121
-
122
-
123
-
124
-
125
-
126
-
127
-
 128
128 -
 129
129 -
 130
130 -
 131
131 -
 132
132 -
 133
133 -
 134
134 -
 135
135 -
 136
136 -
 137
137 -
 138
138 -
139
-
140
 |
 |