Dell PowerConnect W-IAP92 Dell Instant 5.0.3.0-1.1.0.0 User Guide - Page 45
Guest, Primary usage, Client IP assignment, Virtual Controller, assigned, 4 GHz, Hide SSID, Security
 |
View all Dell PowerConnect W-IAP92 manuals
Add to My Manuals
Save this manual to your list of manuals |
Page 45 highlights
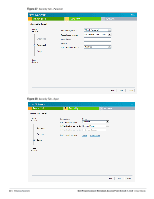
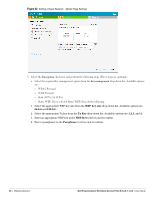
b. Select the Guest radio button from the Primary usage options. This selection determines the primary usage of the network being added. The Client IP assignment selection automatically changes to Virtual Controller assigned. The virtual controller creates a private subnet and VLAN for the IAPs and the wireless clients. The virtual controller NATs all traffic out of this interface. For more information, see Chapter 11, "Guest DMZ" . 3. Click the More link and perform the following steps (These steps are optional). a. Band - Set the band at which the network will transmit radio signals. Available options are All, 2.4 GHz, and 5 GHz. The All option is selected by default. It is also the recommended option. b. Hide SSID - Select this check box if you want to hide the SSID (network name) from the users. 4. Click Next. The Security tab appears. This tab allows you to configure the captive portal page for the Guest network. Select one of the following splash page type: Table 9 Conditions for Adding a Guest Network - Basic Info Tab Splash Page Type Description and steps to set up Internal - Authenticated Internal - Acknowledged External A user has to accept the terms and conditions and enter a username and password on the captive portal page. If this option is selected, then add the users who are required to use the captive portal authentication to the user database. Click the Users link to add the users. For information about adding a user, see "Adding a User" on page 133. For information on customizing the splash page, see "Customizing a Splash Page" on page 78. A user has to accept the terms and conditions for this splash page type. For information on customizing the splash page, see "Customizing a Splash Page" on page 78. An external server will be used to display the splash page to the user. If this option is selected, then do the following: 1. Enter the IP or hostname of the external server in the IP or hostname text box. 2. Enter the URL of the captive portal page in the URL text box. 3. Enter the number of the port to be used for communicating with the external server in the Port text box. 4. In the Authentication text box, enter the unique signature that the external server will return in the response after a successful user authentication. If you do not want to set the captive portal authentication, clear the Splash page check box. Dell PowerConnect W-Instant Access Point 5.0.3.0-1.1.0.0 | User Guide Wireless Network | 45
-
 1
1 -
2
-
3
-
4
-
5
-
6
-
7
-
8
-
9
-
10
-
11
-
12
-
13
-
14
-
15
-
16
-
17
-
18
-
19
-
20
-
21
-
22
-
23
-
24
-
25
-
26
-
27
-
28
-
29
-
30
-
31
-
32
-
33
-
34
-
35
-
36
-
37
-
38
-
39
-
 40
40 -
 41
41 -
 42
42 -
 43
43 -
 44
44 -
 45
45 -
 46
46 -
 47
47 -
 48
48 -
 49
49 -
 50
50 -
51
-
52
-
53
-
54
-
55
-
56
-
57
-
58
-
59
-
60
-
61
-
62
-
63
-
64
-
65
-
66
-
67
-
68
-
69
-
70
-
71
-
72
-
73
-
74
-
75
-
76
-
77
-
78
-
79
-
80
-
81
-
82
-
83
-
84
-
85
-
86
-
87
-
88
-
89
-
90
-
91
-
92
-
93
-
94
-
95
-
96
-
97
-
98
-
99
-
100
-
101
-
102
-
103
-
104
-
105
-
106
-
107
-
108
-
109
-
110
-
111
-
112
-
113
-
114
-
115
-
116
-
117
-
118
-
119
-
120
-
121
-
122
-
123
-
124
-
125
-
126
-
127
-
128
-
129
-
130
-
131
-
132
-
133
-
134
-
135
-
136
-
137
-
138
-
139
-
140
 |
 |