Dell PowerConnect W-IAP92 Dell Instant 5.0.3.0-1.1.0.0 User Guide - Page 68
Configuring the DHCP Server,
 |
View all Dell PowerConnect W-IAP92 manuals
Add to My Manuals
Save this manual to your list of manuals |
Page 68 highlights
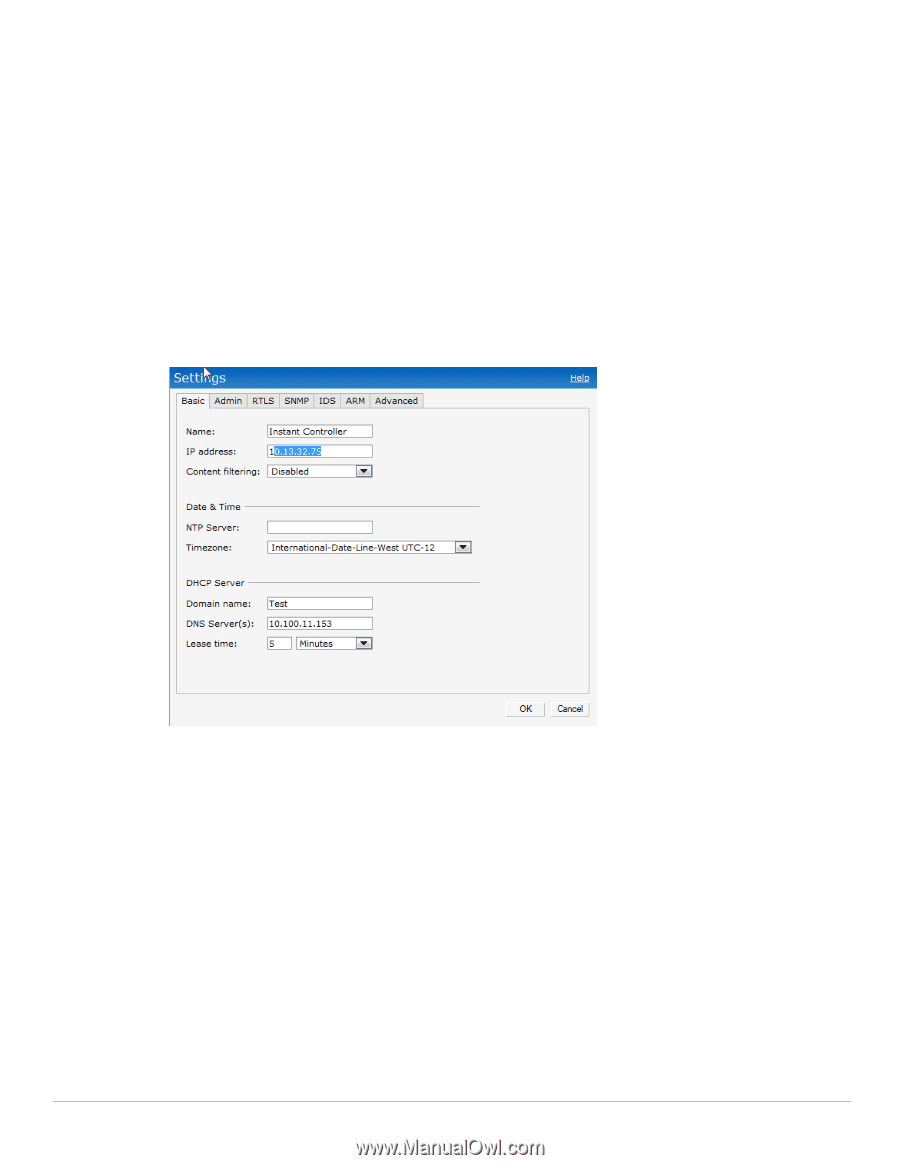
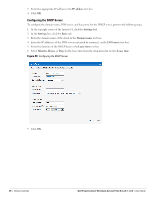
3. Enter the appropriate IP address in the IP address text box. 4. Click OK. Configuring the DHCP Server To configure the domain name, DNS server, and lease time for the DHCP server, perform the following steps: 1. At the top right corner of the Instant UI, click the Settings link. 2. In the Settings box, click the Basic tab. 3. Enter the domain name of the client in the Domain name text box. 4. Enter the IP addresses of the DNS servers seperated by comma(,). in the DNS server text box. 5. Enter the duration of the DHCP lease in the Lease time text box. 6. Select Minutes, Hours, or Days for the lease time from the drop-down list next to Lease time. Figure 59 Configuring the DHCP Server 7. Click OK. 68 | Virtual Controller Dell PowerConnect W-Instant Access Point 5.0.3.0-1.1.0.0 | User Guide
-
 1
1 -
2
-
3
-
4
-
5
-
6
-
7
-
8
-
9
-
10
-
11
-
12
-
13
-
14
-
15
-
16
-
17
-
18
-
19
-
20
-
21
-
22
-
23
-
24
-
25
-
26
-
27
-
28
-
29
-
30
-
31
-
32
-
33
-
34
-
35
-
36
-
37
-
38
-
39
-
40
-
41
-
42
-
43
-
44
-
45
-
46
-
47
-
48
-
49
-
50
-
51
-
52
-
53
-
54
-
55
-
56
-
57
-
58
-
59
-
60
-
61
-
62
-
 63
63 -
 64
64 -
 65
65 -
 66
66 -
 67
67 -
 68
68 -
 69
69 -
 70
70 -
 71
71 -
 72
72 -
 73
73 -
74
-
75
-
76
-
77
-
78
-
79
-
80
-
81
-
82
-
83
-
84
-
85
-
86
-
87
-
88
-
89
-
90
-
91
-
92
-
93
-
94
-
95
-
96
-
97
-
98
-
99
-
100
-
101
-
102
-
103
-
104
-
105
-
106
-
107
-
108
-
109
-
110
-
111
-
112
-
113
-
114
-
115
-
116
-
117
-
118
-
119
-
120
-
121
-
122
-
123
-
124
-
125
-
126
-
127
-
128
-
129
-
130
-
131
-
132
-
133
-
134
-
135
-
136
-
137
-
138
-
139
-
140
 |
 |