Dell PowerEdge 2900 Hardware Owner's Manual (PDF) - Page 60
Installing a SATA Hard Drive and Interposer Card Into a SATAu Hard-Drive Carrier, the rear. See - sata drive
 |
View all Dell PowerEdge 2900 manuals
Add to My Manuals
Save this manual to your list of manuals |
Page 60 highlights
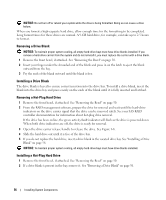
Figure 3-8. Installing a SATA Hard Drive Into a SATA Drive Carrier 1 2 3 1 screws (4) 2 SATA drive carrier 3 SATA hard drive Installing a SATA Hard Drive and Interposer Card Into a SATAu Hard-Drive Carrier NOTE: When you install a SATA hard drive into a SATAu drive carrier, you must install an interposer card onto the back of the hard drive. The SATAu drive carrier is labeled "SATAu" and also has marks indicating the SAS and SATA mounting screws. 1 Insert the SATA hard drive into the SATAu hard-drive carrier with the connector end of the drive at the rear. See Figure 3-9. 2 Viewing the assembly as shown in Figure 3-9, align the bottom rear screw hole on the hard drive with the hole labeled "SATAu" on the hard drive carrier. When aligned correctly, the rear of the interposer will be flush with the rear of the hard-drive carrier. 3 Attach the four screws to secure the hard drive to the hard-drive carrier. See Figure 3-9. 60 Installing System Components
-
 1
1 -
2
-
3
-
4
-
5
-
6
-
7
-
8
-
9
-
10
-
11
-
12
-
13
-
14
-
15
-
16
-
17
-
18
-
19
-
20
-
21
-
22
-
23
-
24
-
25
-
26
-
27
-
28
-
29
-
30
-
31
-
32
-
33
-
34
-
35
-
36
-
37
-
38
-
39
-
40
-
41
-
42
-
43
-
44
-
45
-
46
-
47
-
48
-
49
-
50
-
51
-
52
-
53
-
54
-
 55
55 -
 56
56 -
 57
57 -
 58
58 -
 59
59 -
 60
60 -
 61
61 -
 62
62 -
 63
63 -
 64
64 -
 65
65 -
66
-
67
-
68
-
69
-
70
-
71
-
72
-
73
-
74
-
75
-
76
-
77
-
78
-
79
-
80
-
81
-
82
-
83
-
84
-
85
-
86
-
87
-
88
-
89
-
90
-
91
-
92
-
93
-
94
-
95
-
96
-
97
-
98
-
99
-
100
-
101
-
102
-
103
-
104
-
105
-
106
-
107
-
108
-
109
-
110
-
111
-
112
-
113
-
114
-
115
-
116
-
117
-
118
-
119
-
120
-
121
-
122
-
123
-
124
-
125
-
126
-
127
-
128
-
129
-
130
-
131
-
132
-
133
-
134
-
135
-
136
-
137
-
138
-
139
-
140
-
141
-
142
-
143
-
144
-
145
-
146
-
147
-
148
-
149
-
150
-
151
-
152
-
153
-
154
-
155
-
156
-
157
-
158
-
159
-
160
-
161
-
162
-
163
-
164
-
165
-
166
-
167
-
168
-
169
-
170
-
171
-
172
-
173
-
174
-
175
-
176
-
177
-
178
-
179
-
180
-
181
-
182
 |
 |
