Denon DRW840 Operating Instructions - Page 8
English, Dubbing
 |
UPC - 081577500643
View all Denon DRW840 manuals
Add to My Manuals
Save this manual to your list of manuals |
Page 8 highlights
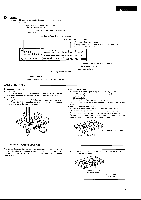
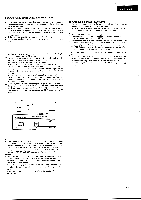
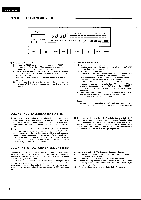
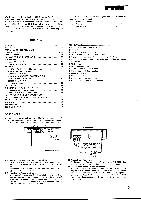
ENGLISH NI TWIN RECORDING (simultaneous recording on deck A and deck B) This is a convenient feature for recording the same program source onto two tapes at the same time. • Load cassette tapes into both deck A and B. Set the Dolby NR switch 0 and the REVERSE MODE button 0. 0 Press the TWIN REC button D. The A + B indicator will light up and both decks will enter the recording pause mode. e 0 Adjust the INPUT LEVEL control for the best recording input levels while watching the Peak Level Meter. 0 Press the PLAY button 0 of deck B to start twin recording. ® To stop twin recording, press the STOP ( • ) button 0 of each deck. • By pressing the deck B REC PAUSE (II) button or the REC/REC MUTE I • I button, the recording pause or recording mute mode on both decks can be set automatically. The deck A (II) and l• I buttons cannot be used. • To set the twin recording mute mode from the twin recording pause mode, press the REC/REC MUTE button (•) on deck B for at least 0.5 seconds. • The relay mode cannot be set with the REVERSE MODE button when in the twin recording mode. • RELAY RECORDING (continues recording from deck A to deck B) To record a long program, start recording on deck A, and when both sides of the tape in deck A have been recorded, the relay recording feature continues to record on the tape in deck B. • Load cassette tapes into decks A and B, and set the Dolby NR switch. O REVERSE MODE set to "RELAY" 0. The RELAY indicator will light. Deck A Side facing you Opposite side Recording Order Deck B Side facing you Opposite side O Press the REC/REC MUTE ( • ) button 0 of deck A to set the recording pause mode. O Adjust the INPUT LEVEL control 0 for the best recording input level while watching the Peak Level Meter. ® Press the PLAY button 0 of deck A to start relay recording. 0 To stop relay recording, press the STOP ( • ) button 0 of the deck that is recording. DUBBING (from deck A to deck B) • Switch on the amplifier or receiver. • Set the Tape Monitor switch on your amplifier or receiver to the TAPE position. 0 Press the POWER switch 0 to the ON ( = 1 position. ® Load the cassette tape to be played in deck A and the one to be recorded in deck B 0, (D. 0 Select the type of tape transport with the REVERSE MODE button 0. Reverse mode -..- CZ) RELAY Operation Dubbing is performed only for one side. The decks stop when either deck A or B reaches the end of the tape. The tape direction is reversed on each deck when they reach the end of the tape. (This is convenient for dubbing to a tape with a different length.) During dubbing of the side facing you, the deck that first reaches the end of the tape will stand by until the other deck reaches the end of the tape, then both decks will reverse the tape direction together. (Depending on the manufacturer, the length of tapes having the same recording time may differ somewhat. Setting this mode permits the arrangement of the beginning portion of the opposite side of the tape.) ® To begin normal speed dubbing, press the DUBBING SPEED NORMAL button 0. The DUB indicator will light at this time. To high speed dubbing, press the DUBBING SPEED HIGH button 0. The HIGH indicator will light at this time. e 0 To stop dubbing, press the stop ( • 1 button of deck A or deck B. • When deck A is in the playback mode and deck B is in the stop condition, setting deck B to the recording pause mode will engage the normal speed dubbing pause mode. Dubbing is then started by pressing the PLAY button. • When dubbing, the recording level and the Dolby NR coding will be the same as those of the playback tape, regardless of the positions of the INPUT LEVEL control and the DOLBY NR switch. • When listening to the playback sound during normal speed dubbing, set the DOLBY NR switch to match the Dolby NR system with which the playback tape was recorded. This will assure correct sound reproduction, but does not affect the recording. • The playback sound cannot be heard during high speed dubbing. • Operation using the REC/REC MUTE (•) and REC PAUSE (II) buttons of deck B is permitted during normal speed dubbing. • Buttons other than the stop ( • button cannot be used during high speed dubbing. 10
-
 1
1 -
2
-
 3
3 -
 4
4 -
 5
5 -
 6
6 -
 7
7 -
 8
8 -
 9
9 -
 10
10 -
 11
11 -
 12
12 -
 13
13 -
14
-
15
-
16
-
17
-
18
-
19
-
20
-
21
-
22
-
23
-
24
-
25
-
26
-
27
-
28
-
29
-
30
-
31
-
32
-
33
-
34
-
35
-
36
-
37
-
38
-
39
-
40
-
41
-
42
-
43
-
44
-
45
-
46
-
47
-
48
-
49
-
50
-
51
-
52
-
53
-
54
-
55
-
56
-
57
-
58
-
59
-
60
-
61
-
62
-
63
-
64
-
65
-
66
-
67
-
68
-
69
-
70
-
71
-
72
-
73
-
74
-
75
-
76
 |
 |
