Epson 12000XL Users Guide - Page 39
Main Settings, Preview, Advanced Settings, Searchable PDF, Image Format, Options, Image Format Options
 |
View all Epson 12000XL manuals
Add to My Manuals
Save this manual to your list of manuals |
Page 39 highlights
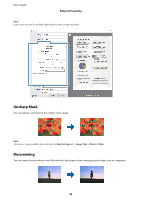
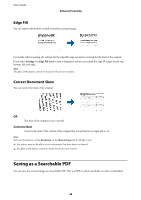
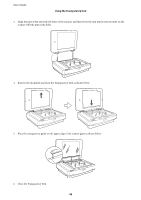
User's Guide Advanced Scanning Note: ❏ Text on the originals is recognized using Optical Character Recognition (OCR), and then embedded in the scanned image. ❏ This feature is only available when the EPSON Scan OCR component (Windows) or Epson Scan 2 OCR component (Mac) is installed. 1. Place the original. 2. Start Epson Scan 2. 3. Make settings for each item on the Main Settings tab. 4. Click Preview. 5. Check the preview, and make other settings on the Advanced Settings tab if necessary. 6. Select Searchable PDF from the Image Format list. 7. Select Options from the Image Format list to open the Image Format Options window. 8. Select the Text tab on the Image Format Options window. 9. Check that the language of the original is selected in the Text Language list. 10. Click OK to close the Image Format Options window. 11. Check the save file name displayed in File Name. 12. Select the save folder for the scanned image from the Folder list. 13. Click Scan. The scanned image is saved as a Searchable PDF. Related Information & "Scanning Using Epson Scan 2" on page 18 & "Placing Originals on the Product" on page 14 & "Text is Not Recognized Correctly when Saving as a Searchable PDF" on page 59 39
-
 1
1 -
2
-
3
-
4
-
5
-
6
-
7
-
8
-
9
-
10
-
11
-
12
-
13
-
14
-
15
-
16
-
17
-
18
-
19
-
20
-
21
-
22
-
23
-
24
-
25
-
26
-
27
-
28
-
29
-
30
-
31
-
32
-
33
-
 34
34 -
 35
35 -
 36
36 -
 37
37 -
 38
38 -
 39
39 -
 40
40 -
 41
41 -
 42
42 -
 43
43 -
 44
44 -
45
-
46
-
47
-
48
-
49
-
50
-
51
-
52
-
53
-
54
-
55
-
56
-
57
-
58
-
59
-
60
-
61
-
62
-
63
-
64
-
65
-
66
-
67
-
68
 |
 |