Epson 12000XL Users Guide - Page 49
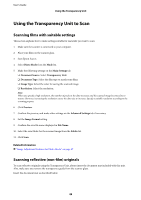
Using the Transparency Unit to Scan, Scanning films with suitable settings
 |
View all Epson 12000XL manuals
Add to My Manuals
Save this manual to your list of manuals |
Page 49 highlights
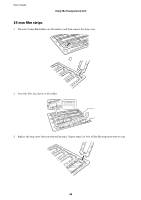
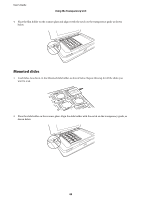
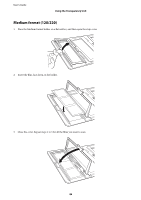
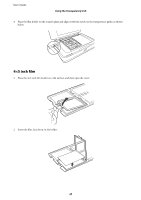
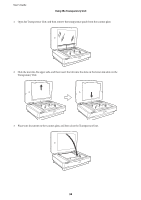
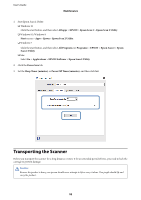
User's Guide Using the Transparency Unit Using the Transparency Unit to Scan Scanning films with suitable settings This section explains how to make settings suitable for materials you want to scan. 1. Make sure the scanner is connected to your computer. 2. Place your films on the scanner glass. 3. Start Epson Scan 2. 4. Select Photo Mode from the Mode list. 5. Make the following settings on the Main Settings tab. ❏ Document Source: Select Transparency Unit. ❏ Document Type: Select the film type to match your films. ❏ Image Type: Select the color for saving the scanned image. ❏ Resolution: Select the resolution. Note: When you specify a high resolution, the number of pixels in the data increases and the scanned image becomes fine in texture. However, increasing the resolution causes the data size to increase. Specify a suitable resolution according to the scanning purpose. 6. Click Preview. 7. Confirm the preview, and make other settings on the Advanced Settings tab if necessary. 8. Set the Image Format setting. 9. Confirm the save file name displayed in File Name. 10. Select the save folder for the scanned image from the Folder list. 11. Click Scan. Related Information & "Image Adjustment Features for Photo Mode" on page 27 Scanning reflective (non-film) originals To scan reflective originals using the Transparency Unit, always insert the document mat included with this unit. Also, make sure you remove the transparency guide from the scanner glass. Insert the document mat as described below. 49
-
 1
1 -
2
-
3
-
4
-
5
-
6
-
7
-
8
-
9
-
10
-
11
-
12
-
13
-
14
-
15
-
16
-
17
-
18
-
19
-
20
-
21
-
22
-
23
-
24
-
25
-
26
-
27
-
28
-
29
-
30
-
31
-
32
-
33
-
34
-
35
-
36
-
37
-
38
-
39
-
40
-
41
-
42
-
43
-
 44
44 -
 45
45 -
 46
46 -
 47
47 -
 48
48 -
 49
49 -
 50
50 -
 51
51 -
 52
52 -
 53
53 -
 54
54 -
55
-
56
-
57
-
58
-
59
-
60
-
61
-
62
-
63
-
64
-
65
-
66
-
67
-
68
 |
 |