Epson 755c User's Guide - Page 105
Editing Your Scenario on the Projector, insert the slide and press
 |
UPC - 010343855366
View all Epson 755c manuals
Add to My Manuals
Save this manual to your list of manuals |
Page 105 highlights
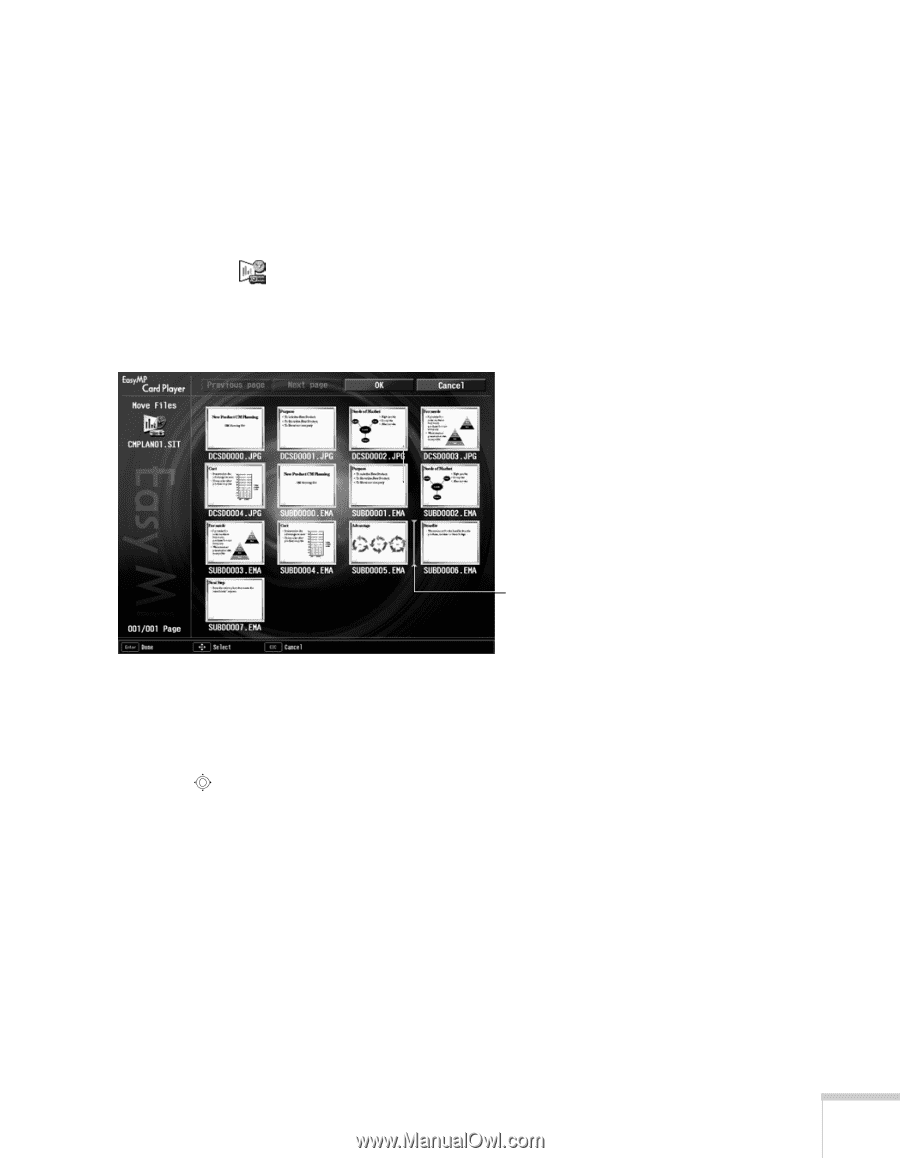
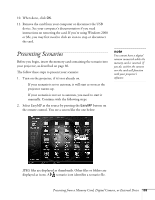
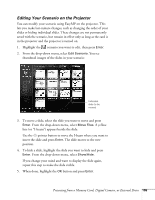
Editing Your Scenario on the Projector You can modify your scenario using EasyMP on the projector. This lets you make last-minute changes, such as changing the order of your slides or hiding individual slides. These changes are not permanently saved with the scenario, but remain in effect only as long as the card is in the projector and the projector is turned on. 1. Highlight the scenario you want to edit, then press Enter. 2. From the drop-down menu, select Edit Scenario. You see thumbnail images of the slides in your scenario: Indicates slide to be moved 3. To move a slide, select the slide you want to move and press Enter. From the drop-down menu, select Move Files. A yellow line (or "I-beam") appears beside the slide. Use the pointer button to move the I-beam where you want to insert the slide and press Enter. The slide moves to the new position. 4. To hide a slide, highlight the slide you want to hide and press Enter. From the drop-down menu, select Show/Hide. If you change your mind and want to display the slide again, repeat this step to make the slide visible. 5. When done, highlight the OK button and press Enter. Presenting from a Memory Card, Digital Camera, or External Drive 105
-
 1
1 -
2
-
3
-
4
-
5
-
6
-
7
-
8
-
9
-
10
-
11
-
12
-
13
-
14
-
15
-
16
-
17
-
18
-
19
-
20
-
21
-
22
-
23
-
24
-
25
-
26
-
27
-
28
-
29
-
30
-
31
-
32
-
33
-
34
-
35
-
36
-
37
-
38
-
39
-
40
-
41
-
42
-
43
-
44
-
45
-
46
-
47
-
48
-
49
-
50
-
51
-
52
-
53
-
54
-
55
-
56
-
57
-
58
-
59
-
60
-
61
-
62
-
63
-
64
-
65
-
66
-
67
-
68
-
69
-
70
-
71
-
72
-
73
-
74
-
75
-
76
-
77
-
78
-
79
-
80
-
81
-
82
-
83
-
84
-
85
-
86
-
87
-
88
-
89
-
90
-
91
-
92
-
93
-
94
-
95
-
96
-
97
-
98
-
99
-
 100
100 -
 101
101 -
 102
102 -
 103
103 -
 104
104 -
 105
105 -
 106
106 -
 107
107 -
 108
108 -
 109
109 -
 110
110 -
111
-
112
-
113
-
114
-
115
-
116
-
117
-
118
-
119
-
120
-
121
-
122
-
123
-
124
-
125
-
126
-
127
-
128
-
129
-
130
-
131
-
132
-
133
-
134
-
135
-
136
-
137
-
138
-
139
-
140
-
141
-
142
-
143
-
144
-
145
-
146
-
147
-
148
-
149
-
150
-
151
-
152
-
153
-
154
-
155
-
156
-
157
-
158
-
159
-
160
-
161
-
162
-
163
-
164
-
165
-
166
-
167
-
168
-
169
-
170
-
171
-
172
-
173
-
174
-
175
-
176
-
177
-
178
-
179
-
180
-
181
-
182
-
183
-
184
-
185
-
186
-
187
-
188
-
189
-
190
-
191
-
192
-
193
-
194
-
195
-
196
-
197
-
198
 |
 |