Epson PowerLite 9000NL User Manual - Page 106
Assigning the Logo to the A/V Mute Button, Enter, A/V Mute
 |
View all Epson PowerLite 9000NL manuals
Add to My Manuals
Save this manual to your list of manuals |
Page 106 highlights
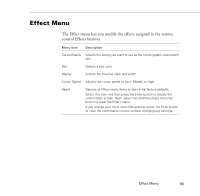
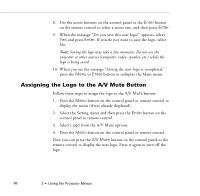
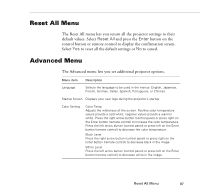
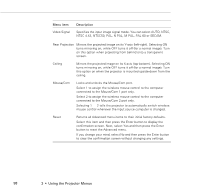
8. Use the arrow buttons on the control panel or the Enter button on the remote control to select a zoom rate, and then press Enter. 9. When the message "Do you save this user logo?" appears, select Yes and press Enter. If you do not want to save the logo, select No. Note: Saving the logo may take a few moments. Do not use the projector or other sources (computer, video, speaker, etc.) while the logo is being saved. 10. When you see the message "Saving the user logo is completed," press the Menu or Enter button to redisplay the Main menu. Assigning the Logo to the A/V Mute Button Follow these steps to assign the logo to the A/V Mute button: 1. Press the Menu button on the control panel or remote control to display the menu (if not already displayed). 2. Select the Setting menu and then press the Enter button on the control panel or remote control. 3. Select Logo from the A/V Mute options. 4. Press the Menu button on the control panel or remote control. Now you can press the A/V Mute button on the control panel or the remote control to display the user logo. Press it again to turn off the logo. 96 3 • Using the Projector Menus
-
 1
1 -
2
-
3
-
4
-
5
-
6
-
7
-
8
-
9
-
10
-
11
-
12
-
13
-
14
-
15
-
16
-
17
-
18
-
19
-
20
-
21
-
22
-
23
-
24
-
25
-
26
-
27
-
28
-
29
-
30
-
31
-
32
-
33
-
34
-
35
-
36
-
37
-
38
-
39
-
40
-
41
-
42
-
43
-
44
-
45
-
46
-
47
-
48
-
49
-
50
-
51
-
52
-
53
-
54
-
55
-
56
-
57
-
58
-
59
-
60
-
61
-
62
-
63
-
64
-
65
-
66
-
67
-
68
-
69
-
70
-
71
-
72
-
73
-
74
-
75
-
76
-
77
-
78
-
79
-
80
-
81
-
82
-
83
-
84
-
85
-
86
-
87
-
88
-
89
-
90
-
91
-
92
-
93
-
94
-
95
-
96
-
97
-
98
-
99
-
100
-
 101
101 -
 102
102 -
 103
103 -
 104
104 -
 105
105 -
 106
106 -
 107
107 -
 108
108 -
 109
109 -
 110
110 -
 111
111 -
112
-
113
-
114
-
115
-
116
-
117
-
118
-
119
-
120
-
121
-
122
-
123
-
124
-
125
-
126
-
127
-
128
-
129
-
130
-
131
-
132
-
133
-
134
-
135
-
136
-
137
-
138
-
139
-
140
-
141
-
142
-
143
-
144
-
145
-
146
-
147
-
148
-
149
-
150
-
151
-
152
-
153
-
154
-
155
-
156
-
157
-
158
-
159
-
160
-
161
-
162
-
163
-
164
-
165
-
166
-
167
-
168
-
169
-
170
-
171
-
172
-
173
-
174
-
175
-
176
-
177
-
178
 |
 |