Epson PowerLite 9000NL User Manual - Page 124
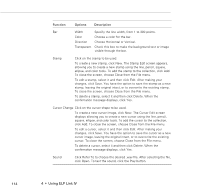
Choose Horizontal or Vertical., Cursor Change
 |
View all Epson PowerLite 9000NL manuals
Add to My Manuals
Save this manual to your list of manuals |
Page 124 highlights
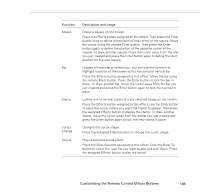
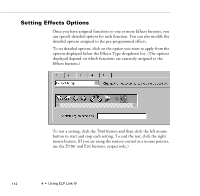
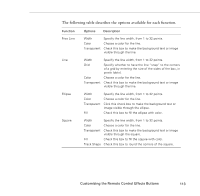
Function Options Description Bar Width Specify the line width, from 1 to 300 points. Color Choose a color for the bar. Direction Choose Horizontal or Vertical. Transparent Check this box to make the background text or image visible through the bar. Stamp Click on the stamp to be used. To create a new stamp, click New. The Stamp Edit screen appears, allowing you to create a new stamp using the line, pencil, square, ellipse, and color tools. To add the stamp to the collection, click Add. To close the screen, choose Close from the File menu. To edit a stamp, select it and then click Edit. After making your changes, click Save. You have the option to save the stamp as a new stamp, leaving the original intact, or to overwrite the existing stamp. To close the screen, choose Close from the File menu. To delete a stamp, select it and then click Delete. When the confirmation message displays, click Yes. Cursor Change Click on the cursor shape to be used. To create a new cursor image, click New. The Cursor Edit screen displays allowing you to create a new cursor using the line, pencil, square, ellipse, and color tools. To add the cursor to the collection, click Add. To close the screen, choose Close from the File menu. To edit a cursor, select it and then click Edit. After making your changes, click Save. You have the option to save the cursor as a new cursor image, leaving the original intact, or to overwrite the existing cursor. To close the screen, choose Close from the File menu. To delete a cursor, select it and then click Delete. When the confirmation message displays, click Yes. Sound Click Refer To to choose the desired .wav file. After selecting the file, click Open. To test the sound, click the Play button. 114 4 • Using ELP Link IV
-
 1
1 -
2
-
3
-
4
-
5
-
6
-
7
-
8
-
9
-
10
-
11
-
12
-
13
-
14
-
15
-
16
-
17
-
18
-
19
-
20
-
21
-
22
-
23
-
24
-
25
-
26
-
27
-
28
-
29
-
30
-
31
-
32
-
33
-
34
-
35
-
36
-
37
-
38
-
39
-
40
-
41
-
42
-
43
-
44
-
45
-
46
-
47
-
48
-
49
-
50
-
51
-
52
-
53
-
54
-
55
-
56
-
57
-
58
-
59
-
60
-
61
-
62
-
63
-
64
-
65
-
66
-
67
-
68
-
69
-
70
-
71
-
72
-
73
-
74
-
75
-
76
-
77
-
78
-
79
-
80
-
81
-
82
-
83
-
84
-
85
-
86
-
87
-
88
-
89
-
90
-
91
-
92
-
93
-
94
-
95
-
96
-
97
-
98
-
99
-
100
-
101
-
102
-
103
-
104
-
105
-
106
-
107
-
108
-
109
-
110
-
111
-
112
-
113
-
114
-
115
-
116
-
117
-
118
-
 119
119 -
 120
120 -
 121
121 -
 122
122 -
 123
123 -
 124
124 -
 125
125 -
 126
126 -
 127
127 -
 128
128 -
 129
129 -
130
-
131
-
132
-
133
-
134
-
135
-
136
-
137
-
138
-
139
-
140
-
141
-
142
-
143
-
144
-
145
-
146
-
147
-
148
-
149
-
150
-
151
-
152
-
153
-
154
-
155
-
156
-
157
-
158
-
159
-
160
-
161
-
162
-
163
-
164
-
165
-
166
-
167
-
168
-
169
-
170
-
171
-
172
-
173
-
174
-
175
-
176
-
177
-
178
 |
 |