Epson PowerLite 9000NL User Manual - Page 108
NTSC 4.43, NTSC50, PAL, N PAL, PAL 60 or SECAM., Rear Projection
 |
View all Epson PowerLite 9000NL manuals
Add to My Manuals
Save this manual to your list of manuals |
Page 108 highlights
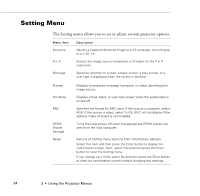
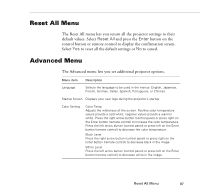
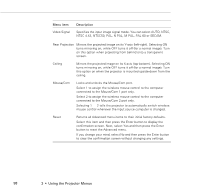
Menu item Video Signal Description Specifies the input image signal mode. You can select AUTO, NTSC, NTSC 4.43, NTSC50, PAL, N PAL, M PAL, PAL 60 or SECAM. Rear Projection Mirrors the projected image on its Y-axis (left-right). Selecting ON turns mirroring on, while OFF turns it off (for a normal image). Turn on this option when projecting from behind onto a transparent screen. Ceiling Mirrors the projected image on its X-axis (top-bottom). Selecting ON turns mirroring on, while OFF turns it off (for a normal image). Turn this option on when the projector is mounted upside-down from the ceiling. Mouse/Com Locks and unlocks the Mouse/Com port. Select 1 to assign the wireless mouse control to the computer connected to the Mouse/Com 1 port only. Select 2 to assign the wireless mouse control to the computer connected to the Mouse/Com 2 port only. Selecting 1 ↔ 2 tells the projector to automatically switch wireless mouse control whenever the input source computer is changed. Reset Returns all Advanced menu items to their initial factory defaults. Select this item and then press the Enter button to display the confirmation screen. Next, select Yes and then press the Enter button to reset the Advanced menu. If you change your mind, select No and then press the Enter button to clear the confirmation screen without changing any settings. 98 3 • Using the Projector Menus
-
 1
1 -
2
-
3
-
4
-
5
-
6
-
7
-
8
-
9
-
10
-
11
-
12
-
13
-
14
-
15
-
16
-
17
-
18
-
19
-
20
-
21
-
22
-
23
-
24
-
25
-
26
-
27
-
28
-
29
-
30
-
31
-
32
-
33
-
34
-
35
-
36
-
37
-
38
-
39
-
40
-
41
-
42
-
43
-
44
-
45
-
46
-
47
-
48
-
49
-
50
-
51
-
52
-
53
-
54
-
55
-
56
-
57
-
58
-
59
-
60
-
61
-
62
-
63
-
64
-
65
-
66
-
67
-
68
-
69
-
70
-
71
-
72
-
73
-
74
-
75
-
76
-
77
-
78
-
79
-
80
-
81
-
82
-
83
-
84
-
85
-
86
-
87
-
88
-
89
-
90
-
91
-
92
-
93
-
94
-
95
-
96
-
97
-
98
-
99
-
100
-
101
-
102
-
 103
103 -
 104
104 -
 105
105 -
 106
106 -
 107
107 -
 108
108 -
 109
109 -
 110
110 -
 111
111 -
 112
112 -
 113
113 -
114
-
115
-
116
-
117
-
118
-
119
-
120
-
121
-
122
-
123
-
124
-
125
-
126
-
127
-
128
-
129
-
130
-
131
-
132
-
133
-
134
-
135
-
136
-
137
-
138
-
139
-
140
-
141
-
142
-
143
-
144
-
145
-
146
-
147
-
148
-
149
-
150
-
151
-
152
-
153
-
154
-
155
-
156
-
157
-
158
-
159
-
160
-
161
-
162
-
163
-
164
-
165
-
166
-
167
-
168
-
169
-
170
-
171
-
172
-
173
-
174
-
175
-
176
-
177
-
178
 |
 |
