Epson PowerLite 9000NL User Manual - Page 32
Connecting to a PC Desktop Computer
 |
View all Epson PowerLite 9000NL manuals
Add to My Manuals
Save this manual to your list of manuals |
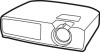
Page 32 highlights
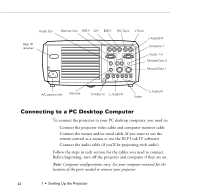
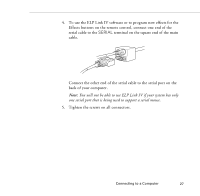
Audio Out Rear IR receiver Monitor Out R/R-Y G/Y B/B-Y H/C Sync V Sync L-Audio2-R R/R-Y G/Y B/B-Y H/C Sync V Sync Monitor Out Computer 2/ Component Video Computer 1 Audio Out L-Audio2-R Audio 1 Remote Mouse/Com2 Mouse/Com1 S-Video L-Audio-R Video L-Audio-R Computer 1 Audio 1 In Mouse/Com 2 Mouse/Com 1 A/C power inlet Remote S-Video In L-Audio-R Video L-Audio-R Connecting to a PC Desktop Computer To connect the projector to your PC desktop computer, you need to: Ë Connect the projector video cable and computer monitor cable Ë Connect the mouse and/or serial cable (if you want to use the remote control as a mouse or use the ELP Link IV software) Ë Connect the audio cable (if you'll be projecting with audio) Follow the steps in each section for the cables you need to connect. Before beginning, turn off the projector and computer if they are on. Note: Computer configurations vary. See your computer manual for the location of the ports needed to connect your projector. 22 1 • Setting Up the Projector
-
 1
1 -
2
-
3
-
4
-
5
-
6
-
7
-
8
-
9
-
10
-
11
-
12
-
13
-
14
-
15
-
16
-
17
-
18
-
19
-
20
-
21
-
22
-
23
-
24
-
25
-
26
-
 27
27 -
 28
28 -
 29
29 -
 30
30 -
 31
31 -
 32
32 -
 33
33 -
 34
34 -
 35
35 -
 36
36 -
 37
37 -
38
-
39
-
40
-
41
-
42
-
43
-
44
-
45
-
46
-
47
-
48
-
49
-
50
-
51
-
52
-
53
-
54
-
55
-
56
-
57
-
58
-
59
-
60
-
61
-
62
-
63
-
64
-
65
-
66
-
67
-
68
-
69
-
70
-
71
-
72
-
73
-
74
-
75
-
76
-
77
-
78
-
79
-
80
-
81
-
82
-
83
-
84
-
85
-
86
-
87
-
88
-
89
-
90
-
91
-
92
-
93
-
94
-
95
-
96
-
97
-
98
-
99
-
100
-
101
-
102
-
103
-
104
-
105
-
106
-
107
-
108
-
109
-
110
-
111
-
112
-
113
-
114
-
115
-
116
-
117
-
118
-
119
-
120
-
121
-
122
-
123
-
124
-
125
-
126
-
127
-
128
-
129
-
130
-
131
-
132
-
133
-
134
-
135
-
136
-
137
-
138
-
139
-
140
-
141
-
142
-
143
-
144
-
145
-
146
-
147
-
148
-
149
-
150
-
151
-
152
-
153
-
154
-
155
-
156
-
157
-
158
-
159
-
160
-
161
-
162
-
163
-
164
-
165
-
166
-
167
-
168
-
169
-
170
-
171
-
172
-
173
-
174
-
175
-
176
-
177
-
178
 |
 |
