HP 2100 Service Manual - Page 54
Using the Control Panel, Display LEDs, Job Cancel Button, Go Button - laserjet troubleshooting
 |
UPC - 873662008284
View all HP 2100 manuals
Add to My Manuals
Save this manual to your list of manuals |
Page 54 highlights
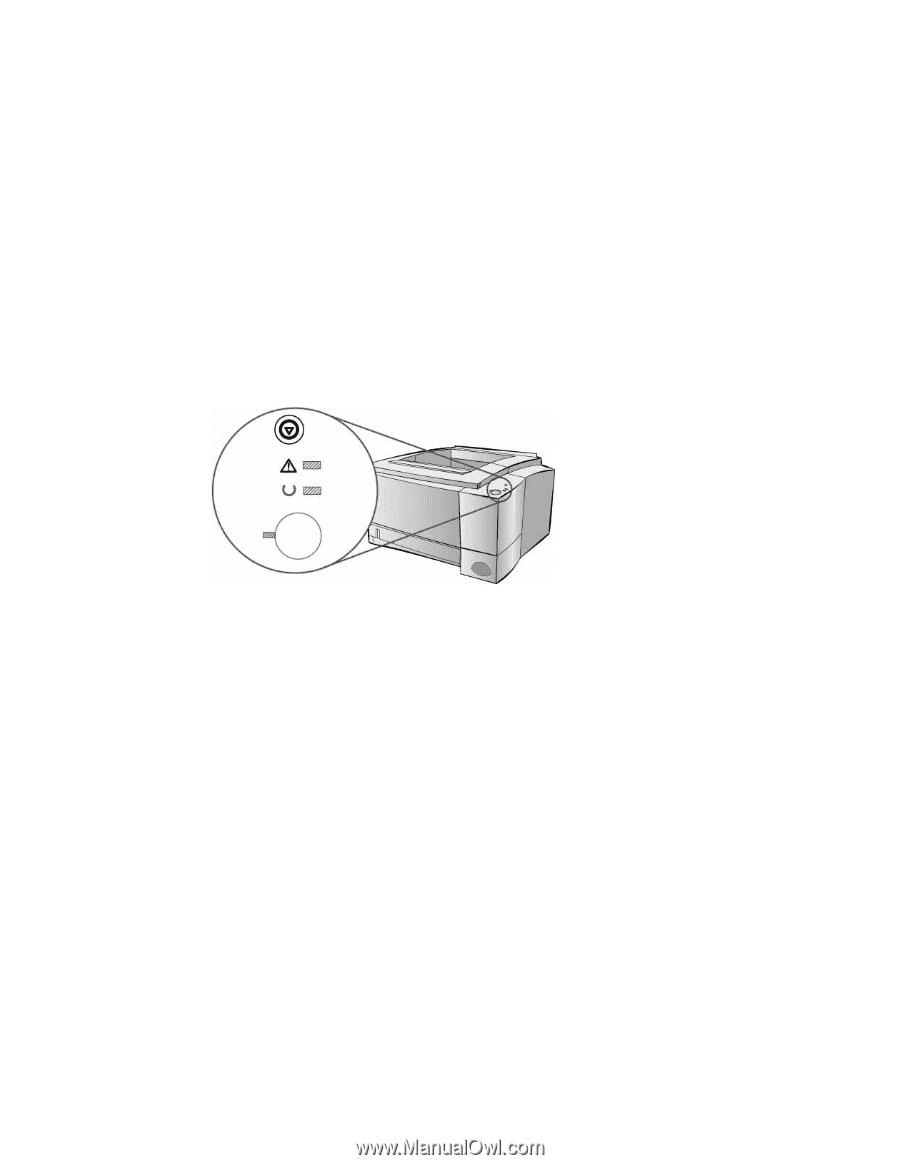
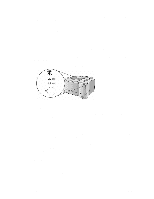
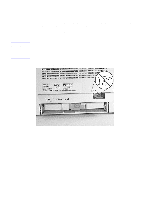
Using the Control Panel As shown in figure 3-1, this printer's control panel has only two buttons: JOB CANCEL and GO. Pressing one of these buttons or a combination of the two does the following: • Cancels print jobs. • Resumes printing when the printer is paused. • Prints a demo page or a self test/configuration page. • Initiates a continuous self test. • Performs a cold reset or an NVRAM init. • Reveals secondary information (for example, LED messages). Other printer configurations must be performed while in the service mode via PJL commands or using the LaserJet configuration utility. See "Service Mode" (page 49) for more information. Figure 3-1 HP LaserJet 2100 Control Panel LEDs Display LEDs The control panel LEDs provide both status and error messages via distinct light patterns. See Chapter 6: Troubleshooting for more information. Job Cancel Button Press JOB CANCEL to cancel the current print job. The control panel LEDs will cycle while the print job is cleared from both the printer and the computer, and then return to ready. This might take some time, depending on the size of the print job. • If JOB CANCEL is accidentally pushed, the job must be reprinted. • If JOB CANCEL is pushed when the printer is idle, the top panel status lights will cycle and the printer will return to the ready state. Go Button • Press GO to resume printing when the printer is paused or when unprinted data is still in the printer. • Press GO to clear some printer errors. 44 3 Printer Configuration C4170-90959
-
 1
1 -
2
-
3
-
4
-
5
-
6
-
7
-
8
-
9
-
10
-
11
-
12
-
13
-
14
-
15
-
16
-
17
-
18
-
19
-
20
-
21
-
22
-
23
-
24
-
25
-
26
-
27
-
28
-
29
-
30
-
31
-
32
-
33
-
34
-
35
-
36
-
37
-
38
-
39
-
40
-
41
-
42
-
43
-
44
-
45
-
46
-
47
-
48
-
 49
49 -
 50
50 -
 51
51 -
 52
52 -
 53
53 -
 54
54 -
 55
55 -
 56
56 -
 57
57 -
 58
58 -
 59
59 -
60
-
61
-
62
-
63
-
64
-
65
-
66
-
67
-
68
-
69
-
70
-
71
-
72
-
73
-
74
-
75
-
76
-
77
-
78
-
79
-
80
-
81
-
82
-
83
-
84
-
85
-
86
-
87
-
88
-
89
-
90
-
91
-
92
-
93
-
94
-
95
-
96
-
97
-
98
-
99
-
100
-
101
-
102
-
103
-
104
-
105
-
106
-
107
-
108
-
109
-
110
-
111
-
112
-
113
-
114
-
115
-
116
-
117
-
118
-
119
-
120
-
121
-
122
-
123
-
124
-
125
-
126
-
127
-
128
-
129
-
130
-
131
-
132
-
133
-
134
-
135
-
136
-
137
-
138
-
139
-
140
-
141
-
142
-
143
-
144
-
145
-
146
-
147
-
148
-
149
-
150
-
151
-
152
-
153
-
154
-
155
-
156
-
157
-
158
-
159
-
160
-
161
-
162
-
163
-
164
-
165
-
166
-
167
-
168
-
169
-
170
-
171
-
172
-
173
-
174
-
175
-
176
-
177
-
178
-
179
-
180
-
181
-
182
-
183
-
184
-
185
-
186
-
187
-
188
-
189
-
190
-
191
-
192
-
193
-
194
-
195
-
196
-
197
-
198
-
199
-
200
-
201
-
202
-
203
-
204
-
205
-
206
-
207
-
208
-
209
-
210
-
211
-
212
-
213
-
214
-
215
-
216
-
217
-
218
-
219
-
220
-
221
-
222
-
223
-
224
-
225
-
226
-
227
-
228
-
229
-
230
-
231
-
232
-
233
-
234
-
235
-
236
-
237
-
238
-
239
-
240
-
241
-
242
-
243
-
244
-
245
-
246
-
247
-
248
-
249
-
250
-
251
-
252
-
253
-
254
-
255
-
256
-
257
-
258
-
259
-
260
-
261
-
262
-
263
-
264
-
265
-
266
-
267
-
268
-
269
-
270
-
271
-
272
-
273
-
274
-
275
-
276
-
277
-
278
-
279
-
280
-
281
-
282
-
283
-
284
-
285
-
286
-
287
-
288
-
289
-
290
-
291
-
292
-
293
-
294
-
295
-
296
-
297
-
298
-
299
-
300
-
301
-
302
-
303
-
304
-
305
-
306
-
307
-
308
-
309
-
310
 |
 |