HP 4700n HP Color LaserJet 4700 - User Guide - Page 220
Stop At Low, Replace Fuser Kit
 |
UPC - 829160845630
View all HP 4700n manuals
Add to My Manuals
Save this manual to your list of manuals |
Page 220 highlights
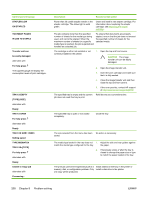
Control panel message Remove at least one print cartridge. To exit press Stop REPLACE CARTRIDGE The supplies gauge will display the consumption levels of print cartridges. alternates with To continue press The supplies gauge will display the consumption levels of print cartridges. REPLACE FUSER KIT For help press REPLACE FUSER KIT For help press alternates with REPLACE FUSER KIT To continue press Description Recommended action The printer is executing a disable cartridge check or component test where the component selected is the cartridge motor. Remove one print cartridge. The identified print cartridge has reached the 1. end of life and the COLOR SUPPLY OUT setting in the SYSTEM SETUP menu is set to 2. STOP AT LOW. Printing can continue. 3. Order the appropriate print cartridge. To continue, press . Open the front and top covers and then open the image transfer unit. CAUTION The image transfer unit can be easily damaged. 4. Remove the identified print cartridge. 5. Install a new print cartridge. 6. Close the image transfer unit and the top and front covers. 7. Supplies ordering information is also available from the embedded Web server. See Using the embedded Web server for more information. The fuser kit has reached the end of its life. 1. Open the top cover. Replace the fuser kit. Printing can continue although print quality might be reduced. 2. Grasp the purple handles on the fuser unit. 3. Remove the old fuser unit from the printer. 4. Install a new fuser unit and secure with thumb screws. 5. Close the top cover. 6. Supplies ordering information is also available from the embedded Web server. See Using the embedded Web server for more information. The fuser is nearing the end of its useful life 1. Order the fuser kit. and the REPLACE SUPPLIES setting in the SYSTEM SETUP menu is set to STOP 2. To continue printing, press . AT LOW. Printing can continue. 3. To replace the fuser kit, perform the following steps: ● Open the top cover. ● Grasp the purple handles on the fuser unit. ● Remove the old fuser unit from the printer. ● Install the new fuser unit. 204 Chapter 8 Problem solving ENWW
-
 1
1 -
2
-
3
-
4
-
5
-
6
-
7
-
8
-
9
-
10
-
11
-
12
-
13
-
14
-
15
-
16
-
17
-
18
-
19
-
20
-
21
-
22
-
23
-
24
-
25
-
26
-
27
-
28
-
29
-
30
-
31
-
32
-
33
-
34
-
35
-
36
-
37
-
38
-
39
-
40
-
41
-
42
-
43
-
44
-
45
-
46
-
47
-
48
-
49
-
50
-
51
-
52
-
53
-
54
-
55
-
56
-
57
-
58
-
59
-
60
-
61
-
62
-
63
-
64
-
65
-
66
-
67
-
68
-
69
-
70
-
71
-
72
-
73
-
74
-
75
-
76
-
77
-
78
-
79
-
80
-
81
-
82
-
83
-
84
-
85
-
86
-
87
-
88
-
89
-
90
-
91
-
92
-
93
-
94
-
95
-
96
-
97
-
98
-
99
-
100
-
101
-
102
-
103
-
104
-
105
-
106
-
107
-
108
-
109
-
110
-
111
-
112
-
113
-
114
-
115
-
116
-
117
-
118
-
119
-
120
-
121
-
122
-
123
-
124
-
125
-
126
-
127
-
128
-
129
-
130
-
131
-
132
-
133
-
134
-
135
-
136
-
137
-
138
-
139
-
140
-
141
-
142
-
143
-
144
-
145
-
146
-
147
-
148
-
149
-
150
-
151
-
152
-
153
-
154
-
155
-
156
-
157
-
158
-
159
-
160
-
161
-
162
-
163
-
164
-
165
-
166
-
167
-
168
-
169
-
170
-
171
-
172
-
173
-
174
-
175
-
176
-
177
-
178
-
179
-
180
-
181
-
182
-
183
-
184
-
185
-
186
-
187
-
188
-
189
-
190
-
191
-
192
-
193
-
194
-
195
-
196
-
197
-
198
-
199
-
200
-
201
-
202
-
203
-
204
-
205
-
206
-
207
-
208
-
209
-
210
-
211
-
212
-
213
-
214
-
 215
215 -
 216
216 -
 217
217 -
 218
218 -
 219
219 -
 220
220 -
 221
221 -
 222
222 -
 223
223 -
 224
224 -
 225
225 -
226
-
227
-
228
-
229
-
230
-
231
-
232
-
233
-
234
-
235
-
236
-
237
-
238
-
239
-
240
-
241
-
242
-
243
-
244
-
245
-
246
-
247
-
248
-
249
-
250
-
251
-
252
-
253
-
254
-
255
-
256
-
257
-
258
-
259
-
260
-
261
-
262
-
263
-
264
-
265
-
266
-
267
-
268
-
269
-
270
-
271
-
272
-
273
-
274
-
275
-
276
-
277
-
278
-
279
-
280
-
281
-
282
-
283
-
284
-
285
-
286
-
287
-
288
-
289
-
290
-
291
-
292
-
293
-
294
-
295
-
296
-
297
-
298
-
299
-
300
-
301
-
302
-
303
-
304
-
305
-
306
-
307
-
308
-
309
-
310
-
311
-
312
-
313
-
314
-
315
-
316
-
317
-
318
-
319
-
320
-
321
-
322
-
323
-
324
-
325
-
326
-
327
-
328
-
329
-
330
 |
 |