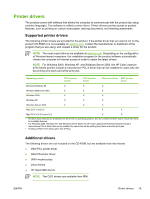
HP 4700n HP Color LaserJet 4700 - User Guide - Page 37
Printer drivers, Operating System - color laserjet duplex option
 |
UPC - 829160845630
View all HP 4700n manuals
Add to My Manuals
Save this manual to your list of manuals |
Page 37 highlights
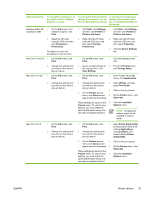
Operating System To change the settings for all print jobs until the software program is closed To change the print job default settings (for example, turn on Print on Both Sides by default) To change the configuration settings (for example, add a tray or enable/disable Manual Duplexing) Windows 2000, XP, 1. On the File menu in the and Server 2003 software program, click Print. 1. Click Start, click Settings, 1. Click Start, click Settings, and then click Printers or and then click Printers or Printers and Faxes. Printers and Faxes. 2. Select the HP Color LaserJet 4700, and then click Properties or Preferences. The steps can vary; this procedure is most common. 2. Right-click the HP Color LaserJet 4700 icon, and then select Printing Preferences. 2. Right-click the HP Color LaserJet 4700 icon, and then select Properties. 3. Click the Device Settings tab. Mac OS 9.1 and 9.2 1. On the File menu, click Print. 1. On the File menu, click Print. 1. Click the desktop printer icon. 2. Change the settings that you want on the various pop-up menus. 2. As you change settings on 2. From the Printing menu, the pop-up menu, click click Change Setup. Save Settings. Mac OS X v10.2.8 1. On the File menu, click Print. 1. On the File menu, click Print. 1. In the Finder, on the Go menu, click Applications. 2. Change the settings that you want on the various pop-up menus. 2. Change the settings that 2. Open Utilities, and then you want on the various open Print Center. pop-up menus. 3. Click on the print queue. 3. On the Presets pop-up menu, click Save as and 4. On the Printers menu, click type a name for the preset. Show Info. These settings are saved in the 5. Click the Installable Presets menu. To use the new Options menu. settings, you must select the saved preset option every time you open a program and print. NOTE Configuration settings might not be available in Classic mode. Mac OS X v10.3 1. On the File menu, click Print. 2. Change the settings that you want on the various pop-up menus. 1. On the File menu, click Print. 2. Change the settings that you want on the various pop-up menus. 1. Open Printer Setup Utility by selecting the hard drive, clicking Applications, clicking Utilities, then double-clicking Printer Setup Utility. 3. On the Presets pop-up 2. menu, click Save as and type a name for the preset. 3. These settings are saved in the Presets menu. To use the new 4. settings, you must select the saved preset option every time you open a program and print. Click on the print queue. On the Printers menu, click Show Info. Click the Installable Options menu. ENWW Printer drivers 21
-
 1
1 -
2
-
3
-
4
-
5
-
6
-
7
-
8
-
9
-
10
-
11
-
12
-
13
-
14
-
15
-
16
-
17
-
18
-
19
-
20
-
21
-
22
-
23
-
24
-
25
-
26
-
27
-
28
-
29
-
30
-
31
-
 32
32 -
 33
33 -
 34
34 -
 35
35 -
 36
36 -
 37
37 -
 38
38 -
 39
39 -
 40
40 -
 41
41 -
 42
42 -
43
-
44
-
45
-
46
-
47
-
48
-
49
-
50
-
51
-
52
-
53
-
54
-
55
-
56
-
57
-
58
-
59
-
60
-
61
-
62
-
63
-
64
-
65
-
66
-
67
-
68
-
69
-
70
-
71
-
72
-
73
-
74
-
75
-
76
-
77
-
78
-
79
-
80
-
81
-
82
-
83
-
84
-
85
-
86
-
87
-
88
-
89
-
90
-
91
-
92
-
93
-
94
-
95
-
96
-
97
-
98
-
99
-
100
-
101
-
102
-
103
-
104
-
105
-
106
-
107
-
108
-
109
-
110
-
111
-
112
-
113
-
114
-
115
-
116
-
117
-
118
-
119
-
120
-
121
-
122
-
123
-
124
-
125
-
126
-
127
-
128
-
129
-
130
-
131
-
132
-
133
-
134
-
135
-
136
-
137
-
138
-
139
-
140
-
141
-
142
-
143
-
144
-
145
-
146
-
147
-
148
-
149
-
150
-
151
-
152
-
153
-
154
-
155
-
156
-
157
-
158
-
159
-
160
-
161
-
162
-
163
-
164
-
165
-
166
-
167
-
168
-
169
-
170
-
171
-
172
-
173
-
174
-
175
-
176
-
177
-
178
-
179
-
180
-
181
-
182
-
183
-
184
-
185
-
186
-
187
-
188
-
189
-
190
-
191
-
192
-
193
-
194
-
195
-
196
-
197
-
198
-
199
-
200
-
201
-
202
-
203
-
204
-
205
-
206
-
207
-
208
-
209
-
210
-
211
-
212
-
213
-
214
-
215
-
216
-
217
-
218
-
219
-
220
-
221
-
222
-
223
-
224
-
225
-
226
-
227
-
228
-
229
-
230
-
231
-
232
-
233
-
234
-
235
-
236
-
237
-
238
-
239
-
240
-
241
-
242
-
243
-
244
-
245
-
246
-
247
-
248
-
249
-
250
-
251
-
252
-
253
-
254
-
255
-
256
-
257
-
258
-
259
-
260
-
261
-
262
-
263
-
264
-
265
-
266
-
267
-
268
-
269
-
270
-
271
-
272
-
273
-
274
-
275
-
276
-
277
-
278
-
279
-
280
-
281
-
282
-
283
-
284
-
285
-
286
-
287
-
288
-
289
-
290
-
291
-
292
-
293
-
294
-
295
-
296
-
297
-
298
-
299
-
300
-
301
-
302
-
303
-
304
-
305
-
306
-
307
-
308
-
309
-
310
-
311
-
312
-
313
-
314
-
315
-
316
-
317
-
318
-
319
-
320
-
321
-
322
-
323
-
324
-
325
-
326
-
327
-
328
-
329
-
330
 |
 |
