HP 4700n HP Color LaserJet 4700 - User Guide - Page 228
Common causes of paper jams, Paper jams
 |
UPC - 829160845630
View all HP 4700n manuals
Add to My Manuals
Save this manual to your list of manuals |
Page 228 highlights
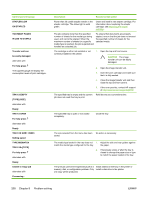
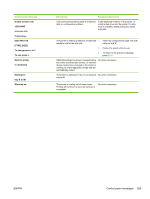
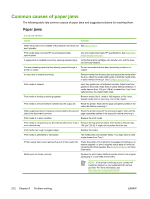
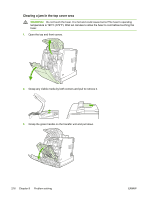
Common causes of paper jams The following table lists common causes of paper jams and suggested solutions for resolving them. Paper jams Cause and solution Cause Solution When the printer is first installed, the protective insert does not See Jam in Tray 1. eject properly. Print media does not meet HP-recommended media specifications. Use only media that meets HP specifications. See Supported media weights and sizes. A supply item is installed incorrectly, causing repeated jams. Verify that all print cartridges, the transfer unit, and the fuser are correctly installed. You are reloading paper that has already passed through a printer or copier. Do not use media that has been previously printed on or copied. An input tray is loaded incorrectly. Remove media from the input tray and replace the media within the tray. Adjust the media width guide to hold the media firmly in place without bending it. See Configuring input trays. Print media is skewed. Input tray guides are not adjusted correctly. Adjust input tray guides so they hold media firmly in place without bending it. If media heavier than 105 g/m2 (28 lb) is loaded into Tray 2 and optional trays, the media might skew. Print media is binding or sticking together. Remove media, flex it, rotate it 180 degrees, or flip it over. Reload media into the input tray. Do not fan media. Print media is removed before it settles into the output bin. Reset the printer. Wait until the page completely settles in the output bin before removing it. When duplexing, the print media is removed before the second Reset the printer and print the document again. Wait until the side of the document is printed. page completely settles in the output bin before removing it. Print media is in poor condition. Replace the print media. Print media is not picked up by the internal rollers from Tray 2 Remove the top sheet of media. If the media is heavier than or an optional tray. 105 g/m2 (28 lb), it might not be picked from the tray. Print media has rough or jagged edges. Replace the media. Print media is perforated or embossed. This media does not separate easily. You might need to feed single sheets from Tray 1. Printer supply items have reached the end of their useful life. Check the printer control panel for messages prompting you to replace supplies, or print a supplies status page to verify the remaining life of the supplies. See Replacing supplies for more information. Media was not stored correctly. Replace the print media. Media should be stored in the original packaging in a controlled environment. NOTE If the printer continues to jam, contact HP Customer Support or your authorized HP service provider. For more information, see http://www.hp.com/support/clj4700. 212 Chapter 8 Problem solving ENWW
-
 1
1 -
2
-
3
-
4
-
5
-
6
-
7
-
8
-
9
-
10
-
11
-
12
-
13
-
14
-
15
-
16
-
17
-
18
-
19
-
20
-
21
-
22
-
23
-
24
-
25
-
26
-
27
-
28
-
29
-
30
-
31
-
32
-
33
-
34
-
35
-
36
-
37
-
38
-
39
-
40
-
41
-
42
-
43
-
44
-
45
-
46
-
47
-
48
-
49
-
50
-
51
-
52
-
53
-
54
-
55
-
56
-
57
-
58
-
59
-
60
-
61
-
62
-
63
-
64
-
65
-
66
-
67
-
68
-
69
-
70
-
71
-
72
-
73
-
74
-
75
-
76
-
77
-
78
-
79
-
80
-
81
-
82
-
83
-
84
-
85
-
86
-
87
-
88
-
89
-
90
-
91
-
92
-
93
-
94
-
95
-
96
-
97
-
98
-
99
-
100
-
101
-
102
-
103
-
104
-
105
-
106
-
107
-
108
-
109
-
110
-
111
-
112
-
113
-
114
-
115
-
116
-
117
-
118
-
119
-
120
-
121
-
122
-
123
-
124
-
125
-
126
-
127
-
128
-
129
-
130
-
131
-
132
-
133
-
134
-
135
-
136
-
137
-
138
-
139
-
140
-
141
-
142
-
143
-
144
-
145
-
146
-
147
-
148
-
149
-
150
-
151
-
152
-
153
-
154
-
155
-
156
-
157
-
158
-
159
-
160
-
161
-
162
-
163
-
164
-
165
-
166
-
167
-
168
-
169
-
170
-
171
-
172
-
173
-
174
-
175
-
176
-
177
-
178
-
179
-
180
-
181
-
182
-
183
-
184
-
185
-
186
-
187
-
188
-
189
-
190
-
191
-
192
-
193
-
194
-
195
-
196
-
197
-
198
-
199
-
200
-
201
-
202
-
203
-
204
-
205
-
206
-
207
-
208
-
209
-
210
-
211
-
212
-
213
-
214
-
215
-
216
-
217
-
218
-
219
-
220
-
221
-
222
-
 223
223 -
 224
224 -
 225
225 -
 226
226 -
 227
227 -
 228
228 -
 229
229 -
 230
230 -
 231
231 -
 232
232 -
 233
233 -
234
-
235
-
236
-
237
-
238
-
239
-
240
-
241
-
242
-
243
-
244
-
245
-
246
-
247
-
248
-
249
-
250
-
251
-
252
-
253
-
254
-
255
-
256
-
257
-
258
-
259
-
260
-
261
-
262
-
263
-
264
-
265
-
266
-
267
-
268
-
269
-
270
-
271
-
272
-
273
-
274
-
275
-
276
-
277
-
278
-
279
-
280
-
281
-
282
-
283
-
284
-
285
-
286
-
287
-
288
-
289
-
290
-
291
-
292
-
293
-
294
-
295
-
296
-
297
-
298
-
299
-
300
-
301
-
302
-
303
-
304
-
305
-
306
-
307
-
308
-
309
-
310
-
311
-
312
-
313
-
314
-
315
-
316
-
317
-
318
-
319
-
320
-
321
-
322
-
323
-
324
-
325
-
326
-
327
-
328
-
329
-
330
 |
 |