HP 4700n HP Color LaserJet 4700 - User Guide - Page 269
Calibrating the printer, Repetitive defect ruler, QUICK CALIBRATE NOW, CALIBRATION, PRINT QUALITY - color laserjet drum
 |
UPC - 829160845630
View all HP 4700n manuals
Add to My Manuals
Save this manual to your list of manuals |
Page 269 highlights
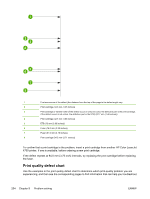
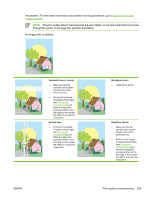
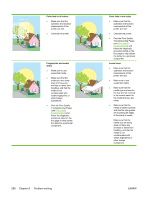
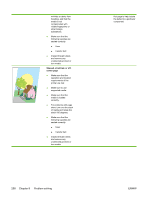
Calibrating the printer The HP Color LaserJet 4700 printer automatically calibrates and cleans at various times to maintain the highest level of print quality. The user might also request the printer to calibrate via the printer's control panel, using QUICK CALIBRATE NOW or FULL CALIBRATE NOW located in the CALIBRATION and PRINT QUALITY menu. QUICK CALIBRATE NOW is used for color tone calibration and takes about 65 seconds. If color density or tone seems wrong, Quick Calibration can be run. Full Calibration includes the Quick Calibrate routines and adds Drum Phase Calibration and Color Plane Registration (CPR). This takes about 4 minutes and 20 seconds. If color layers (black, magenta, cyan, and yellow) on the printed page seem to be shifted from one another, FULL CALIBRATE NOW should be run. The HP Color LaserJet 4700 printer incorporates a new feature to skip calibration when appropriate, thereby making the printer available more quickly. For example, if the printer is powered off and on quickly (within 20 seconds), calibration is not needed and will be skipped. In this case, the printer will reach the Ready state approximately one minute sooner. While the printer is calibrating and cleaning, the printer will pause printing for the amount of time it takes to complete the calibration or cleaning. For most calibrations and cleaning, the printer will not interrupt a print job, but will wait for the job to complete before calibrating or cleaning. 1. Press Menu to enter the MENUS. 2. Press to highlight CONFIGURE DEVICE. 3. Press to select CONFIGURE DEVICE. 4. Press to highlight PRINT QUALITY. 5. Press to select PRINT QUALITY. 6. Press to highlight QUICK CALIBRATE NOW. 7. Press to select QUICK CALIBRATE NOW. OR To perform a full calibration, use FULL CALIBRATE NOW instead of QUICK CALIBRATE NOW in steps 6 and 7. Repetitive defect ruler If defects repeat at regular intervals on the page, use this ruler to identify the cause of the defect. Place the top of the ruler at the first defect. The marking that is beside the next occurrence of the defect indicates which component needs to be replaced. ENWW Print quality troubleshooting 253
-
 1
1 -
2
-
3
-
4
-
5
-
6
-
7
-
8
-
9
-
10
-
11
-
12
-
13
-
14
-
15
-
16
-
17
-
18
-
19
-
20
-
21
-
22
-
23
-
24
-
25
-
26
-
27
-
28
-
29
-
30
-
31
-
32
-
33
-
34
-
35
-
36
-
37
-
38
-
39
-
40
-
41
-
42
-
43
-
44
-
45
-
46
-
47
-
48
-
49
-
50
-
51
-
52
-
53
-
54
-
55
-
56
-
57
-
58
-
59
-
60
-
61
-
62
-
63
-
64
-
65
-
66
-
67
-
68
-
69
-
70
-
71
-
72
-
73
-
74
-
75
-
76
-
77
-
78
-
79
-
80
-
81
-
82
-
83
-
84
-
85
-
86
-
87
-
88
-
89
-
90
-
91
-
92
-
93
-
94
-
95
-
96
-
97
-
98
-
99
-
100
-
101
-
102
-
103
-
104
-
105
-
106
-
107
-
108
-
109
-
110
-
111
-
112
-
113
-
114
-
115
-
116
-
117
-
118
-
119
-
120
-
121
-
122
-
123
-
124
-
125
-
126
-
127
-
128
-
129
-
130
-
131
-
132
-
133
-
134
-
135
-
136
-
137
-
138
-
139
-
140
-
141
-
142
-
143
-
144
-
145
-
146
-
147
-
148
-
149
-
150
-
151
-
152
-
153
-
154
-
155
-
156
-
157
-
158
-
159
-
160
-
161
-
162
-
163
-
164
-
165
-
166
-
167
-
168
-
169
-
170
-
171
-
172
-
173
-
174
-
175
-
176
-
177
-
178
-
179
-
180
-
181
-
182
-
183
-
184
-
185
-
186
-
187
-
188
-
189
-
190
-
191
-
192
-
193
-
194
-
195
-
196
-
197
-
198
-
199
-
200
-
201
-
202
-
203
-
204
-
205
-
206
-
207
-
208
-
209
-
210
-
211
-
212
-
213
-
214
-
215
-
216
-
217
-
218
-
219
-
220
-
221
-
222
-
223
-
224
-
225
-
226
-
227
-
228
-
229
-
230
-
231
-
232
-
233
-
234
-
235
-
236
-
237
-
238
-
239
-
240
-
241
-
242
-
243
-
244
-
245
-
246
-
247
-
248
-
249
-
250
-
251
-
252
-
253
-
254
-
255
-
256
-
257
-
258
-
259
-
260
-
261
-
262
-
263
-
 264
264 -
 265
265 -
 266
266 -
 267
267 -
 268
268 -
 269
269 -
 270
270 -
 271
271 -
 272
272 -
 273
273 -
 274
274 -
275
-
276
-
277
-
278
-
279
-
280
-
281
-
282
-
283
-
284
-
285
-
286
-
287
-
288
-
289
-
290
-
291
-
292
-
293
-
294
-
295
-
296
-
297
-
298
-
299
-
300
-
301
-
302
-
303
-
304
-
305
-
306
-
307
-
308
-
309
-
310
-
311
-
312
-
313
-
314
-
315
-
316
-
317
-
318
-
319
-
320
-
321
-
322
-
323
-
324
-
325
-
326
-
327
-
328
-
329
-
330
 |
 |