HP CM3530 HP Color LaserJet CM3530 MFP Embedded Web Server - User Guide - Page 45
Select Control Panel Messages to Suppress, Show All Alerts
 |
UPC - 884420196501
View all HP CM3530 manuals
Add to My Manuals
Save this manual to your list of manuals |
Page 45 highlights
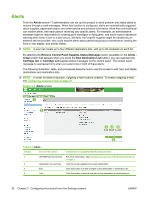
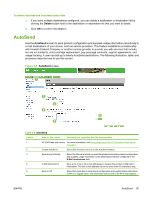
To configure alerts 1. Do one of the following: ● To create a new destination list, click New Destination List. -Or- ● To modify an existing destination list, click Edit next to the list that you want to modify. The Alerts - setup screen appears. 2. Type a name in the List Name field, such as Service or Supplies. 3. Type the e-mail addresses to designate the people who will receive alerts. In large environments, system administrators can route e-mail addresses to list servers, URLs, and mobile devices for expanded alerts. Add multiple destinations by separating each destination with a comma or semicolon. 4. Select the check box for the alerts that you want sent with this destination list. (To see all of the alerts that are available for the product, click Show All Alerts.) 5. Where applicable, set the threshold value for the individual alerts. The threshold value for service alerts and for the paper-path alerts is a user-specified number of minutes. This is the amount of time that an event will be ignored before an e-mail alert message is sent. For example, you might want to set the threshold value for the "Tray Open" alert to 10 minutes to allow someone to close the tray after loading the tray or clearing a jam. 6. Under Select Control Panel Messages to Suppress, select messages that you do not want to appear on the product control panel. This step applies only to messages that were selected to be received as alerts. NOTE: If the browser does not accept JavaScript, the check box for message suppression is always enabled. The check-box selection is validated when pressing the Apply button to submit the page. If the corresponding suppression alerts have not been selected, the Alerts - setup screen is reloaded with a warning message. The message warns that you must first select the corresponding alerts to suppress their appearance on the control panel. 7. Select the attachments to include with your e-mail alert messages. These attachments may include the following pages. (Go to the Information tab to see examples of these pages.) ● Supplies Status Page ● Usage Page ● Configuration Page ● Event Log Page ● XML Data Select the XML Data option if one of the destinations you have chosen to receive alerts is an automated computer system. Each item that you select will be attached to the e-mail. For example, if you select Usage Page and Event Log Page, you will receive one e-mail message with two attachments, one for each selection. If you also select the XML Data option, you will receive one e-mail message with three attachments: one attachment for the Usage Page in HTML, one for the Event Log in HTML, and a third consisting of instant support information in a text file attachment that has an .XML extension. ENWW Alerts 33
-
 1
1 -
2
-
3
-
4
-
5
-
6
-
7
-
8
-
9
-
10
-
11
-
12
-
13
-
14
-
15
-
16
-
17
-
18
-
19
-
20
-
21
-
22
-
23
-
24
-
25
-
26
-
27
-
28
-
29
-
30
-
31
-
32
-
33
-
34
-
35
-
36
-
37
-
38
-
39
-
 40
40 -
 41
41 -
 42
42 -
 43
43 -
 44
44 -
 45
45 -
 46
46 -
 47
47 -
 48
48 -
 49
49 -
 50
50 -
51
-
52
-
53
-
54
-
55
-
56
-
57
-
58
-
59
-
60
-
61
-
62
-
63
-
64
-
65
-
66
-
67
-
68
-
69
-
70
-
71
-
72
-
73
-
74
-
75
-
76
-
77
-
78
-
79
-
80
-
81
-
82
-
83
-
84
-
85
-
86
-
87
-
88
-
89
-
90
-
91
-
92
-
93
-
94
-
95
-
96
-
97
-
98
-
99
-
100
-
101
-
102
-
103
-
104
-
105
-
106
-
107
-
108
-
109
-
110
-
111
-
112
-
113
-
114
-
115
-
116
-
117
-
118
-
119
-
120
-
121
-
122
-
123
-
124
-
125
-
126
-
127
-
128
 |
 |
