HP DL120 ProLiant DL120 Generation 5 Server Maintenance and Service Guide - Page 39
Remove the new hard drive from its protective packaging.
 |
UPC - 884962061909
View all HP DL120 manuals
Add to My Manuals
Save this manual to your list of manuals |
Page 39 highlights
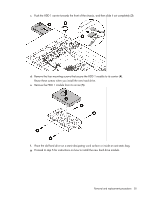
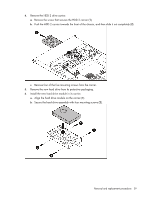
4. Remove the HDD 2 drive carrier. a. Remove the screw that secures the HDD 2 carrier (1). b. Push the HDD 2 carrier towards the front of the chassis, and then slide it out completely (2). c. Remove four of the five mounting screws from the carrier. 5. Remove the new hard drive from its protective packaging. 6. Install the new hard drive module in its carrier. a. Align the hard drive module on the carrier (1). b. Secure the hard drive assembly with four mounting screws (2). Removal and replacement procedures 39
-
 1
1 -
2
-
3
-
4
-
5
-
6
-
7
-
8
-
9
-
10
-
11
-
12
-
13
-
14
-
15
-
16
-
17
-
18
-
19
-
20
-
21
-
22
-
23
-
24
-
25
-
26
-
27
-
28
-
29
-
30
-
31
-
32
-
33
-
 34
34 -
 35
35 -
 36
36 -
 37
37 -
 38
38 -
 39
39 -
 40
40 -
 41
41 -
 42
42 -
 43
43 -
 44
44 -
45
-
46
-
47
-
48
-
49
-
50
-
51
-
52
-
53
-
54
-
55
-
56
-
57
-
58
-
59
-
60
-
61
-
62
-
63
-
64
-
65
-
66
-
67
-
68
-
69
-
70
-
71
-
72
-
73
-
74
-
75
-
76
-
77
-
78
-
79
-
80
-
81
-
82
-
83
-
84
-
85
-
86
-
87
-
88
-
89
-
90
-
91
-
92
-
93
-
94
-
95
-
96
-
97
-
98
-
99
-
100
-
101
-
102
-
103
-
104
-
105
-
106
-
107
-
108
 |
 |

Removal and replacement procedures
39
4.
Remove the HDD 2 drive carrier.
a.
Remove the screw that secures the HDD 2 carrier (
1
).
b.
Push the HDD 2 carrier towards the front of the chassis, and then slide it out completely (
2
).
c.
Remove four of the five mounting screws from the carrier.
5.
Remove the new hard drive from its protective packaging.
6.
Install the new hard drive module in its carrier.
a.
Align the hard drive module on the carrier (
1
).
b.
Secure the hard drive assembly with four mounting screws (
2
).