HP DL120 ProLiant DL120 Generation 5 Server Maintenance and Service Guide - Page 44
Place the old ODD module on a static-dissipating work surface or inside an anti-static bag.
 |
UPC - 884962061909
View all HP DL120 manuals
Add to My Manuals
Save this manual to your list of manuals |
Page 44 highlights
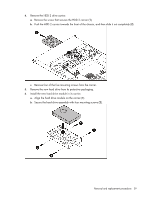
4. Remove the default optical disc drive from its carrier. a. Use a flat-blade M2.5 screwdriver to remove the four mounting screws that secure the ODD module to its carrier (1). Reuse these screws when you install the new ODD. b. Remove the default ODD module from its carrier (2). c. Place the old ODD module on a static-dissipating work surface or inside an anti-static bag. 5. Remove the new ODD module from its protective packaging. 6. Install the new ODD module in its carrier. a. Align the ODD module on the carrier (1). b. Secure the ODD assembly with four mounting screws (2). Removal and replacement procedures 44
-
 1
1 -
2
-
3
-
4
-
5
-
6
-
7
-
8
-
9
-
10
-
11
-
12
-
13
-
14
-
15
-
16
-
17
-
18
-
19
-
20
-
21
-
22
-
23
-
24
-
25
-
26
-
27
-
28
-
29
-
30
-
31
-
32
-
33
-
34
-
35
-
36
-
37
-
38
-
 39
39 -
 40
40 -
 41
41 -
 42
42 -
 43
43 -
 44
44 -
 45
45 -
 46
46 -
 47
47 -
 48
48 -
 49
49 -
50
-
51
-
52
-
53
-
54
-
55
-
56
-
57
-
58
-
59
-
60
-
61
-
62
-
63
-
64
-
65
-
66
-
67
-
68
-
69
-
70
-
71
-
72
-
73
-
74
-
75
-
76
-
77
-
78
-
79
-
80
-
81
-
82
-
83
-
84
-
85
-
86
-
87
-
88
-
89
-
90
-
91
-
92
-
93
-
94
-
95
-
96
-
97
-
98
-
99
-
100
-
101
-
102
-
103
-
104
-
105
-
106
-
107
-
108
 |
 |

Removal and replacement procedures
44
4.
Remove the default optical disc drive from its carrier.
a.
Use a flat-blade M2.5 screwdriver to remove the four mounting screws that secure the ODD
module to its carrier (
1
).
Reuse these screws when you install the new ODD.
b.
Remove the default ODD module from its carrier (
2
).
c.
Place the old ODD module on a static-dissipating work surface or inside an anti-static bag.
5.
Remove the new ODD module from its protective packaging.
6.
Install the new ODD module in its carrier.
a.
Align the ODD module on the carrier (
1
).
b.
Secure the ODD assembly with four mounting screws (
2
).