HP LH4r Microsoft Windows 2000 Installation Guide for HP Servers - Page 11
Computer Name and Administrator Password, Workgroup or Computer Domain
 |
View all HP LH4r manuals
Add to My Manuals
Save this manual to your list of manuals |
Page 11 highlights
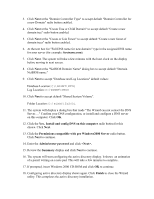
NOTE: If you see a dialog box titled "Digital Signature Not Found". Please click "Yes" to continue the installation and read Tip #14 in the troubleshooting section of this guide. 15. Click Next at the regional Settings screen. 16. At the Personalize Your Software screen, enter a name and organization. Then click Next. 17. Enter the product license key. 18. Click the Per Seat radio button. (At the Licensing modes screen) 19. Click Next 20. At the Computer Name and Administrator Password type in your computer name, administrator password and password confirmation. Then click Next. 21. Click Next at the Windows 2000 Component screen to accept default values. 22. Enter the proper date and time and click Next . 23. The Networking Setting screen starts with a progress bar chart. 24. Click Next to accept the default Typical settings. 25. Click Next at the Workgroup or Computer Domain to accept the default: "No, This computer is not on a network, or is on a network without a domain..." and "Workgroup or computer domain: WORKGROUP." NOTE: For Windows 2000 DataCenter, you must enter either the domain or workgroup name before you can proceed to the next step. 26. The Installing Components screen starts with a progress bar chart. It takes about 20 minutes to complete this section. The wizard will then start the "Performing Final Tasks" section to complete the installation. 27. Click Finish to complete the installation. Remove the CD from the drive. The system will then reboot from the hard drive. NOTE: There may be a period of time with no apparent activity after it displays a message that reads "OS Loader Version 5.0". Be patient. 28. Follow screen instructions to logon. Enter user-id and password. 29. Read Tip #18 to install the Windows 2000 Recovery Console to enhance the system's configuration.
-
 1
1 -
2
-
3
-
4
-
5
-
 6
6 -
 7
7 -
 8
8 -
 9
9 -
 10
10 -
 11
11 -
 12
12 -
 13
13 -
 14
14 -
 15
15 -
 16
16 -
17
-
18
-
19
-
20
-
21
-
22
-
23
-
24
-
25
-
26
-
27
-
28
-
29
-
30
-
31
-
32
-
33
-
34
-
35
-
36
-
37
-
38
-
39
-
40
-
41
-
42
-
43
-
44
-
45
-
46
-
47
-
48
-
49
-
50
-
51
-
52
-
53
-
54
-
55
-
56
 |
 |
