HP LH4r Microsoft Windows 2000 Installation Guide for HP Servers - Page 17
Installing the Client Utility on a Workstation, Test the Connection
 |
View all HP LH4r manuals
Add to My Manuals
Save this manual to your list of manuals |
Page 17 highlights
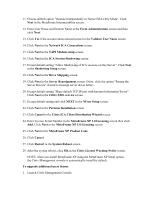
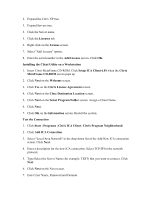
18. Select Terminal Services for 32-bit x86 windows. (Select the appropriate client type for your environment). 19. Click Format disk if needed. 20. Label two diskettes as "Terminal Services for 32-bit x86 Disk1" and "Terminal Services for 32-bit x86 Disk2". 21. Click OK. 22. Insert diskette one when prompted and click OK. 23. Insert diskette two when prompted and click OK. 24. Click OK at the screen that reads "2 floppies were created....". 25. Click the Close button to end the "Create Installation disks" utility. 26. Install Client Utility on each workstation that you want to use to connect to Terminal Server. 27. Configure clients to connect to target Terminal Server and test for communication functionality. Installing the Client Utility on a Workstation 28. Insert diskette 1 in the target client and run setup.exe. 29. Click Continue. 30. Complete the "Name and Organization Information" form. You will be prompted for this information only the first time the diskettes are used. 31. Click OK. 32. Click OK to confirm. 33. Click I Agree. 34. Click Large Icon button to start installation. 35. Click Yes to accept initial settings. (Make the choice you feel appropriate). 36. Insert diskette 2 when prompted and follow screen instructions. 37. Shutdown and restart workstation. Test the Connection 38. Click Start | Programs | Terminal Services Client.
-
 1
1 -
2
-
3
-
4
-
5
-
6
-
7
-
8
-
9
-
10
-
11
-
 12
12 -
 13
13 -
 14
14 -
 15
15 -
 16
16 -
 17
17 -
 18
18 -
 19
19 -
 20
20 -
 21
21 -
 22
22 -
23
-
24
-
25
-
26
-
27
-
28
-
29
-
30
-
31
-
32
-
33
-
34
-
35
-
36
-
37
-
38
-
39
-
40
-
41
-
42
-
43
-
44
-
45
-
46
-
47
-
48
-
49
-
50
-
51
-
52
-
53
-
54
-
55
-
56
 |
 |