HP LH4r Microsoft Windows 2000 Installation Guide for HP Servers - Page 22
Installing Windows 2000 DataCenter from the HP-Provided CD-ROM, Troubleshooting Tips and Tricks
 |
View all HP LH4r manuals
Add to My Manuals
Save this manual to your list of manuals |
Page 22 highlights
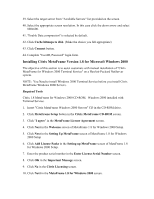
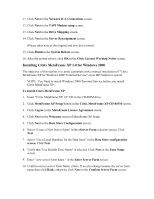
8. Click Next on the Next screen. 9. Click Finish to complete the ICA connection setup. 10. Click on the icon of the server name to establish connection with the server. Installing Windows 2000 DataCenter from the HP-Provided CD-ROM The following are the procedures for installing Microsoft Windows 2000 DataCenter Server from the HP-provided CD-ROM. For more information, please view the Windows 2000 DataCenter Readme file. 1. Insert the DataCenter CD and reboot the system. 2. The restore process will invoke Ghost(TM) a disk cloning application. The process will take several minutes to complete. 3. The user will be asked to specify the active partition size DataCenter is to be installed on. The minimum or default partition size is 2GB or 2048KB. The maximum (option: all) is the entire physical drive. Any remaining disk space will be unallocated. 4. Upon completion of the restore process, the DOS environment will appear. 5. Eject all CDs and diskettes and reboot the system. 6. Microsoft DataCenter will now begin its standard installation process. 7. Go to the Installing Windows 2000 section listed above to continue with the installation process, but first make a note of the following: · Optional components (e.g. mass storage, network adapters) and services (e.g. Terminal Services) may be added using the standard Windows 2000 procedures. However, when prompted for the location of the Windows 2000 CD-ROM enter the following path: c:\i386 · Do not use the Navigator CD to install drivers. Install drivers for optional components using the Windows DataCenter installation CD only. Troubleshooting Tips and Tricks This section provides information about known issues, solutions and workaround.
-
 1
1 -
2
-
3
-
4
-
5
-
6
-
7
-
8
-
9
-
10
-
11
-
12
-
13
-
14
-
15
-
16
-
 17
17 -
 18
18 -
 19
19 -
 20
20 -
 21
21 -
 22
22 -
 23
23 -
 24
24 -
 25
25 -
 26
26 -
 27
27 -
28
-
29
-
30
-
31
-
32
-
33
-
34
-
35
-
36
-
37
-
38
-
39
-
40
-
41
-
42
-
43
-
44
-
45
-
46
-
47
-
48
-
49
-
50
-
51
-
52
-
53
-
54
-
55
-
56
 |
 |