HP LaserJet Pro 200 HP LaserJet Pro 200 Color M251 - Software Technical Refere - Page 137
Upload Fonts, Auto-off, Information And Support, Memory, Printer Settings
 |
View all HP LaserJet Pro 200 manuals
Add to My Manuals
Save this manual to your list of manuals |
Page 137 highlights
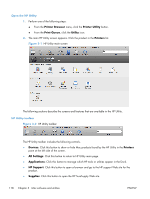
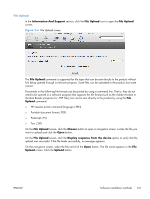
Upload Fonts In the Information And Support section, click the Upload Fonts icon to gain access to fonts that you can upload to the product. Figure 3-9 Upload Fonts screen The drop-down menu in the Upload Fonts pane has the following options: ● Memory. Fonts that are available in the product memory are listed. ● Disk. Select this option to show any fonts that are installed on the product hard disk or flash disk. By default, no fonts are stored on either of these disks. To upload fonts, select the font name, and then click the Add button. Auto-off In the Printer Settings section, click the Auto-off icon to configure the product to automatically turn off. Figure 3-10 Auto-off screen ENWW Software installation methods 123
-
 1
1 -
2
-
3
-
4
-
5
-
6
-
7
-
8
-
9
-
10
-
11
-
12
-
13
-
14
-
15
-
16
-
17
-
18
-
19
-
20
-
21
-
22
-
23
-
24
-
25
-
26
-
27
-
28
-
29
-
30
-
31
-
32
-
33
-
34
-
35
-
36
-
37
-
38
-
39
-
40
-
41
-
42
-
43
-
44
-
45
-
46
-
47
-
48
-
49
-
50
-
51
-
52
-
53
-
54
-
55
-
56
-
57
-
58
-
59
-
60
-
61
-
62
-
63
-
64
-
65
-
66
-
67
-
68
-
69
-
70
-
71
-
72
-
73
-
74
-
75
-
76
-
77
-
78
-
79
-
80
-
81
-
82
-
83
-
84
-
85
-
86
-
87
-
88
-
89
-
90
-
91
-
92
-
93
-
94
-
95
-
96
-
97
-
98
-
99
-
100
-
101
-
102
-
103
-
104
-
105
-
106
-
107
-
108
-
109
-
110
-
111
-
112
-
113
-
114
-
115
-
116
-
117
-
118
-
119
-
120
-
121
-
122
-
123
-
124
-
125
-
126
-
127
-
128
-
129
-
130
-
131
-
 132
132 -
 133
133 -
 134
134 -
 135
135 -
 136
136 -
 137
137 -
 138
138 -
 139
139 -
 140
140 -
 141
141 -
 142
142 -
143
-
144
-
145
-
146
-
147
-
148
-
149
-
150
-
151
-
152
-
153
-
154
-
155
-
156
-
157
-
158
-
159
-
160
-
161
-
162
-
163
-
164
-
165
-
166
-
167
-
168
-
169
-
170
-
171
-
172
 |
 |
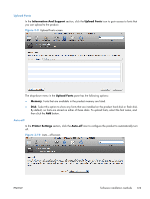
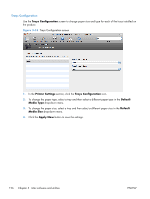
Upload Fonts
In the
Information And Support
section, click the
Upload Fonts
icon to gain access to fonts that
you can upload to the product.
Figure 3-9
Upload Fonts screen
The drop-down menu in the
Upload Fonts
pane has the following options:
●
Memory
. Fonts that are available in the product memory are listed.
●
Disk
. Select this option to show any fonts that are installed on the product hard disk or flash disk.
By default, no fonts are stored on either of these disks. To upload fonts, select the font name, and
then click the
Add
button.
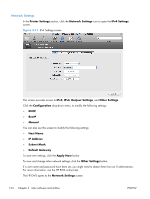
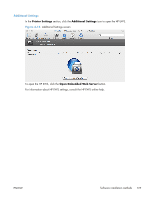
Auto-off
In the
Printer Settings
section, click the
Auto-off
icon to configure the product to automatically turn
off.
Figure 3-10
Auto—off screen
ENWW
Software installation methods
123