HP P4000 HP Smart Array SAS controllers for Integrity servers support guide - Page 42
Configuring a logical drive offline using ORCA
 |
View all HP P4000 manuals
Add to My Manuals
Save this manual to your list of manuals |
Page 42 highlights
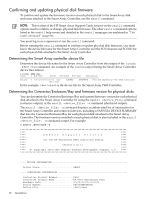
Before you set up a Smart Array Controller as a boot device, consider the following: • When you use a Smart Array logical drive as a boot device running HP-UX, you are limited in the configuration tasks you can perform with the saconfig configuration utility. The saconfig utility sees the logical drive as being in use, so configuration changes affecting that drive are not allowed until the drive is no longer the boot device. • When you are not using a logical drive as a boot device, if you clear the controller's configuration the logical drive is also deleted. If you want a logical drive to remain set up as a boot device, configure a logical drive and then complete the entire boot setup process again. • If you have trouble accessing RAID boot data, only limited troubleshooting tools are available. HP recommends booting from an alternative boot media and using STM and sautil online tools. For more information, see Chapter 4: "Troubleshooting" (page 65). Configuring a logical drive offline using ORCA Smart Array controllers support Option ROM Configuration for Arrays (ORCA) on HP Integrity servers. ORCA is a menu-driven system for creating, editing, and deleting logical drives. To access ORCA, follow the procedures in the installation guide for your controller. Installation guides are available on the HP website at: http://www.hp.com/go/hpux-iocards-docs Click the link for your HP-UX version. Installation guides are listed alphabetically in the "Setup and install - general" section. IMPORTANT: ORCA appearance, functionality, and keystrokes are not the same for all Smart Array controllers. This section provides a generic procedure using a P400 controller as an example. Always follow the on-screen prompts when using ORCA. Figure 2-1 ORCA Main Menu Screen To create a logical drive using ORCA: 1. Select Create Logical Drive. The screen displays a list of available (unconfigured) physical drives and the valid RAID options for the system. 42 Installation
-
 1
1 -
2
-
3
-
4
-
5
-
6
-
7
-
8
-
9
-
10
-
11
-
12
-
13
-
14
-
15
-
16
-
17
-
18
-
19
-
20
-
21
-
22
-
23
-
24
-
25
-
26
-
27
-
28
-
29
-
30
-
31
-
32
-
33
-
34
-
35
-
36
-
 37
37 -
 38
38 -
 39
39 -
 40
40 -
 41
41 -
 42
42 -
 43
43 -
 44
44 -
 45
45 -
 46
46 -
 47
47 -
48
-
49
-
50
-
51
-
52
-
53
-
54
-
55
-
56
-
57
-
58
-
59
-
60
-
61
-
62
-
63
-
64
-
65
-
66
-
67
-
68
-
69
-
70
-
71
-
72
-
73
-
74
-
75
-
76
-
77
-
78
-
79
-
80
-
81
-
82
-
83
-
84
-
85
-
86
-
87
-
88
-
89
-
90
-
91
-
92
-
93
-
94
-
95
-
96
-
97
-
98
-
99
-
100
-
101
-
102
-
103
-
104
-
105
-
106
-
107
-
108
-
109
-
110
-
111
-
112
-
113
-
114
-
115
-
116
-
117
-
118
-
119
-
120
-
121
-
122
-
123
-
124
-
125
-
126
-
127
-
128
-
129
-
130
-
131
-
132
-
133
-
134
-
135
-
136
-
137
-
138
-
139
-
140
-
141
-
142
 |
 |