HP P4000 HP Smart Array SAS controllers for Integrity servers support guide - Page 58
Performing stripe size migration, Extending the capacity of a logical drive
 |
View all HP P4000 manuals
Add to My Manuals
Save this manual to your list of manuals |
Page 58 highlights
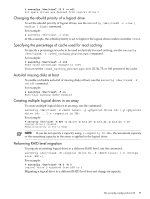
NOTE: If you do not specify a stripe size using -S , the default stripe size is used. For information on the RAID levels supported by each Smart Array controller, see "Supported RAID modes, by controller" (page 26). Performing stripe size migration To perform a migration of a logical drive to a different stripe size, use the command: saconfig /dev/cissX -M -S For example: # saconfig /dev/ciss5 -M 0 -S 64 Logical drive 0 migrated from stripe 16 to 64 KB Extending the capacity of a logical drive WARNING! The logical drive capacity specified with option c must be larger than the existing capacity, or data loss occurs. To extend the capacity of a logical drive in an array by adding storage space from existing physical disks, use the command: saconfig /dev/cissX -E -c For example: # saconfig /dev/ciss5 -E 0 -c 15 Logical drive 0 extended from 10.0 GB to 15 GB in capacity Expanding the capacity of an array To add physical disks to an array, use capacity expansion. The number of logical drives that exists in the array before the expansion remains the same, and the capacity of each logical drive that exists in the array remains unchanged. Expansion only increases the amount of free space in the array. To expand the capacity of an array by adding physical disks, use the command: saconfig /dev/cissX -E -p [-p ...] For example: # saconfig /dev/ciss5 -E 0 -p 2I:1:16 -p 2I:1:14 Logical drive 0 expanded from 4 to 6 physical drives NOTE: You can specify any logical drive in an array with -E to expand the array. The data in all logical drives in the array is redistributed to make use of the added physical disk space. Changing the expand priority To change the expand priority of the controller to low, medium, or high, use the following command: saconfig /dev/cissX -e [low|medium|high] Where: cissX The device file for the Smart Array controller. [low|medium|high] The priority level of the capacity expansion. 58 Configuration
-
 1
1 -
2
-
3
-
4
-
5
-
6
-
7
-
8
-
9
-
10
-
11
-
12
-
13
-
14
-
15
-
16
-
17
-
18
-
19
-
20
-
21
-
22
-
23
-
24
-
25
-
26
-
27
-
28
-
29
-
30
-
31
-
32
-
33
-
34
-
35
-
36
-
37
-
38
-
39
-
40
-
41
-
42
-
43
-
44
-
45
-
46
-
47
-
48
-
49
-
50
-
51
-
52
-
 53
53 -
 54
54 -
 55
55 -
 56
56 -
 57
57 -
 58
58 -
 59
59 -
 60
60 -
 61
61 -
 62
62 -
 63
63 -
64
-
65
-
66
-
67
-
68
-
69
-
70
-
71
-
72
-
73
-
74
-
75
-
76
-
77
-
78
-
79
-
80
-
81
-
82
-
83
-
84
-
85
-
86
-
87
-
88
-
89
-
90
-
91
-
92
-
93
-
94
-
95
-
96
-
97
-
98
-
99
-
100
-
101
-
102
-
103
-
104
-
105
-
106
-
107
-
108
-
109
-
110
-
111
-
112
-
113
-
114
-
115
-
116
-
117
-
118
-
119
-
120
-
121
-
122
-
123
-
124
-
125
-
126
-
127
-
128
-
129
-
130
-
131
-
132
-
133
-
134
-
135
-
136
-
137
-
138
-
139
-
140
-
141
-
142
 |
 |