HP P4000 HP Smart Array SAS controllers for Integrity servers support guide - Page 59
Using ORCA, Creating a logical drive, the Smart Array Controllers, see
 |
View all HP P4000 manuals
Add to My Manuals
Save this manual to your list of manuals |
Page 59 highlights
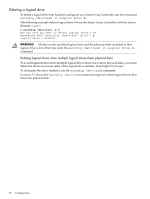
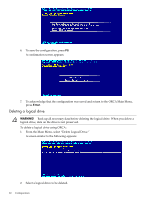
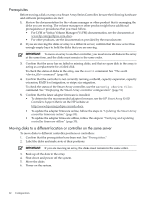
When you create a logical drive after the controller configuration is cleared, or after the last logical drive is deleted, the expand priority of the controller defaults to "medium." You can use saconfig with the -e option to change the expand priority. The expand priority setting applies to both "Extending the capacity of a logical drive" and "Expanding the capacity of an array." Using ORCA HP Smart Array controllers include ORCA, a menu-driven, ROM-based offline configuration utility. You can use ORCA to create, view, and delete logical drives before loading an operating system. To access ORCA, follow the procedures in the installation guide for your controller. Installation guides are available on the HP website at: http://www.hp.com/go/hpux-iocards-docs Click the link for your HP-UX version. Installation guides are listed alphabetically in the "Setup and install - general" section. IMPORTANT: ORCA appearance, functionality, and keystrokes are not the same for all Smart Array controllers. This section provides a generic procedure using a typical Smart Array controller as an example. Always follow the on-screen prompts when using ORCA. Creating a logical drive To create a logical drive using ORCA: 1. From the Main Menu, select "Create Logical Drive." A screen similar to the following appears: 2. Select the physical disks to be included in the logical drive in the Available Physical Drives section. 3. To select the Raid Configurations section and select the RAID type for the logical drive, press Tab. NOTE: You cannot use ORCA to configure a single spare drive to be shared among several arrays. To configure shared spare drives, use the saconfig command. See "Adding a spare disk drive" (page 56). For a summary of the important features of the RAID configurations that are supported by the Smart Array Controllers, see "Fault management in supported RAID configurations" (page 24). For information to help you determine which option is best for your computing environment, see "Choosing a RAID method" (page 25). 4. To select the Spare section and assign spare disks, as needed, press Tab. 5. To create the logical drive, press Enter. A summary of your choices appears: Using ORCA 59
-
 1
1 -
2
-
3
-
4
-
5
-
6
-
7
-
8
-
9
-
10
-
11
-
12
-
13
-
14
-
15
-
16
-
17
-
18
-
19
-
20
-
21
-
22
-
23
-
24
-
25
-
26
-
27
-
28
-
29
-
30
-
31
-
32
-
33
-
34
-
35
-
36
-
37
-
38
-
39
-
40
-
41
-
42
-
43
-
44
-
45
-
46
-
47
-
48
-
49
-
50
-
51
-
52
-
53
-
 54
54 -
 55
55 -
 56
56 -
 57
57 -
 58
58 -
 59
59 -
 60
60 -
 61
61 -
 62
62 -
 63
63 -
 64
64 -
65
-
66
-
67
-
68
-
69
-
70
-
71
-
72
-
73
-
74
-
75
-
76
-
77
-
78
-
79
-
80
-
81
-
82
-
83
-
84
-
85
-
86
-
87
-
88
-
89
-
90
-
91
-
92
-
93
-
94
-
95
-
96
-
97
-
98
-
99
-
100
-
101
-
102
-
103
-
104
-
105
-
106
-
107
-
108
-
109
-
110
-
111
-
112
-
113
-
114
-
115
-
116
-
117
-
118
-
119
-
120
-
121
-
122
-
123
-
124
-
125
-
126
-
127
-
128
-
129
-
130
-
131
-
132
-
133
-
134
-
135
-
136
-
137
-
138
-
139
-
140
-
141
-
142
 |
 |