HP PSC 1600 HP PSC 1600 All-in-One series User Guide - Page 41
Print a proof sheet, Complete the proof sheet, Proof Sheet, Print, Select Photos, Last 20 - ink cartridge
 |
View all HP PSC 1600 manuals
Add to My Manuals
Save this manual to your list of manuals |
Page 41 highlights
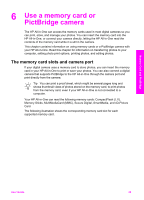
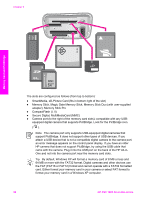
Memory Card and PictBridge Chapter 6 photos using a proof sheet, you need to print the proof sheet, complete it, and then scan it. Printing photos from a proof sheet is done in three steps: printing a proof sheet, completing the proof sheet, and scanning the proof sheet. This section contains detailed information on all three steps. Leave your memory card in the slot until after you have completed all three steps (printed, completed, and scanned your proof sheet) and your photos have printed. If you remove the memory card or insert a different memory card, the photos you select will not print. Print a proof sheet The first step in using a proof sheet is to print it from the HP All-in-One. 1. Insert the memory card into the appropriate slot on your HP All-in-One. Note Leave the memory card in the slot until after you have printed, completed, and scanned your proof sheet and your photos have printed. If you remove the memory card or insert a different memory card, the photos you select will not print. 2. Press Proof Sheet, and then press OK. This displays the Proof Sheet menu and then selects Print. Note Depending on how many photos are on the memory card, the time it takes to print a proof sheet can vary greatly. 3. If there are more than 20 photos on the card, the Select Photos menu appears. Press to scroll to the option you want to select, and then press OK. - All - Last 20 - Custom Range 4. If you choose Custom Range, you must enter the photo index numbers for the first and last photos you want to print. When the First Photo prompt displays, press until the number for the first photo in the range displays, and then press OK. Note If you enter the wrong number, press Cancel to cancel the process and then start over. 5. When the Last Photo prompt displays, press until the number for the last photo in the range displays, and then press OK. Complete the proof sheet After you have printed a proof sheet, you can use it to select the photos you want to print. Note You might want to use a photo print cartridge for superior print quality. With the tri-color and photo print cartridges installed, you have a six-ink system. For more information, see Use a photo print cartridge. 38 HP PSC 1600 All-in-One series
-
 1
1 -
2
-
3
-
4
-
5
-
6
-
7
-
8
-
9
-
10
-
11
-
12
-
13
-
14
-
15
-
16
-
17
-
18
-
19
-
20
-
21
-
22
-
23
-
24
-
25
-
26
-
27
-
28
-
29
-
30
-
31
-
32
-
33
-
34
-
35
-
 36
36 -
 37
37 -
 38
38 -
 39
39 -
 40
40 -
 41
41 -
 42
42 -
 43
43 -
 44
44 -
 45
45 -
 46
46 -
47
-
48
-
49
-
50
-
51
-
52
-
53
-
54
-
55
-
56
-
57
-
58
-
59
-
60
-
61
-
62
-
63
-
64
-
65
-
66
-
67
-
68
-
69
-
70
-
71
-
72
-
73
-
74
-
75
-
76
-
77
-
78
-
79
-
80
-
81
-
82
-
83
-
84
-
85
-
86
-
87
-
88
-
89
-
90
-
91
-
92
-
93
-
94
-
95
-
96
-
97
-
98
-
99
-
100
-
101
-
102
-
103
-
104
-
105
-
106
-
107
-
108
-
109
-
110
-
111
-
112
-
113
-
114
-
115
-
116
-
117
-
118
-
119
-
120
-
121
-
122
-
123
-
124
-
125
-
126
-
127
-
128
-
129
-
130
-
131
-
132
-
133
-
134
 |
 |