HP Smart Tank 7300 User Guide - Page 78
Printing issues, To resolve print issues (Windows)
 |
View all HP Smart Tank 7300 manuals
Add to My Manuals
Save this manual to your list of manuals |
Page 78 highlights
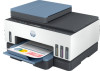
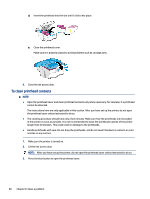
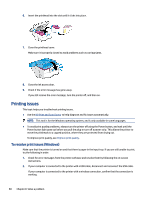
6. Insert the printhead into the slot until it clicks into place. 7. Close the printhead cover. Make sure it is properly closed to avoid problems such as carriage jams. 8. Close the ink access door. 9. Check if the error message has gone away. If you still receive the error message, turn the printer off, and then on. Printing issues This topic helps you troubleshoot printing issues. ● Use the HP Print and Scan Doctor to help diagnose and fix issues automatically. NOTE: This tool is for the Windows operating system, and is only available in some languages. ● To avoid print quality problems, always turn the printer off using the Power button, and wait until the Power button light goes out before you pull the plug or turn off a power strip. This allows the printer to move the printheads to a capped position, where they are protected from drying out. To improve print quality, see Improve print quality. To resolve print issues (Windows) Make sure that the printer is turned on and that there is paper in the input tray. If you are still unable to print, try the following in order: 1. Check for error messages from the printer software and resolve them by following the on-screen instructions. 2. If your computer is connected to the printer with a USB cable, disconnect and reconnect the USB cable. If your computer is connected to the printer with a wireless connection, confirm that the connection is working. 68 Chapter 8 Solve a problem
-
 1
1 -
2
-
3
-
4
-
5
-
6
-
7
-
8
-
9
-
10
-
11
-
12
-
13
-
14
-
15
-
16
-
17
-
18
-
19
-
20
-
21
-
22
-
23
-
24
-
25
-
26
-
27
-
28
-
29
-
30
-
31
-
32
-
33
-
34
-
35
-
36
-
37
-
38
-
39
-
40
-
41
-
42
-
43
-
44
-
45
-
46
-
47
-
48
-
49
-
50
-
51
-
52
-
53
-
54
-
55
-
56
-
57
-
58
-
59
-
60
-
61
-
62
-
63
-
64
-
65
-
66
-
67
-
68
-
69
-
70
-
71
-
72
-
 73
73 -
 74
74 -
 75
75 -
 76
76 -
 77
77 -
 78
78 -
 79
79 -
 80
80 -
 81
81 -
 82
82 -
 83
83 -
84
-
85
-
86
-
87
-
88
-
89
-
90
-
91
-
92
-
93
-
94
-
95
-
96
-
97
-
98
-
99
-
100
-
101
-
102
-
103
-
104
 |
 |