HP StorageWorks 300 HP StorageWorks 300 Virtual Library System user guide (AH1 - Page 91
Managing catridges, Private LAN dual pathing
 |
View all HP StorageWorks 300 manuals
Add to My Manuals
Save this manual to your list of manuals |
Page 91 highlights
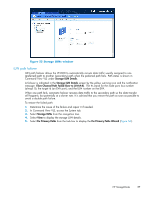
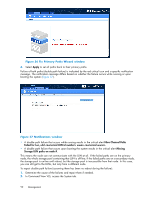
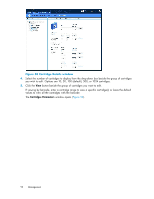
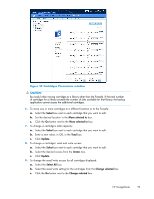
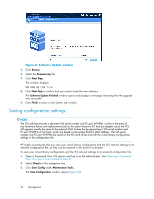
3. Select Storage LUNs from the navigation tree. 4. Select Fix Primary Paths from the task bar to display the Fix Primary Paths Wizard. 5. Select Apply to set all paths back to their original settings. CAUTION: If you attempt to reboot during a path failure without first repairing the failure, the array might reassign paths or fail-over preferences. This will limit device performance because all data traffic will be routed through a single controller. To restore performance, from Command View EVA: 1. Reset path fail-over preferences for each LUN to no preference. 2. Save the presentation. 3. Reset the path fail-over preferences back to their original values. 4. Save the presentation. 5. Reboot the VLS system. Private LAN dual pathing The private LAN on the VLS300 has dual pathing which consists of a cable from each switch to each node. If a LAN switch or a path to a LAN switch fails, the data transfer will automatically fail-over to the other available switch. • The primary path is through NIC 2 of the switch and is referred to in the error notification as eth1. If the LAN switch associated with NIC2 fails, the Notifications tab will display all eth1 failures. • The secondary path is through the USB LAN cable and is identified as eth2 in the error notification. If the LAN switch associated with the USB LAN cable fails, the Notifications tab will display all eth2 failures. • If both paths fail, the critical alert will identify bond 0 as the combined failed path. If both paths from the private LAN to a secondary node fails, the node is off-line; but if both paths to a primary node fails, the whole device is off-line. When a failure occurs, repair the failure. In most cases, the system will automatically recognize that the repair is complete and restore the path or paths without having to reboot the system; however, you may need to reboot the system if the repair includes installing a new USB LAN adapter. Managing cartridges You can change the following parameters for existing cartridges: • Library with which they are associated • Capacity • Write access To view and/or modify cartridges settings: 1. Open a Command View VLS session and log in as the administrator. See Opening a Command View VLS session from Command View TL. 2. Click the System tab. 3. Select Cartridges in the navigation tree. The Cartridge Details window opens (Figure 58). HP StorageWorks 91
-
 1
1 -
2
-
3
-
4
-
5
-
6
-
7
-
8
-
9
-
10
-
11
-
12
-
13
-
14
-
15
-
16
-
17
-
18
-
19
-
20
-
21
-
22
-
23
-
24
-
25
-
26
-
27
-
28
-
29
-
30
-
31
-
32
-
33
-
34
-
35
-
36
-
37
-
38
-
39
-
40
-
41
-
42
-
43
-
44
-
45
-
46
-
47
-
48
-
49
-
50
-
51
-
52
-
53
-
54
-
55
-
56
-
57
-
58
-
59
-
60
-
61
-
62
-
63
-
64
-
65
-
66
-
67
-
68
-
69
-
70
-
71
-
72
-
73
-
74
-
75
-
76
-
77
-
78
-
79
-
80
-
81
-
82
-
83
-
84
-
85
-
 86
86 -
 87
87 -
 88
88 -
 89
89 -
 90
90 -
 91
91 -
 92
92 -
 93
93 -
 94
94 -
 95
95 -
 96
96 -
97
-
98
-
99
-
100
-
101
-
102
-
103
-
104
-
105
-
106
-
107
-
108
-
109
-
110
-
111
-
112
-
113
-
114
-
115
-
116
-
117
-
118
-
119
-
120
-
121
-
122
-
123
-
124
-
125
-
126
-
127
-
128
-
129
-
130
-
131
-
132
-
133
-
134
-
135
-
136
-
137
-
138
-
139
-
140
-
141
-
142
-
143
-
144
-
145
-
146
-
147
-
148
-
149
-
150
-
151
-
152
-
153
-
154
-
155
-
156
-
157
-
158
-
159
-
160
-
161
-
162
-
163
-
164
-
165
-
166
-
167
-
168
-
169
-
170
-
171
-
172
-
173
-
174
-
175
-
176
-
177
-
178
-
179
-
180
 |
 |