HP TouchSmart IQ700 HP TouchSmart Desktop PCs - User Guide - Page 54
Installing a memory module, Complete the procedures to replace the rear cover - screen is blank
 |
View all HP TouchSmart IQ700 manuals
Add to My Manuals
Save this manual to your list of manuals |
Page 54 highlights
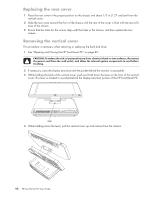
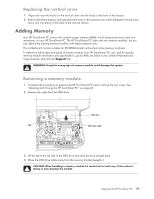
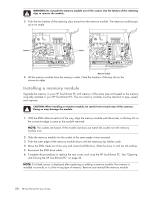
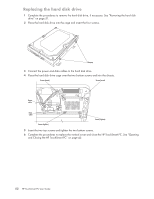
WARNING: Do not pull the memory module out of the socket. Use the latches of the retaining clips to remove the module. 5 Push the two latches of the retaining clips away from the memory module. The memory module pops up at an angle. Latches Latches Memory module 6 Lift the memory module from the memory socket. Note the location of the key slot on the connector edge. Installing a memory module Upgrade the memory in your HP TouchSmart PC with memory of the same type and speed as the memory originally installed in your HP TouchSmart PC. The two memory modules must be identical in type, speed, and capacity. CAUTION: When handling a memory module, be careful not to touch any of the contacts. Doing so may damage the module. 1 With the DVD cable moved out of the way, align the memory module with the socket, so the key slot on the connector edge is same as the module removed. NOTE: The sockets are keyed. If the module slot does not match the socket, turn the memory module over. 2 Slide the memory module into the socket at the same angle it was removed. 3 Push the outer edge of the memory module down until the retaining clip latches catch. 4 Move the DVD cable out of the way and insert the DVD drive. Slide the drive in until the tab catches. 5 Reconnect the DVD drive cable. 6 Complete the procedures to replace the rear cover, and close the HP TouchSmart PC. See "Opening and Closing the HP TouchSmart PC" on page 45. NOTE: If a blank screen is displayed after replacing or adding a memory module, the memory is installed incorrectly or it is the wrong type of memory. Remove and reinstall the memory module. 50 HP TouchSmart PC User Guide
-
 1
1 -
2
-
3
-
4
-
5
-
6
-
7
-
8
-
9
-
10
-
11
-
12
-
13
-
14
-
15
-
16
-
17
-
18
-
19
-
20
-
21
-
22
-
23
-
24
-
25
-
26
-
27
-
28
-
29
-
30
-
31
-
32
-
33
-
34
-
35
-
36
-
37
-
38
-
39
-
40
-
41
-
42
-
43
-
44
-
45
-
46
-
47
-
48
-
 49
49 -
 50
50 -
 51
51 -
 52
52 -
 53
53 -
 54
54 -
 55
55 -
 56
56 -
 57
57 -
 58
58 -
 59
59 -
60
-
61
-
62
-
63
-
64
 |
 |
