HP TouchSmart IQ700 HP TouchSmart Desktop PCs - User Guide - Page 56
Replacing the hard disk drive, Insert the two top screws and tighten the two bottom screws.
 |
View all HP TouchSmart IQ700 manuals
Add to My Manuals
Save this manual to your list of manuals |
Page 56 highlights
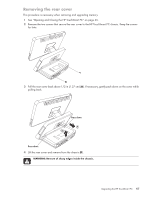
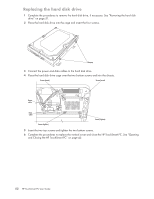
Replacing the hard disk drive 1 Complete the procedures to remove the hard disk drive, if necessary. See "Removing the hard disk drive" on page 51. 2 Place the hard disk drive into the cage and insert the four screws. Screws 3 Connect the power and data cables to the hard disk drive. 4 Place the hard disk drive cage over the two bottom screws and into the chassis. Screw (insert) Screw (insert) Power cable Data cable Screw (tighten) Screw (tighten) 5 Insert the two top screws and tighten the two bottom screws. 6 Complete the procedures to replace the vertical cover and close the HP TouchSmart PC. See "Opening and Closing the HP TouchSmart PC" on page 45. 52 HP TouchSmart PC User Guide
-
 1
1 -
2
-
3
-
4
-
5
-
6
-
7
-
8
-
9
-
10
-
11
-
12
-
13
-
14
-
15
-
16
-
17
-
18
-
19
-
20
-
21
-
22
-
23
-
24
-
25
-
26
-
27
-
28
-
29
-
30
-
31
-
32
-
33
-
34
-
35
-
36
-
37
-
38
-
39
-
40
-
41
-
42
-
43
-
44
-
45
-
46
-
47
-
48
-
49
-
50
-
 51
51 -
 52
52 -
 53
53 -
 54
54 -
 55
55 -
 56
56 -
 57
57 -
 58
58 -
 59
59 -
 60
60 -
 61
61 -
62
-
63
-
64
 |
 |

52
HP TouchSmart PC User Guide
Replacing the hard disk drive
1
Complete the procedures to remove the hard disk drive, if necessary. See “Removing the hard disk
drive” on page 51.
2
Place the hard disk drive into the cage and insert the four screws.
3
Connect the power and data cables to the hard disk drive.
4
Place the hard disk drive cage over the two bottom screws and into the chassis.
5
Insert the two top screws and tighten the two bottom screws.
6
Complete the procedures to replace the vertical cover and close the HP TouchSmart PC. See “Opening
and Closing the HP TouchSmart PC” on page 45.
Screws
Power
cable
Data
cable
Screw (tighten)
Screw (tighten)
Screw (insert)
Screw (insert)