HP t505 Administrator Guide - Page 17
Navigating the interface, Using the taskbar
 |
View all HP t505 manuals
Add to My Manuals
Save this manual to your list of manuals |
Page 17 highlights
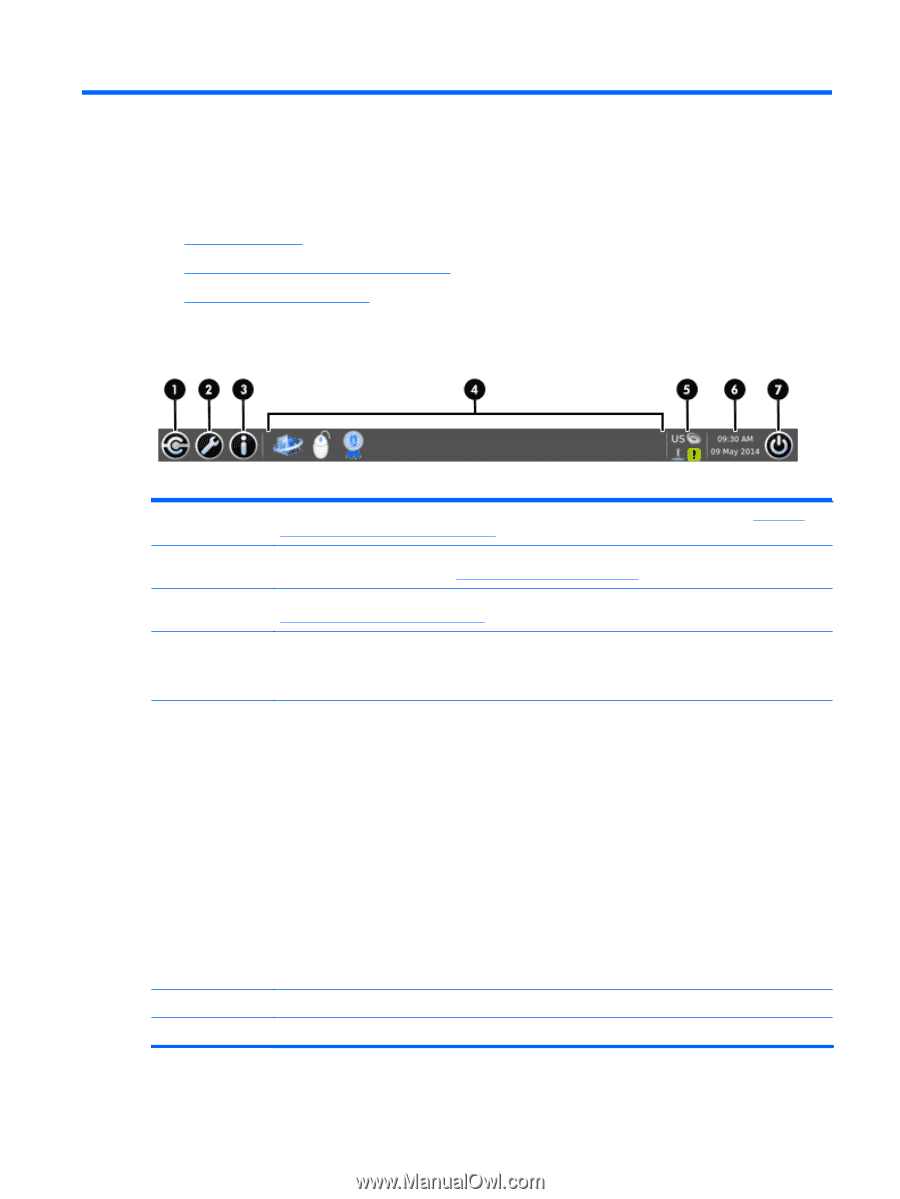
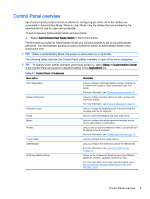
3 Navigating the interface This chapter discusses the following topics: ● Using the taskbar ● Using the Connection Manager controls ● Viewing system information Using the taskbar Table 3-1 Taskbar components 1 Connection Manager-Use to start, stop, add, edit, and delete remote connections. See Using the Connection Manager controls on page 6 for more information. 2 Control Panel-Use to configure the client, switch between Administrator Mode and User Mode, and check for software updates. See Control Panel overview on page 9 for more information. 3 System Information-Use to view system, network, and software information about the client. See Viewing system information on page 7 for more information. 4 Application area-Displays the icons for the currently open applications. TIP: You can hold down Ctrl+Alt and then press Tab repeatedly to select an application to bring to the foreground. 5 System tray-Provides quick access to or provides information about certain utilities, applications, and functions. Items in the system tray can include the following, but some items might not appear depending on the system configuration: ● Audio mixer ● Virtual keyboard ● Network status ● Automatic Update status-A green icon with a checkmark indicates that Automatic Update finished successfully. A yellow icon with an exclamation point indicates that the Automatic Update server was not found or that there are some problems with the server-side settings. A red icon with an X indicates that Automatic Update failed, such as when a package or profile is invalid. A blue icon with a spinning arrow indicates that Automatic Update is currently checking for updates. ● Smart Common Input Method (SCIM) controls ● Citrix applications 6 Date and time-Displays the current date and time. Click to access the date and time settings. 7 Power button-Use to log out of, reboot, or power off the client. Using the taskbar 5
-
 1
1 -
2
-
3
-
4
-
5
-
6
-
7
-
8
-
9
-
10
-
11
-
 12
12 -
 13
13 -
 14
14 -
 15
15 -
 16
16 -
 17
17 -
 18
18 -
 19
19 -
 20
20 -
 21
21 -
 22
22 -
23
-
24
-
25
-
26
-
27
-
28
-
29
-
30
-
31
-
32
-
33
-
34
-
35
-
36
-
37
-
38
-
39
-
40
-
41
-
42
-
43
-
44
-
45
-
46
-
47
-
48
-
49
-
50
-
51
-
52
-
53
-
54
-
55
-
56
-
57
-
58
-
59
-
60
-
61
-
62
-
63
-
64
-
65
-
66
-
67
-
68
-
69
-
70
-
71
-
72
-
73
-
74
-
75
-
76
-
77
-
78
-
79
-
80
-
81
-
82
-
83
-
84
-
85
-
86
-
87
-
88
-
89
-
90
-
91
-
92
-
93
-
94
-
95
-
96
-
97
-
98
-
99
-
100
-
101
-
102
-
103
-
104
-
105
-
106
-
107
-
108
-
109
-
110
-
111
-
112
-
113
-
114
-
115
-
116
-
117
-
118
-
119
-
120
-
121
-
122
-
123
-
124
-
125
-
126
-
127
-
128
-
129
-
130
-
131
-
132
-
133
-
134
-
135
-
136
-
137
-
138
-
139
-
140
-
141
-
142
-
143
-
144
-
145
-
146
-
147
-
148
-
149
-
150
-
151
-
152
-
153
-
154
-
155
-
156
-
157
-
158
-
159
-
160
-
161
-
162
-
163
 |
 |