HP t505 Administrator Guide - Page 69
Obtaining HP Smart Client Services, Viewing the Automatic Update website
 |
View all HP t505 manuals
Add to My Manuals
Save this manual to your list of manuals |
Page 69 highlights
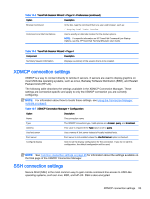
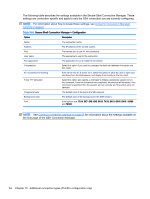
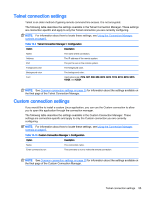
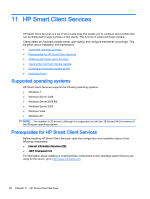
Obtaining HP Smart Client Services To obtain HP Smart Client Services: 1. Go to http://www.hp.com/support. 2. Search for the thin client model. HP Smart Client Services can be found under the Software - System Management category of the Drivers, Software & Firmware page. Viewing the Automatic Update website 1. On the server desktop, select Start > Control Panel, and then click Administrative Tools. 2. Double-click Internet Information Services (IIS) Manager. 3. In the left pane of the IIS Manager, expand the following items: "Server name" > Sites > HP Automatic Update > auto-update NOTE: The physical location where the Automatic Update files are stored is as follows: C:\Program Files (x86)\Hewlett-Packard\HP Smart Client Service\auto-update Creating an Automatic Update profile This section describes how to create an Automatic Update profile for a single MAC address. 1. Obtain the MAC address of the client using the system info. For example, the following steps use the MAC address 00fcab8522ac. 2. Use the Profile Editor to create or modify a client profile (see Using the Profile Editor on page 60) until you are ready to save the client profile. 3. In the Profile Editor, click the Finish link in the left-hand pane to access the Current profile pane. 4. Click Save profile as to save the client profile as the following: C:\Program Files (x86) Hewlett-Packard\HP Smart Client Service\autoupdate\PersistentProfile\MAC\00fcab8522ac.xml 5. Click the Finish button in the Current profile pane to exit the Profile Editor. 6. Reboot the client that uses the specified MAC address to initiate the Automatic Update process. Updating clients ● Using the broadcast update method ● Using the DHCP tag update method ● Using the DNS alias update method ● Using the manual update method Using the broadcast update method To do a broadcast update, plug the client into the same network as the update server. A broadcast update relies on HP Smart Client Services, which works with IIS to automatically push updates to the client. Obtaining HP Smart Client Services 57
-
 1
1 -
2
-
3
-
4
-
5
-
6
-
7
-
8
-
9
-
10
-
11
-
12
-
13
-
14
-
15
-
16
-
17
-
18
-
19
-
20
-
21
-
22
-
23
-
24
-
25
-
26
-
27
-
28
-
29
-
30
-
31
-
32
-
33
-
34
-
35
-
36
-
37
-
38
-
39
-
40
-
41
-
42
-
43
-
44
-
45
-
46
-
47
-
48
-
49
-
50
-
51
-
52
-
53
-
54
-
55
-
56
-
57
-
58
-
59
-
60
-
61
-
62
-
63
-
 64
64 -
 65
65 -
 66
66 -
 67
67 -
 68
68 -
 69
69 -
 70
70 -
 71
71 -
 72
72 -
 73
73 -
 74
74 -
75
-
76
-
77
-
78
-
79
-
80
-
81
-
82
-
83
-
84
-
85
-
86
-
87
-
88
-
89
-
90
-
91
-
92
-
93
-
94
-
95
-
96
-
97
-
98
-
99
-
100
-
101
-
102
-
103
-
104
-
105
-
106
-
107
-
108
-
109
-
110
-
111
-
112
-
113
-
114
-
115
-
116
-
117
-
118
-
119
-
120
-
121
-
122
-
123
-
124
-
125
-
126
-
127
-
128
-
129
-
130
-
131
-
132
-
133
-
134
-
135
-
136
-
137
-
138
-
139
-
140
-
141
-
142
-
143
-
144
-
145
-
146
-
147
-
148
-
149
-
150
-
151
-
152
-
153
-
154
-
155
-
156
-
157
-
158
-
159
-
160
-
161
-
162
-
163
 |
 |