IC Realtime HDVR-MX0402-1U5MP-AI2-WEB Product Manual - Page 37
Local Configurations
 |
View all IC Realtime HDVR-MX0402-1U5MP-AI2-WEB manuals
Add to My Manuals
Save this manual to your list of manuals |
Page 37 highlights
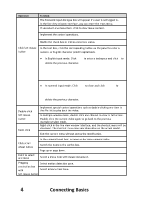
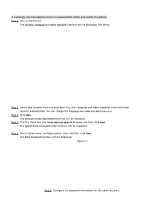
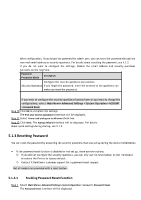
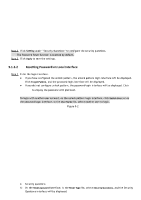
5 Local Configurations Read the following notes prior to using the Device. ● The interfaces in the Manual are used for explaining the operations and only for reference. The actual interface may differ depending on the model or firmware version purchased. If there is an inconsistency between the Manual and the actual product, the actual product shall govern. ● This Manual is a general document for explaining the product, so there may be some functions described for the Device in the Manual that do not apply to the model you purchased. ● Conventions for mouse operations on a menu. ◇ Click: On the menu, left-click the mouse once on an option to enter the option setting. ◇ Right-click: On any interface, right-click the mouse once to return to the previous level. For details about mouse operations, see "3.4 Mouse Operations." 5.1 Initial Settings 5.1.1 Booting up ● Ensure the input voltage corresponds to the power requirement of the Device. Power on the Device after the power cable is properly connected. ● To protect the Device, connect the power cable to the Device first, and then connect to the power source. ● To ensure the stable work of the Device and the external devices connected to the Device and to prolong the HDD life, it is recommended to refer to the national related standard to use the power source that provides stable voltage with less interference from ripples. UPS power source is recommended. Step 1 Connect the Device to the monitor. Step 2 Plug in the power cable to the Device. Step 3 Press the power button to turn on the Device. The power indicator light will turn on. On the connected monitor, the live view screen will be displayed by default. If you turn on the Device during the time period that is configured for recording, the system starts recording after it is turned on, and you will see the icon indicating recording status is working in the specific channels. 5.1.2 Initializing the Device When booting up for the first time, you will need to configure the password information for the admin (by default) account.
-
 1
1 -
2
-
3
-
4
-
5
-
6
-
7
-
8
-
9
-
10
-
11
-
12
-
13
-
14
-
15
-
16
-
17
-
18
-
19
-
20
-
21
-
22
-
23
-
24
-
25
-
26
-
27
-
28
-
29
-
30
-
31
-
 32
32 -
 33
33 -
 34
34 -
 35
35 -
 36
36 -
 37
37 -
 38
38 -
 39
39 -
 40
40 -
 41
41 -
 42
42 -
43
-
44
-
45
-
46
-
47
-
48
-
49
-
50
-
51
-
52
-
53
-
54
-
55
-
56
-
57
-
58
-
59
-
60
-
61
-
62
-
63
-
64
-
65
-
66
-
67
-
68
-
69
-
70
-
71
-
72
-
73
-
74
-
75
-
76
-
77
-
78
-
79
-
80
-
81
-
82
-
83
-
84
-
85
-
86
-
87
-
88
-
89
-
90
-
91
-
92
-
93
-
94
-
95
-
96
-
97
-
98
-
99
-
100
-
101
-
102
-
103
-
104
-
105
-
106
-
107
-
108
-
109
-
110
-
111
-
112
-
113
-
114
-
115
-
116
-
117
-
118
-
119
-
120
-
121
-
122
-
123
-
124
-
125
-
126
-
127
-
128
-
129
-
130
-
131
-
132
-
133
-
134
-
135
-
136
-
137
-
138
-
139
-
140
-
141
-
142
-
143
-
144
-
145
-
146
-
147
-
148
-
149
-
150
-
151
-
152
-
153
-
154
-
155
-
156
-
157
-
158
-
159
-
160
-
161
-
162
-
163
-
164
-
165
-
166
-
167
-
168
-
169
-
170
-
171
-
172
-
173
-
174
-
175
-
176
-
177
-
178
-
179
-
180
-
181
-
182
-
183
-
184
-
185
-
186
-
187
-
188
-
189
-
190
-
191
-
192
-
193
-
194
-
195
-
196
-
197
-
198
-
199
-
200
-
201
-
202
-
203
-
204
-
205
-
206
-
207
-
208
-
209
-
210
-
211
-
212
-
213
-
214
-
215
-
216
-
217
-
218
-
219
-
220
-
221
-
222
-
223
-
224
-
225
-
226
-
227
-
228
-
229
-
230
-
231
-
232
-
233
-
234
-
235
-
236
-
237
-
238
-
239
-
240
-
241
-
242
-
243
-
244
-
245
-
246
-
247
-
248
-
249
-
250
-
251
-
252
-
253
 |
 |
